Let’s briefly examine Android’s architecture from the bottom up. This figure show how’s a simplified representation of the Android stack.
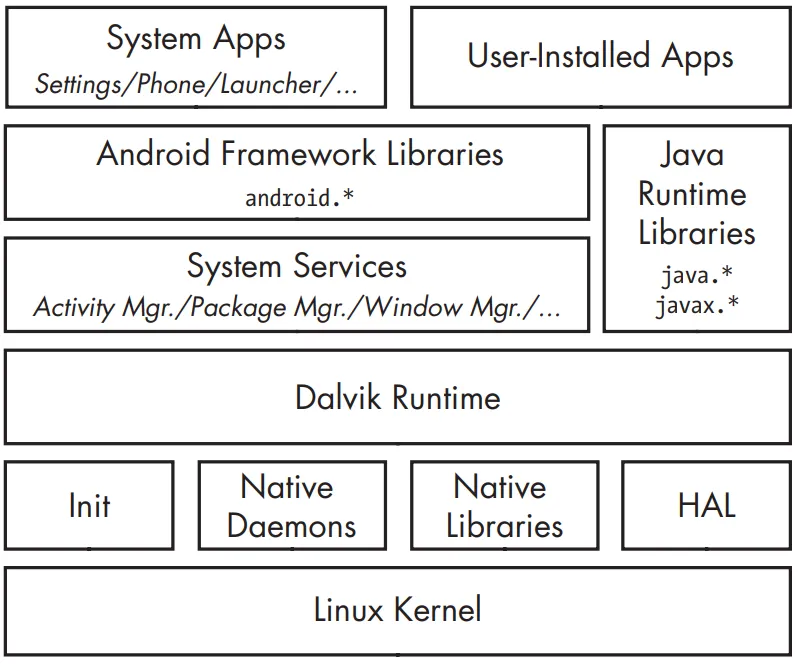
Linux Kernel
Android is built on top of the Linux kernel. As in any Unix system, the kernel provides drivers for hardware, networking, filesystem access, and process management. The Android kernel is slightly different from a “regular” Linux kernel that you might find on a desktop machine or a non-Android embedded device. The differences are due to a set of new features (sometimes called Androidisms) that were originally added to support Android. Some of the main Androidisms are the low memory killer, wakelocks (integrated as part of wakeup sources support in the mainline Linux kernel), anonymous shared memory (ashmem), alarms, paranoid networking, and Binder. The most important Androidisms for our discussion are Binder and paranoid networking. Binder implements IPC and an associated security mechanism. Paranoid networking restricts access to network sockets to applications that hold specific permissions.
What is Daemon
In the context of Linux, a daemon (pronounced “dee-muhn”) refers to a type of background process that runs on a system, typically without any direct interaction with users. The term “daemon” is derived from Greek mythology, where it was used to describe a supernatural being that carries out tasks on behalf of the gods.
Daemons are often started during system boot and continue to run until the system shuts down. They perform various tasks, such as handling network services, managing hardware devices, monitoring system performance, and executing scheduled tasks.
Some key characteristics of daemons in Linux are:
- Background operation: Daemons run in the background, detached from any user interface. They don’t require a user to be logged in or interact with them directly.
- Independence: Daemons are independent of user sessions. They are not tied to a specific user and can continue running even if a user logs out.
- Longevity: Daemons are designed to be long-lived processes, running continuously or intermittently as needed.
- System services: Many daemons provide essential system services, such as network services (e.g., web servers like Apache or database servers like MySQL), printing services, or logging services.
- Configuration: Daemons often have configuration files that allow administrators to customize their behavior. These configuration files specify parameters such as network ports, file paths, and other settings.
- Process management: Daemons are typically managed by init systems like Systemd or Upstart, which handle their startup, shutdown, and automatic restart in case of failure.
Examples of common Linux daemons include “sshd” (the Secure Shell daemon responsible for remote login sessions), “httpd” (the Apache HTTP Server daemon), and “cron” (the daemon responsible for executing scheduled tasks).
Native User-space
On top of the kernel is the native user-space layer, consisting of the init binary (the first process started, which starts all other processes), several native daemons, and a few hundred native libraries that are used throughout the system. While the presence of an init binary and daemons is reminiscent of a traditional Linux system, note that both init and the associated startup scripts have been developed from scratch and are quite different from their mainline Linux counterparts.
Dalvik-VM
The bulk of Android is implemented in Java and as such is executed by a Java Virtual Machine (JVM). Android’s current Java VM implementation is called Dalvik and it is the next layer in our stack. Dalvik was designed with mobile devices in mind and cannot run Java bytecode (.class files) directly: its native input format is called Dalvik Executable (DEX) and is packaged in .dex files. In turn, .dex files are packaged either inside system Java libraries (JAR files), or inside Android applications (APK files). Dalvik and Oracle’s JVM have different architectures—register-based in Dalvik versus stack-based in the JVM—and different instruction sets. Let’s look at a simple example to illustrate the differences between the two VMs.
public static int add(int i, int j) {
return i + j;
}
The result:
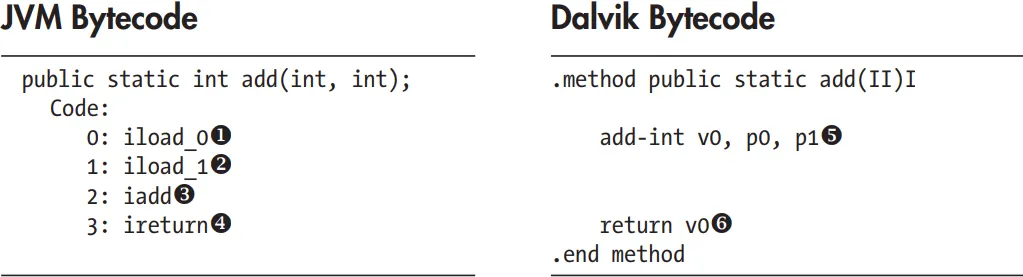
Here, the JVM uses two instructions to load the parameters onto the stack (u and v), then executes the addition w, and finally returns the result x. In contrast, Dalvik uses a single instruction to add parameters (in registers p0 and p1) and puts the result in the v0 register y. Finally, it returns the contents of the v0 register z. As you can see, Dalvik uses fewer instructions to achieve the same result. Generally speaking, register-based VMs use fewer instructions, but the resulting code is larger than the corresponding code in a stack-based VM. However, on most architectures, loading code is less expensive than instruction dispatch, so register-based VMs can be interpreted more efficiently.
<aside>
💡 Dalvik is larger than the corresponding code in the stack-based VM. This means that the bytecode (the low-level code that the virtual machine executes) generated by Dalvik tends to be larger in size compared to the bytecode generated by the stack-based VM.
Despite the larger code size, the statement explains that loading the code (i.e., bringing the bytecode into memory) is generally less expensive than the instruction dispatch. Instruction dispatch refers to the process of determining and executing the next instruction. This means that in most computer architectures, the overhead involved in loading the bytecode is less than the overhead involved in dispatching and executing the instructions.
</aside>
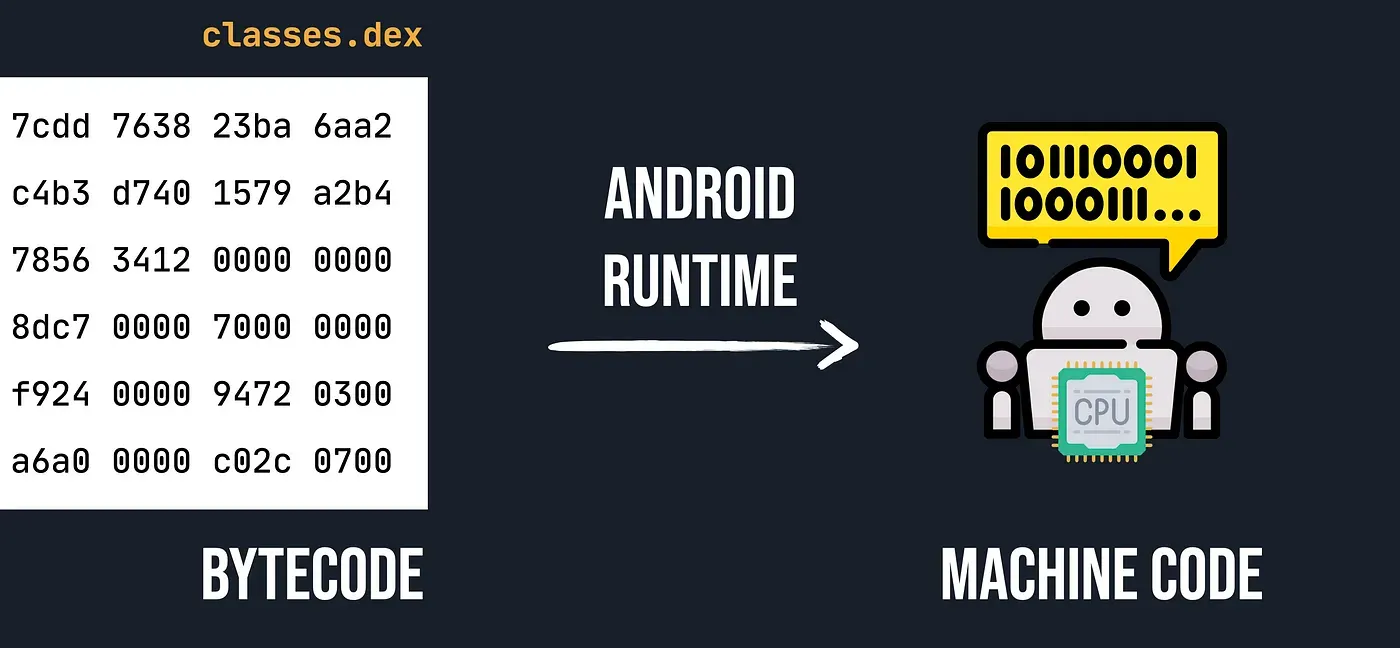
What Is ART(Android Runtime)
As you know computers CPU just understand the machine code which contains 0 and 1. Therefore we need interceptor tor translate bytecodes which is store in classes.dex files to machine code. So in android we have two interceptor which translate the bytecodes to machine codes. There are to interceptors which do this for us. DVM and ART.
Before we talk about the Android Runtime(ART) it makes more sense to get a better understanding of it predecessor Dalvik.
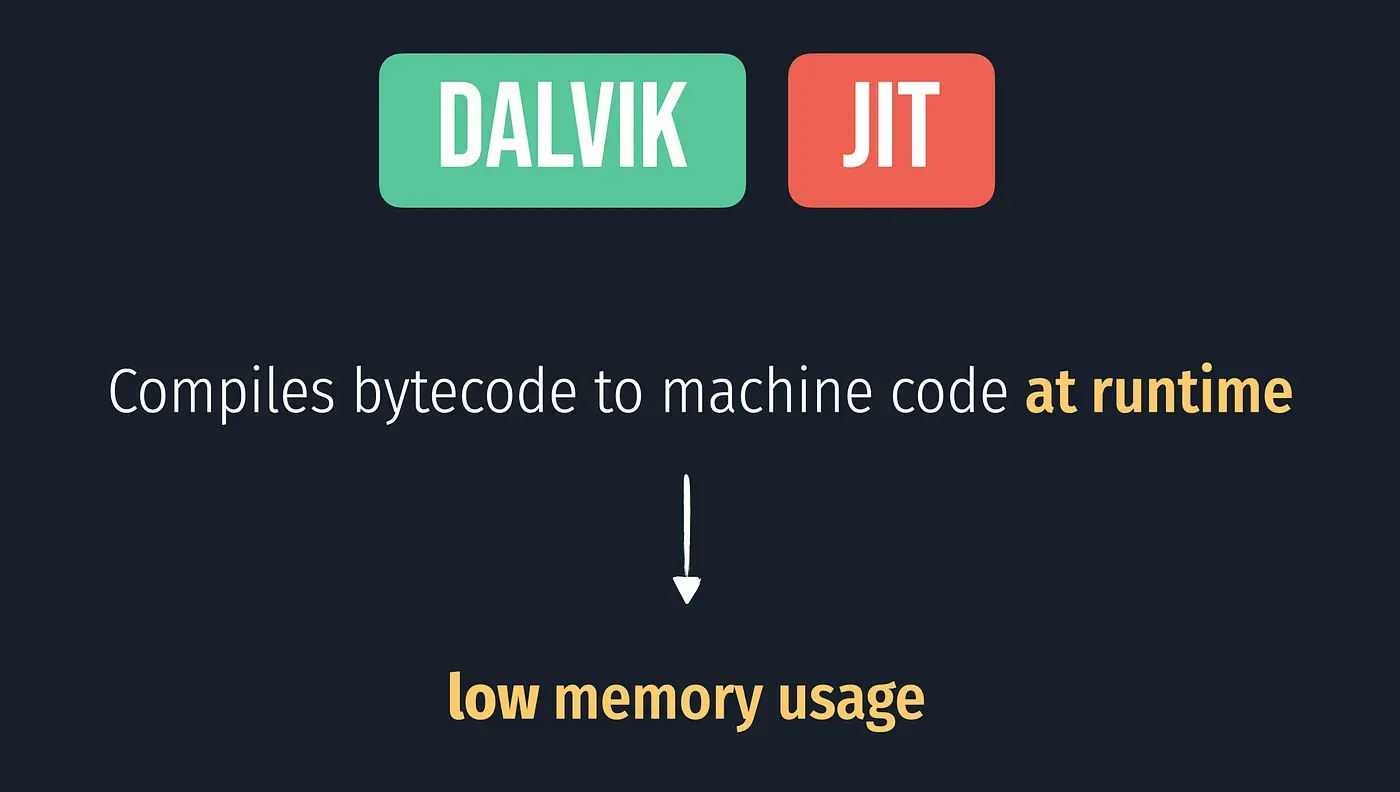
Dalvik is a discontinued process virtual machine in the Android operating system.. In less techy terms, Dalvik(DVM) is a virtual machine that is specialized to run on low memory mobile devices. In the early days of mobile phones, the main limiting factor was memory. Dalvik uses just in time compilation(JIT) which compiles small chunks of code at execution. Essentially, it compiles code it needs. This is a big help when it comes to memory limited environments. So, Dalvik takes normal bytecode and then compiles it down to Dalvik bytecode which is stored in a .dex file. Those .dex files are then what gets run on our Android application. The .dex files are much more compact than normal class files, which again helps with memory consumption. In other word basically Dalvik is a JVM that produces .dex files which are optimized for low memory environments.
Now What About ART(Android Runtime)
As google says:
ART is a new Android runtime being introduced experimentally in the 4.4 release KitKat. This is a preview of work in progress in KitKat. It is available for obtaining early developer and partner feedback.
As the size of applications grew and phones became more powerful, Dalvik became more outdated and the user could see performance lagging. ART was created to fix the growing concerns. The major change with ART was the change from JIT compilation to ahead of time compilation(AOT). Instead of compiling code at runtime, code is compiled before running the app. This gave a large performance boost. ART still uses the .dex files, however, it gives us further optimizations to improve performance for the user. Some of the features introduced in ART are:
- Improved garbage collection
- Development and debugging improvements
- A list of all the improvements can be found HERE
ART vs DVM
- Approach:
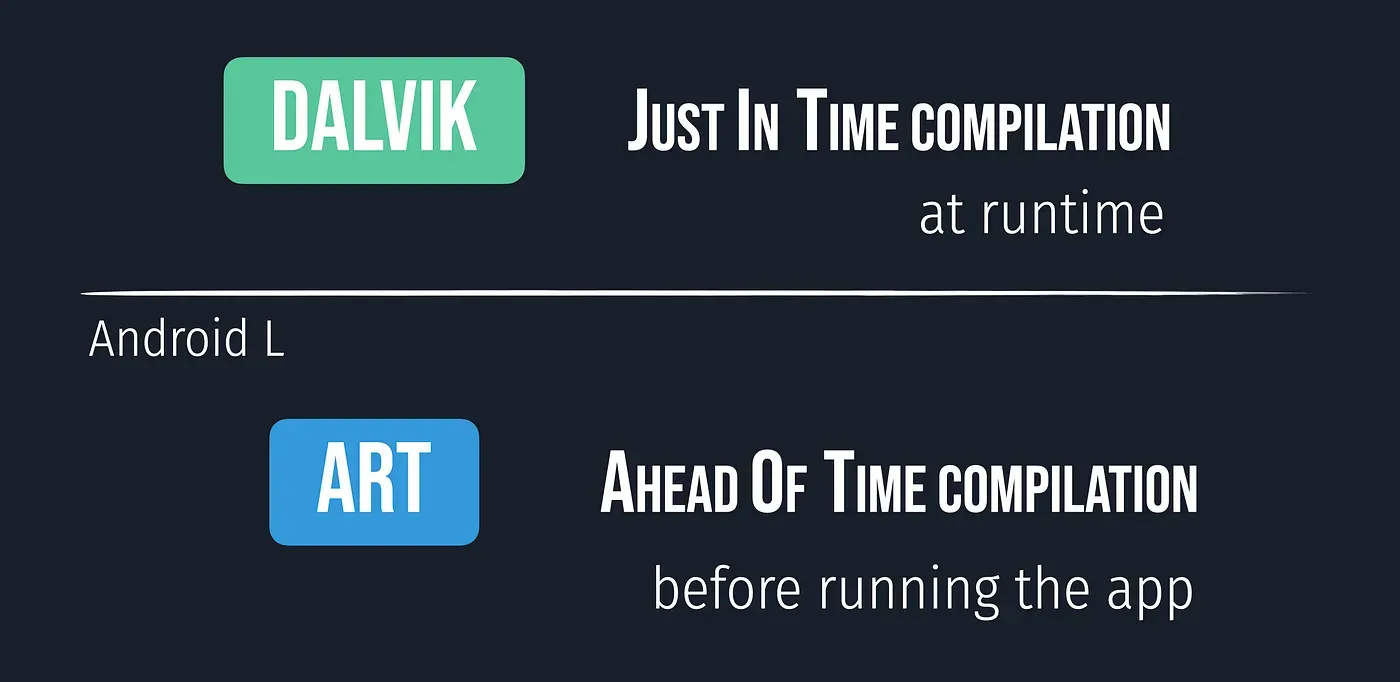
ART uses AOT(Ahead Of Time) approach and compiles the whole code during the installation time but the Dalvik uses JIT(Just In Time) approach and complies only a part of the code during installation and rest of the code will be compiled dynamically.
- Booting time: As compare to Dalvik, ART takes more time to reboot because the cache is built at the first time. So, the booting is slow.
- Space: Since ART uses the AOT approach, so it needs more space during installation. While Dalvik uses the JIT approach, so for mobile phones having less storage can use the Dalvik.
- Battery: ART increases battery performance to a large extent because of the AOT approach. While the Dalvik uses the JIT approach and this results in more battery utilization.
- Garbage Collection: ART has better garbage collection than Dalvik.
Drawbacks of ART
- Since the compilation of the code is done once, ART requires more space or storage during installation.
- The booting time is more as compared to Dalvik because it uses the concept of AOT.
Java Runtime Libraries
A Java language implementation requires a set of runtime libraries, defined mostly in the java.* and javax.* packages. Android’s core Java libraries are originally derived from the Apache Harmony project and are the next layer on our stack. As Android has evolved, the original Harmony code has changed significantly. In the process, some features have been replaced entirely (such as internationalization support, the cryptographic provider, and some related classes), while others have been extended and improved. The core libraries are developed mostly in Java, but they have some native code dependencies as well. Native code is linked into Android’s Java libraries using the standard Java Native Interface (JNI), which allows Java code to call native code and vice versa. The Java runtime libraries layer is directly accessed both from system services and applications.
System Services
The layers introduced up until now make up the plumbing necessary to implement the core of Android—system services. System services implement most of the fundamental Android features, including display and touch screen support, telephony, and network connectivity. Most system services are implemented in Java; some fundamental ones are written in native code. With a few exceptions, each system service defines a remote interface that can be called from other services and applications. Coupled with the service discovery, mediation, and IPC provided by Binder, system services effectively implement an object oriented OS on top of Linux. Let’s look at how Binder enables IPC on Android in detail, as this is one of the cornerstones of Android’s security model.
Inter-Process Communication
As mentioned previously, Binder is an inter-process communication (IPC) mechanism. Before getting into detail about how Binder works, let’s briefly review IPC. As in any Unix-like system, processes in Android have separate address spaces and a process cannot directly access another process’s memory (this is called process isolation). This is usually a good thing, both for stability and security reasons: multiple processes modifying the same memory can be catastrophic, and you don’t want a potentially rogue process that was started by another user to dump your email by accessing your mail client’s memory. However, if a process wants to offer some useful service(s) to other processes, it needs to provide some mechanism that allows other processes to discover and interact with those services. That mechanism is referred to as IPC. The need for a standard IPC mechanism is not new, so several options predate Android. These include files, signals, sockets, pipes, semaphores, shared memory, message queues, and so on. While Android uses some of these (such as local sockets), it does not support others (namely System V IPCs like semaphores, shared memory segments, and message queues).
Binder
Because the standard IPC mechanisms weren’t flexible or reliable enough, a new IPC mechanism called Binder was developed for Android. While Android’s Binder is a new implementation, it’s based on the architecture and ideas of OpenBinder. Binder implements a distributed component architecture based on abstract interfaces. It is similar to Windows Common Object Model (COM) and Common Object Broker Request Architectures (CORBA) on Unix, but unlike those frameworks, it runs on a single device and does not support remote procedure calls (RPC) across the network (although RPC support could be implemented on top of Binder). A full description of the Binder framework is outside the scope of this book, but we introduce its main components briefly in the following sections.
Binder Implementation
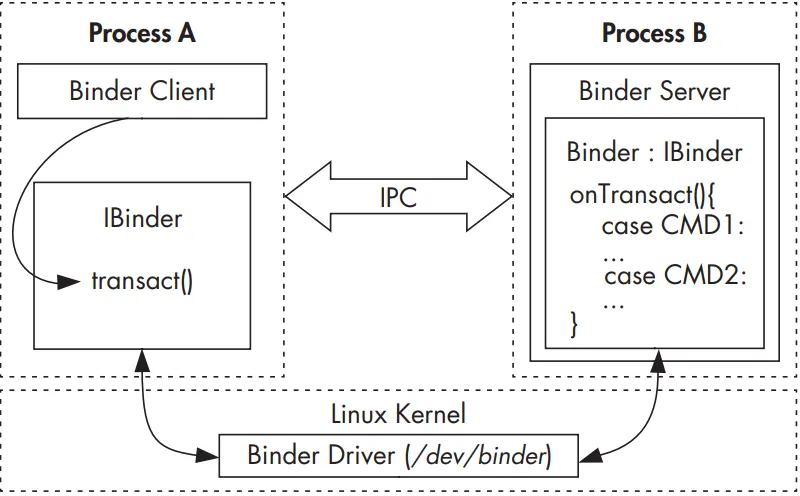
As mentioned earlier, on a Unix-like system, a process cannot access another process’s memory. However, the kernel has control over all processes and therefore can expose an interface that enables IPC. In Binder, this interface is the /dev/binder device, which is implemented by the Binder kernel driver. The Binder driver is the central object of the framework, and all IPC calls go through it. Inter-process communication is implemented with a single ioctl() call that both sends and receives data through the binder_write_read structure, which consists of a write_buffer containing commands for the driver, and a read_buffer containing commands that the user-space needs to perform. But how is data actually passed between processes? The Binder driver manages part of the address space of each process. The Binder driver managed chunk of memory is read-only to the process, and all writing is performed by the kernel module. When a process sends a message to another process, the kernel allocates some space in the destination process’s memory, and copies the message data directly from the sending process. It then queues a short message to the receiving process telling it where the received message is. The recipient can then access that message directly (because it is in its own memory space). When a process is finished with the message, it notifies the Binder driver to mark the memory as free. The Figure shows a simplified illustration of the Binder IPC architecture.
Higher-level IPC abstractions in Android such as Intents (commands with associated data that are delivered to components across processes), Messengers (objects that enable message-based communication across processes), and Content-Providers (components that expose a cross-process data management interface) are built on top of Binder. Additionally, service interfaces that need to be exposed to other processes can be defined using the Android Interface Definition Language (AIDL), which enables clients to call remote services as if they were local Java objects. The associated AIDL tool automatically generates stubs (client-side representations of the remote object) and proxies that map interface methods to the lower-level transact() Binder method and take care of converting parameters to a format that Binder can transmit (this is called parameter marshalling/unmarshalling). Because Binder is inherently type-less, AIDL-generated stubs and proxies also provide type safety by including the target interface name in each Binder transaction (in the proxy) and validating it in the stub.
Binder Security
On a higher level, each object that can be accessed through the Binder framework implements the IBinder interface and is called a Binder object. Calls to a Binder object are performed inside a Binder transaction, which contains a reference to the target object, the ID of the method to execute, and a data buffer. The Binder driver automatically adds the process ID (PID) and effective user ID (EUID) of the calling process to the transaction data. The called process (callee) can inspect the PID and EUID and decide whether it should execute the requested method based on its internal logic or system-wide metadata about the calling application. Since the PID and EUID are filled in by the kernel, caller processes cannot fake their identity to get more privileges than allowed by the system (that is, Binder prevents privilege escalation). This is one of the central pieces of Android’s security model, and all higher-level abstractions, such as permissions, build upon it. The EUID and PID of the caller are accessible via the getCallingPid() and getCallingUid() methods of the android.os.Binder class, which is part of Android’s public API.
<aside>
💡 the EUID is like a key that determines what actions a program can take on a computer. It can be changed during program execution to grant additional privileges or access to certain resources.
</aside>
Binder Identity
One of the most important properties of Binder objects is that they maintain a unique identity across processes. Thus if process A creates a Binder object and passes it to process B, which in turn passes it to process C, calls from all three processes will be processed by the same Binder object. In practice, process A will reference the Binder object directly by its memory address (because it is in process A’s memory space), while process B and C will receive only a handle to the Binder object. The kernel maintains the mapping between “live” Binder objects and their handles in other processes. Because a Binder object’s identity is unique and maintained by the kernel, it is impossible for user-space processes to create a copy of a Binder object or obtain a reference to one unless they have been handed one through IPC. Thus a Binder object is a unique, unforgeable, and communicable object that can act as a security token. This enables the use of capability-based security in Android
Capability-Based Security
In a capability-based security model, programs are granted access to a particular resource by giving them an unforgeable capability that both references the target object and encapsulates a set of access rights to it. Because capabilities are unforgeable, the mere fact that a program possesses a capability is sufficient to give it access to the target resource; there is no need to maintain access control lists (ACLs) or similar structures associated with actual resources.
Binder Token
In Android, Binder objects can act as capabilities and are called Binder tokens when used in this fashion. A Binder token can be both a capability and a target resource. The possession of a Binder token grants the owning process full access to a Binder object, enabling it to perform Binder transactions on the target object. If the Binder object implements multiple actions (by selecting the action to perform based on the code parameter of the Binder transaction), the caller can perform any action when it has a reference to that Binder object. If more granular access control is required, the implementation of each action needs to implement the necessary permission checks, typically by utilizing the PID and EUID of the caller process.
A common pattern in Android is to allow all actions to callers running as system (UID 1000) or root (UID 0), but perform additional permission checks for all other processes. Thus access to important Binder objects such as system services is controlled in two ways: by limiting who can get a reference to that Binder object and by checking the caller identity before performing an action on the Binder object. (This check is optional and implemented by the Binder object itself, if required.)
Android Framework Libraries
Next on the stack are the Android framework libraries, sometimes called just “the framework.” The framework includes all Java libraries that are not part of the standard Java runtime (java., javax., and so on) and is for the most part hosted under the android top-level package. The framework includes the basic blocks for building Android applications, such as the base classes for activities, services, and content providers (in the android.app.* packages); GUI widgets (in the android.view.* and android.widget packages); and classes for file and database access (mostly in the android.database.* and android.content.* packages). It also includes classes that let you interact with device hardware, as well as classes that take advantage of higher-level services offered by the system. Even though almost all Android OS functionality above the kernel level is implemented as system services, it is not exposed directly in the framework but is accessed via facade classes called managers. Typically, each manager is backed by a corresponding system service; for example, the BluetoothManager is a facade for the BluetoothManagerService.
Applications
On the highest level of the stack are applications (or apps), which are the programs that users directly interact with. While all apps have the same structure and are built on top of the Android framework, we distinguish between system apps and user-installed apps.
System Apps
System apps are included in the OS image, which is read-only on production devices (typically mounted as /system), and cannot be uninstalled or changed by users. Therefore, these apps are considered secure and are given many more privileges than user-installed apps. System apps can be part of the core Android OS or can simply be preinstalled user applications, such as email clients or browsers. While all apps installed under /system were treated equally in earlier versions of Android (except by OS features that check the app signing certificate), Android 4.4 and higher treat apps installed in /system/priv-app/ as privileged applications and will only grant permissions with protection level signatureOrSystem to privileged apps, not to all apps installed under /system. Apps that are signed with the platform signing key can be granted system permissions with the signature protection level, and thus can get OS-level privileges even if they are not preinstalled under /system. While system apps cannot be uninstalled or changed, they can be updated by users as long as the updates are signed with the same private key, and some can be overridden by user-installed apps. For example, a user can choose to replace the preinstalled application launcher or input method with a third-party application.
User-Installed Apps
User-installed apps are installed on a dedicated read-write partition (typically mounted as /data) that hosts user data and can be uninstalled at will. Each application lives in a dedicated security sandbox and typically cannot affect other applications or access their data. Additionally, apps can only access resources that they have explicitly been granted a permission to use.
Privilege separation and the principle of least privilege are central to Android’s security model, and we will explore how they are implemented in the next section.
Android Security Model
Like the rest of the system, Android’s security model also takes advantage of the security features offered by the Linux kernel. Linux is a multiuser operating system and the kernel can isolate user resources from one another, just as it isolates processes. In a Linux system, one user cannot access another user’s files (unless explicitly granted permission) and each process runs with the identity (user and group ID, usually referred to as UID and GID) of the user that started it, unless the set-user-ID or set-group-ID (SUID and SGID) bits are set on the corresponding executable file
Android takes advantage of this user isolation, but treats users differently than a traditional Linux system (desktop or server) does. In a traditional system, a UID is given either to a physical user that can log into the system and execute commands via the shell, or to a system service (daemon) that executes in the background (because system daemons are often accessible over the network, running each daemon with a dedicated UID can limit the damage if one is compromised). Android was originally designed for smartphones, and because mobile phones are personal devices, there was no need to register different physical users with the system. The physical user is implicit, and UIDs are used to distinguish applications instead. This forms the basis of Android’s application sandboxing.
Application Sandboxing
Android automatically assigns a unique UID, often called an app ID, to each application at installation and executes that application in a dedicated process running as that UID. Additionally, each application is given a dedicated data directory which only it has permission to read and write to. Thus, applications are isolated, or sandboxed, both at the process level (by having each run in a dedicated process) and at the file level (by having a private data directory). This creates a kernel-level application sandbox, which applies to all applications, regardless of whether they are executed in a native or virtual machine process.
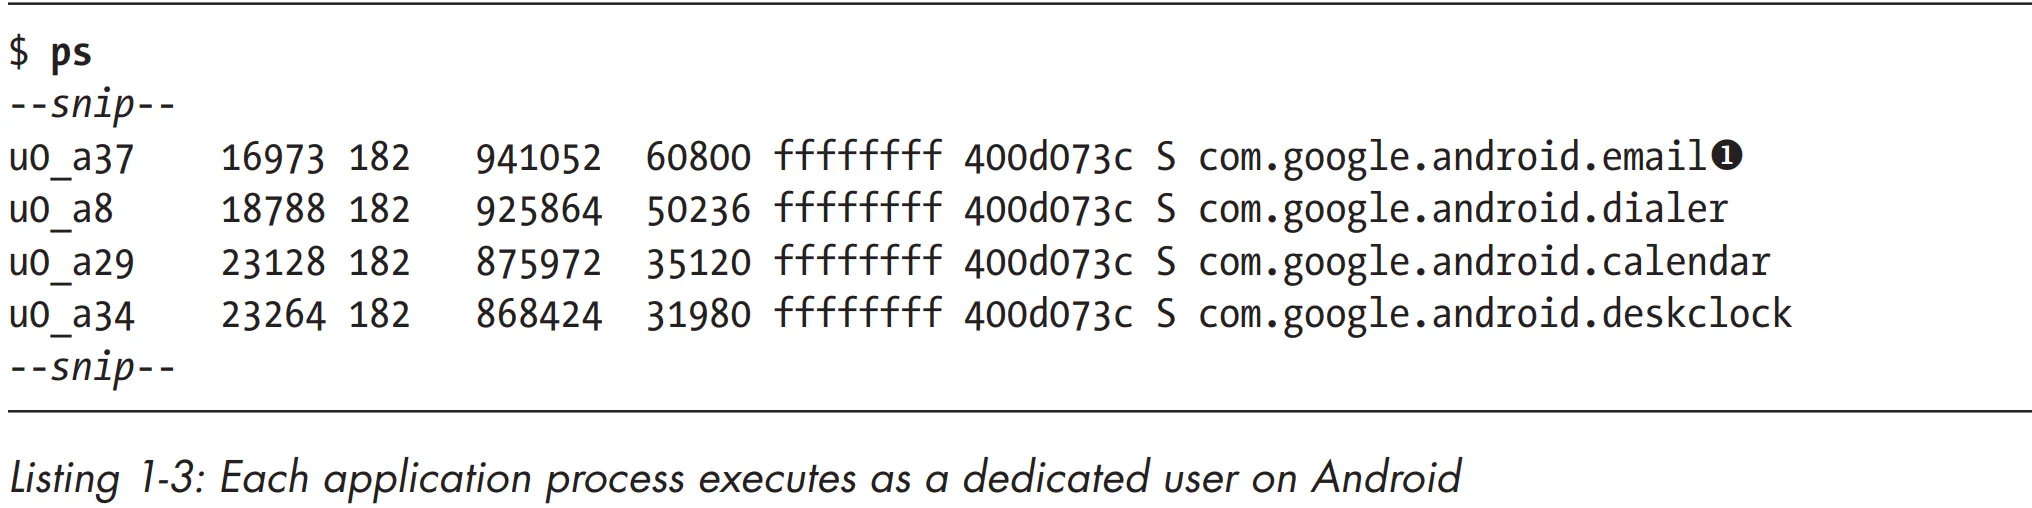
System daemons and applications run under well-defined and constant UIDs, and very few daemons run as the root user (UID 0). Android does not have the traditional /etc/password file and its system UIDs are statically defined in the android_filesystem_config.h header file. UIDs for system services start from 1000, with 1000 being the system (AID_SYSTEM) user, which has special (but still limited) privileges. Automatically generated UIDs for applications start at 10000 (AID_APP), and the corresponding usernames are in the form app_XXX or uY_aXXX (on Android versions that support multiple physical users), where XXX is the offset from AID_APP and Y is the Android user ID (not the same as UID). For example, the 10037 UID corresponds to the u0_a37 username and may be assigned to the Google email client application (com.google.android.email package). Listing 1-3 shows that the email application process executes as the u0_a37 user u, while other application processes execute as different users.
Permission
Because Android applications are sandboxed, they can access only their own files and any world-accessible resources on the device. Such a limited application wouldn’t be very interesting though, and Android can grant additional, fine-grained access rights to applications in order to allow for richer functionality. Those access rights are called permissions, and they can control access to hardware devices, Internet connectivity, data, or OS services. Applications can request permissions by defining them in the AndroidManifest.xml file. At application install time, Android inspects the list of requested permissions and decides whether to grant them or not.
SELinux
The traditional Android security model relies heavily on the UIDs and GIDs granted to applications. While those are guaranteed by the kernel, and by default each application’s files are private, nothing prevents an application from granting world access to its files (whether intentionally or due to a programming error).
Similarly, nothing prevents malicious applications from taking advantage of the overly permissive access bits of system files or local sockets. In fact, inappropriate permissions assigned to application or system files have been the source of a number of Android vulnerabilities. Those vulnerabilities are unavoidable in the default access control model employed by Linux, known as discretionary access control (DAC). Discretionary here means that once a user gets access to a particular resource, they can pass it on to another user at their discretion, such as by setting the access mode of one of their files to world-readable. In contrast, mandatory access control (MAC) ensures that access to resources conforms to a system-wide set of authorization rules called a policy. The policy can only be changed by an administrator, and users cannot override or bypass it in order to, for example, grant everyone access to their own files.
Security Enhanced Linux (SELinux) is a MAC implementation for the Linux kernel and has been integrated in the mainline kernel for more than 10 years. As of version 4.3, Android integrates a modified SELinux version from the Security Enhancements for Android (SEAndroid) project9
that has been augmented to support Android-specific features such as Binder.
Note
In Linux, file permissions are represented by a set of 12 mode bits. These bits control who can read, write, and execute a file. Let’s break it down:
- Owner Permissions (User):
- The first 3 bits represent the owner’s permissions (RWX).
- For example, if the owner has read and write permissions, these bits would be set to RW.
- Group Permissions:
- The next 3 bits represent the group’s permissions (RWX).
- These apply to users who belong to the same group as the file.
- For instance, if the group has read and execute permissions, these bits would be set to RX.
- Others Permissions:
- The final 3 bits represent permissions for others (RWX).
- These apply to everyone else who is not the owner or part of the group.
- If these bits are set to RWX, others can read, write, and execute the file.
But what about the remaining 3 bits? Let’s dive into those:
- Setuid (suid): When set on an executable file, it allows the user who runs it to temporarily gain the privileges of the file’s owner.
- Setgid (sgid): When set on a directory, it ensures that files created within that directory inherit the group ownership of the directory itself.
- Sticky Bit: When set on a directory, it prevents users from deleting files they don’t own within that directory.
These additional bits are often not explicitly mentioned, but they’re still present for every file.
Remember, these permissions play a crucial role in maintaining security and access control in the Linux filesystem.
Setup Environments
What we need?
- An Android Emulator or Real device.
- How to Connect to emulator or device?
- WiFi (May face to some bugs)(Not recommended)
- USB (This one is absolutely better)
- Android Studio
- SDK 30,31,32
- NDK
- Android SDK Command-Line Tools (ADB, fastboot)
- CMake
- Android Emulator
- Plugins
- Visual Stadio Code
- Plugins
- Smali Language Support
- APKLab
- JADx
- APKTool
- APKEditor
Note
To adding platform-tools to the system path:
vim ~/.zshrc
export PATH=$PATH:/home/app/Android/Sdk/platform-tools/:
# IN macOS /Users/hossein/Library/Android/sdk/platform-tools/
Note
To adding SDK-Tools to the system path:
vim ~/.zshrc
export PATH=$PATH:/home/app/Android/Sdk/build-tools/32.0.0/:
Note
To refresh you environment variable for current terminal:
source ~/.zshrc
What we can do with USB connection?
- Using Android Debug Bridge (ADB) or Java Debug Wire Protocol(JWDP)
- We can use GNU Project Debugger (GNU)
- Frida
<aside>
💡 GNU is an extensive collection of free software, which can be used as an operating system or can be used in parts with other operating systems. The use of the completed GNU tools led to the family of operating systems popularly known as Linux. Most of GNU is licensed under the GNU Project’s own General Public License.
</aside>
Don’t own a real device?
No problem you can use one these solutions:
- Using an emulator
- Android VDM (Virtual Device Manager)
- Genymotion
- Nox
- Using a virtual machine (VM)
Real Android Phone via Emulator/VM
| Real Device | Features | Emulator/VM |
|---|
| Depends on Model | Root Access | YES |
| YES | Performance | Depends on Host resources |
| YES | Platform Support | In ARM based apps it’s slow |
| YES | Smartphone Features(SMS,…) | It depends |
| It depends on device support | Up to Date | YES |
| Depends on device model | Price | Usually Free |
Working with VDM (Virtual Device Manager)
You can access Virtual Device Manager(VDM) from two ways:
- Open android studio → More actions → Virtual Device Management
- Open /home/app/Android/Sdk/emulator/emulator
- Adding emulator to the system PATH
- emulator -list-avds
- emulator @Nexus5
To proxy android traffic don’t use WiFi settings. Because it just send WiFi traffic to proxy. Alternatively use VDM → Settings → Proxy.
To create macro or load it: VDM → Record and Playback. Macro is multiple steps which you record and play it back. It usually use to automating UI Tasks like doing something repetitive in games.
VDM Secret Features
In this part we want to access qemu process which is emulation framework for VDM.
Finding the port
netstat -tulpen

<aside>
💡 The netstat command will display a list of all open network connections on your Linux, including the local and remote addresses, the protocol used, and the state of the connection. The -t option specifies that only TCP connections should be displayed, the -u option specifies that only UDP connections should be displayed, the -l option specifies that only listening connections should be displayed, the -p option specifies that the process ID and name should be displayed for each connection, the -e option specifies that extended information should be displayed for each connection, and the -n option specifies that numeric addresses should be displayed instead of hostnames
</aside>
<aside>
💡 The 5555 port is used for default ADB port.
</aside>
Connecting
telnet 127.0.0.1 5554
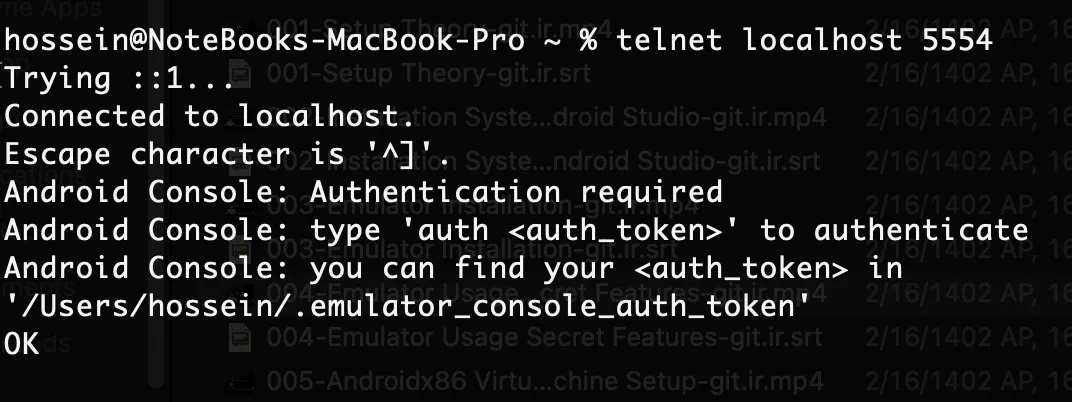
Getting access token
cat /home/app/.emulator_console_auth_token
Connecting and authenticate
telnet 127.0.0.1 5554
auth [secret_key]
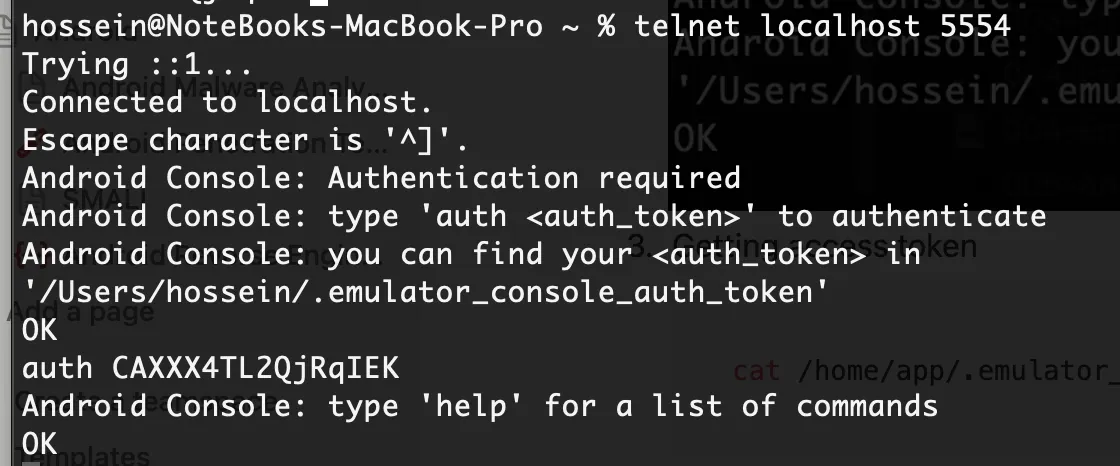
Run your command. Example:
geo fix [lat] [lang]
automation record # Macro
automation stop-record # Stop recording macro
automation play # Running macro
automation stop-play # Stop playing macro
More info
Send emulator console commands | Android Studio | Android Developers
Installing Android On VMware
Open this website and download the image:
Android-x86 - Porting Android to x86
to validate the file hash in MacOS:
shasum -a 256 file.iso
Create new VM in VMware.
Add the ISO and install it.
For graphic support you should do these steps:
mount -o remount,rw /mnt
cd /mnt/grub
vi menu.lst
# Add this kernel parameter in first line to running android via GUI
nomodset xforcevesa
