In this part of this Linux Privilege Escalation series, I’m going to cover 3 more techniques & the format will be the same as in the previous part. First some theory & then practical on Linux system.
7. Privilege Escalation: NFS
Theory
NFS allows a system to share directories and files with others over a network. By using NFS, users and programs can access files on remote systems almost as if they were local files.
The NFS methodology is simple;
- Check the config file of NFS (if the target has NFS installed then it’ll be at /etc/nfs).
- Look at the dir that has “no root squash disabled”.
- Mount that vulnerable (no root squash disabled) NFS dir in your local system.
- Create your payload & set write & execute permission on that payload (perform this with root privilege on your local system).
- All these actions will be synced in your target system NFS dir so just trigger the payload from there.
Root squash is a special mapping of the remote superuser (root) identity when using identity authentication (local user is the same as a remote user). Under root squash, a client’s uid 0 (root) is mapped to 65534 (nobody).
Root squash is a technique to avoid privilege escalation on the client machine via suid executables Setuid. Without root squash, an attacker can generate suid binaries on the server that are executed as root on other client, even if the client user does not have superuser privileges. Hence it protects client machines against other malicious clients.
Practical

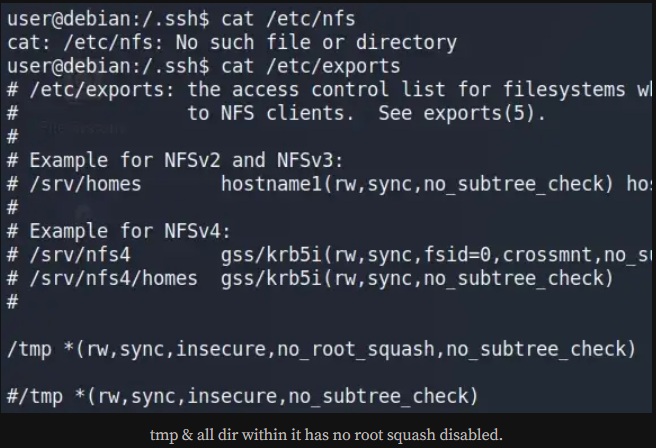
tmp & all dir within it has no root squash disabled.
At your Machine (Attacker Side)

Mount that target nfs share

Mounted Successfully

Create a payload in that share & set the suid of the root.

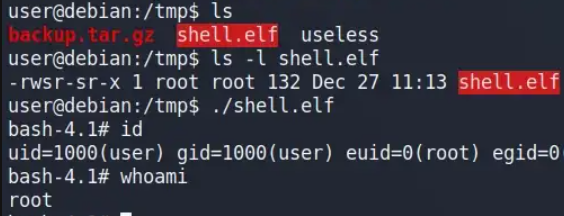
In target side executes that setuid payload.
8. Privilege Escalation: Environment Variable
Theory
Environment variables allow you to customize how the system works and the behavior of the applications on the system. For example, the environment variable can store information about the default text editor or browser, the path to executable files, or the system locale and keyboard layout settings.
The Environment Variable Methodology is simple;
- Check for LD_PRELOAD (with the env_keep option)
- Write a payload compiled as a shared object (.so)
- Run the program with the LD_PRELOAD pointing to our .so file
LD_PRELOAD is a function that allows any program to use shared libraries If the “env_keep” option is enabled we can generate a shared library which will be loaded and executed before the program is run. Please note the LD_PRELOAD option will be ignored if the real user ID is different from the effective user ID.
Practical

Check if the system has LD_PRELOAD env variable set. (Most Linux distro by default has this enabled)


Compile the payload

Run the LD_PRELOAD with our compiled payload (shared object)
9. Privilege Escalation: Wildcards
Theory
Wildcards are useful in many ways for a GNU/Linux system and for various other uses. Commands can use wildcards to perform actions on more than one file at a time or to find part of a phrase in a text file. There are many uses for wildcards, there are two different major ways that wildcards are used, they are globbing patterns/standard wildcards that are often used by the shell. The alternative is regular expressions, popular with many other commands and popular for use with text searching and manipulation.
Check this to learn the basics about Different Wildcards & their Behavior.
The Wildcard Methodology is simple;
- Check if any script has wildcard use within it.
- Search for wildcard Manipulation tricks HERE of that command used with wildcard.
- Exploit & gain that script’s owner access.
Practical

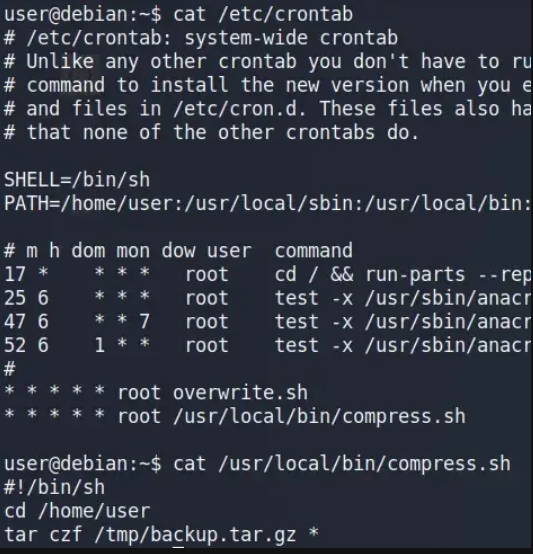
In the above Cronjob’s script (compress.sh) there’s a * wildcard used with the tar program & it’s running every 1 min with root privileges.
Script working: Script is changing its location into “user” home dir & then creating a tar archive of all the file/dir (*) available in “user” home dir & saving it into /tmp/backup directory.)
We know that tar has built-in options that allow us to execute actions. Check this PAGE.
Let’s create a simple reverse shell script.

Next create a file (which name will be the tar build-in option — checkpoint-action: it allows us to execute a script or some action.)

Checkpoint-action option here calling our reverse shell script.
if we use tar commands then when tar will run. tar will recognize the file names & take them as it’s a build-in command rather then just a normal file/name.

After tar will run again it’ll trigger the shell.elf & we get our target shell.
🔗 Part 1 - https://hacklido.com/blog/158
🔗 Part 2 - https://hacklido.com/blog/162