DNS Demystified
DNS stands for Domain Name System. It is a system that translates human-readable domain names, such as www.example.com, into IP addresses, which are used by computers to communicate with each other over the internet.
Let’s look at how DNS works:
How DNS Works?
1) A user enters domain such as example.com in address bar. The web browser searches in its cache for the record. If not found, it forwards this task to operating system. If operating system does not have a cached record, a DNS request is sent to configured DNS resolver (usually provided by ISP).
Q) How the system knows the IP address of DNS resolver?
Ans) DNS resolver IP address is configured to automatically obtain through DHCP service or can be set statically in the settings.
2) The DNS resolver checks for the associated DNS record in its cache. If it doesn’t have, it sends the DNS request to a root sever. DNS resolvers always contain root server’s IP address.
3) The root server responds with TLD (top level domain such as .com, .org, .in etc) server’s IP address. The resolver stores this information in its cache so that it doesn’t have to ask root again.
4) DNS resolver sends the DNS request to associated TLD server (.com in this case).
5) The TLD server responds back with an IP address of DNS server which is authoritative for example.com domain. There can be multiple authoritative servers.
Q) How TLD server knows the address of authoritative name server of example.com? There are so many .com domains.
Ans) Whenever a domain is purchased (example.com in this case), domain registrar reserves the name and communicates to the TLD registry the authoritative name servers.
6) DNS resolver sends the DNS request to authoritative name server (ns1.example.com in this case).
7) Finally, ns1.example.com responds with the IP address of example.com.
8) DNS resolver saves this information in its cache for future use. It sends this obtained IP address to the user’s system for forming further connection to example.com.
Common DNS Record Types
Each domain can use different types of DNS records. Some of the most common types of DNS records include:
1) NS — Nameserver records contain the name of the authoritative servers hosting the DNS records for a domain.
2) A — Also known as a host record, the “a record” contains the IP address of a hostname (such as www.megacorpone.com).
3) MX — Mail Exchange records contain the names of the servers responsible for handling email for the domain. A domain can contain multiple MX records.
4) PTR — Pointer Records are used in reverse lookup zones and are used to find the records associated with an IP address.
5) CNAME — Canonical Name Records are used to create aliases for other host records.
6) TXT — Text records can contain any arbitrary data and can be used for various purposes, such as domain ownership verification
DNS Zone Transfer
It is the process of transferring a copy of the DNS zone file from the primary DNS server to a secondary DNS server. DNS zone file is a text file that contains DNS resource records for a particular DNS zone (example.com in this case).
Why is there a need to transfer DNS zone database files from one server to another?
DNS is a critical service. If a DNS server for a zone is not working and cached information has expired, the domain is inaccessible to all services (web, mail, and more). Therefore, each zone should have at least two DNS servers. For more critical zones, there may be even more.
However, a zone may be large and may require frequent changes. If you manually edit zone data on each server separately, it takes a lot of time and there is a lot of potential for a mistake. This is why DNS zone transfer is needed.
You can use different mechanisms for DNS zone transfer but the simplest one is AXFR (technically speaking, AXFR refers to the protocol used during a DNS zone transfer). It is a client-initiated request. Therefore, you can edit information on the primary DNS server and then use AXFR from the secondary DNS server to download the entire zone.
DNS Enumeration Using Zone Transfer:
In DNS enumeration using zone transfer, an attacker attempts to retrieve a copy of the entire zone file for a domain from the DNS server. To perform a DNS zone transfer, the attacker sends a zone-transfer request to the DNS server pretending to be a client; the DNS server then sends a portion of its database as a zone to the attacker. This zone may contain a large amount of information about the DNS zone network.
So to perform DNS enumeration using zone transfer, we require authoritative name servers of domain so that we can check each of the available servers for zone transfer.
Here we will be using domain zonetransfer.me.
There are many techniques to enumerate DNS via zone transfer, so I will focus on 2 most common ways:
Using dig command in Linux:
To find available name servers of a domain, we use:

Here ns specifies to fetch DNS records of type NS(nameserver). You will see following output:
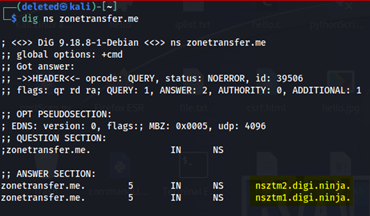
In this screenshot, we can clearly see two available name servers nsztm1.digi.ninja and nsztm2.digi.ninja. Now we can test these 2 name servers for zone transfer.
2) Let’s test for nsztm1.digi.ninja. The command we will use is:

Here we pass name server as first parameter and our target domain as second parameter. Third parameter specifies axfr protocol which is used during zone transfer. This will fetch following results:
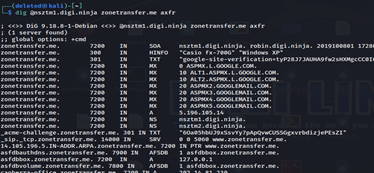
We retrieve whole DNS zone records for the domain. If zone transfer fails, it gives something like this:

Using nslookup command in Windows:
Don’t have Linux, don’t worry! We can use nslookup command in Windows cmd to do the same. Open command prompt in Windows and type nslookup. Nslookup command line prompt opens:

Note: Your default server might be different depending on your ISP.
2) In nslookup prompt, type set querytype=ns. Hit enter, then type zonetransfer.me. Hit enter again.
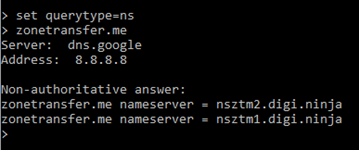
We can clearly see the two available name servers.
3) Now we need to change our default server to one of the available name servers. This can be done by typing server nsztm1.digi.ninja. Hit enter.

4) Now type ls –d zonetransfer.me. Hit enter.

We retrieve all DNS zone records for the domain similarly to dig command.
Some other tools which can be used are DNSRecon, DNSEnum, host command, Nmap broadcast-dns-service-discovery script etc.
How it can be prevented?
Untrusted hosts should not be able to transfer zones.
Ensure that in the DNS zone files of publicly accessible DNS servers, private hostnames are not referenced to IP addresses.
DNS Cache Poisoning (DNS Spoofing)
DNS cache poisoning is the act of entering false information into a DNS cache, so that DNS queries return an incorrect response and users are directed to the wrong websites.
We already saw that DNS resolution involves communication with many servers. Therefore, a DNS resolver saves responses to IP address queries for a certain amount of time. In this way, the resolver can respond to future queries much more quickly, without needing to communicate with the many servers involved in the typical DNS resolution process.
Q) How long a DNS resolver stores a particular DNS record in its cache? It can’t be forever, right?
Ans) Yeah, it’s not forever. In the DNS working process, we saw that if DNS resolver can’t find cached record, it ultimately goes to authoritative name server. When this name server responds with valid IP address resolution, it also sets a TTL value which points out to how long a DNS resolver can store the entry in its cache.
Why DNS cache poisoning occurs?
Attackers can poison DNS caches by impersonating DNS nameservers, making a request to a DNS resolver, and then forging the reply when the DNS resolver queries a nameserver. This is possible because DNS servers use UDP instead of TCP. Instead of using TCP, which requires both communicating parties to perform a ‘handshake’ to initiate communication, DNS requests and responses use UDP, or the User Datagram Protocol. With UDP, there is no guarantee that a connection is open or that the recipient is ready to receive. UDP is vulnerable to forging for this reason — an attacker can send a message via UDP and pretend it is a response from a legitimate server by forging the header data. Using UDP is one of the many reasons why DNS poisoning occurs.
Q) Doesn’t DNS also use TCP?
Ans) DNS uses both UDP and TCP for communication between clients and servers. UDP is used for simple DNS queries and responses, while TCP is used for more complex requests and responses that exceed the size limit of a single UDP packet.
DNS poisoning attacks take advantage of vulnerabilities in the DNS system to inject false information into the cache of a DNS server. This can be done through various means, such as exploiting a weakness in the DNS server software, intercepting and modifying DNS queries and responses in transit, or tricking the DNS server into accepting false information by impersonating a legitimate source.
If a DNS resolver receives a forged response, it accepts and caches the data uncritically because there is no way to verify if the information is accurate and comes from a legitimate source. DNS was created in the early days of the Internet, when the only parties connected to it were universities and research centers. There was no reason to expect that anyone would try to spread fake DNS information.
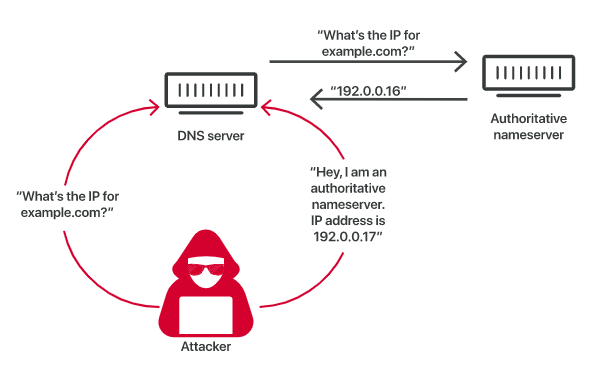
Despite these major points of vulnerability in the DNS caching process, DNS poisoning attacks are not easy. Because the DNS resolver does actually query the authoritative nameserver, attackers have only a few milliseconds to send the fake reply before the real reply from the authoritative nameserver arrives.
Attackers also have to either know or guess a number of factors to carry out DNS spoofing attacks:
· Which DNS queries are not cached by the targeted DNS resolver, so that the resolver will query the authoritative nameserver
· What port the DNS resolver is using — they used to use the same port for every query, but now they use a different, random port each time
· The request ID number
· Which authoritative nameserver the query will go to
How DNS poisoning can be prevented?
It can be prevented by using DNSSEC. DNSSEC is short for Domain Name System Security Extensions, and it is a means of verifying DNS data integrity and origin. DNS was originally designed with no such verification, which is why DNS poisoning is possible. Much like TLS/SSL, DNSSEC uses public key cryptography (a way of digitally signing information) to verify and authenticate data.
With DNSSEC, the DNS server signs the DNS response with a digital signature that can be verified by the resolver. The DNS resolver then verifies the signature to ensure that the DNS response has not been tampered with. If the signature is valid, the resolver returns the IP address to the user’s web browser, which then connects to the website. If the signature is invalid, the resolver rejects the response and sends a warning to the user’s web browser.
Flaw in DNSSEC?
Before getting to know a flaw in DNSSEC, let’s first understand what happens if domain doesn’t exist.
DNS is split into smaller pieces called zones. A zone typically starts at a domain name, and contains all records pertaining to the subdomains. Each zone is managed by a single manager. For example, example.com is a zone containing all DNS records for example.com and its subdomains (e.g.www.example.com, api.example.com). There is no directory service for subdomains in DNS so if you want to know if api.example.com exists, you have to ask a DNS server and that DNS server will end up asking example.com whether api.example.com exists.
But with DNSSEC, something different happens. There is a concept of NSEC record type (next secure) which contains cryptography information for authentication and also includes the name of the closest existing domain name in the zone, along with the name of the next domain name that would exist in the zone if it did exist. Let’s see an example.
Suppose there is a DNSSEC-enabled zone called example.com, with subdomains public.example.com and secret.example.com. secret.example.com is a private subdomain and not for public access. Now if DNS query request for api.example.com (which doesn’t exist) hits the name server, it will respond the NSEC record containing closest existing subdomain which is public.example.com in this case and next subdomain secret.example.com. So, this way an attacker can enumerate all the secret subdomains if DNSSEC is not properly configured.
DNSSEC Zone Walking:
It is a DNS enumeration technique in which an attacker attempts to obtain internal records of DNS server if DNS zone is not properly configured.
Since we have understood the concept of the flaw which prevails in DNSSEC, let’s see how we can implement it.
There might be many tools to do the task, but I will focus on two most common tools:
Here we will be using domain iana.org
LDNS
1) ldns-walk command utility can be used to enumerate for misconfigured DNSSEC zone. In linux, it can be installed with the following command:

2) After installing it, enter the following command:

Here, first parameter is one of the name servers of iana.org. We already saw in DNS zone transfer, how to find name servers of a domain. Second parameter is the domain name.
3) Following output will be fetched:
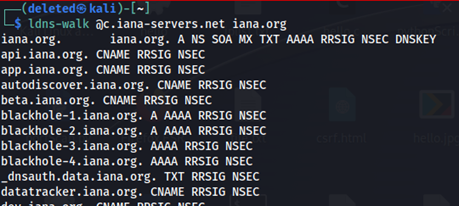
We can clearly see all the subdomains.
DNSRecon
1) It comes pre-installed with Kali Linux, but you can install it manually by git cloning https://github.com/darkoperator/dnsrecon.git.
2) After successfully installing, enter the command:

Here –d specified domain name and –z specifies DNSSEC zone enumeration.
3) The output will be as follows:
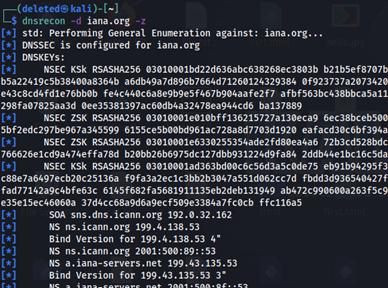
Nmap script dns-nsec-snum can also be used to perform DNSSEC zone walking.
How to prevent DNSSEC Zone Walking:
We can prevent DNSEC Zone Walking by using NSEC3 records which contain salted hash values of the non-existent domain as well as closest existing domain. Let’s take an example. Consider following subdomains of example.com
www.example.com
mail.example.com
Their corresponding hashes be:
www.example.com — ABCDE
mail.example.com — FGHIJ
let’s consider a DNS query for the non-existent name “blog.example.com”. The DNS server will return the NSEC3 record for the closest existing name, which is “mail.example.com”. The NSEC3 record will contain the salted hash value of mail.example.com along with the hash value of non-existent domain blog.example.com. Since the hashed value of the non-existent name does not match the hashed value included in the NSEC3 record, the requesting DNS resolver can determine that the requested name does not exist in the zone. Since the values are hashed, attacker won’t be able to understand the subdomains.
DNS Cache Snooping
DNS cache snooping is a type of attack where an attacker tries to obtain information about the DNS queries and responses made by a target user or network. The attacker does this by analyzing the contents of the DNS cache maintained by the target’s DNS resolver. The information obtained can be further used to facilitate phishing agenda. For example, an attacker may discover that an organization uses a certain company as their ISP. An attacker who discovers this could craft an email from their ISP, and tailor it specifically to the organization. This would prove to be more effective than a random email.
Before going further, let’s understand the concept of recursive and non-recursive queries.
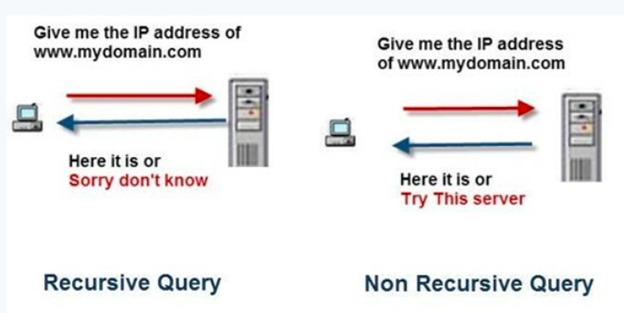
In a recursive query, if DNS resolver doesn’t have cached record, it will try to fetch the result by contacting the upper servers in the hierarchy such as root servers, TLD servers, name servers etc.
In non-recursive query, DNS resolver won’t try to contact the upper servers. If, it contains cached record, it will respond the resolved IP address else respond with DNS servers which might contain that information.
So, attacker can know whether a particular domain is cached in DNS resolver or not by sending non recursive query to it. If it responds with IP address, it means it was cached else it was not. Here, we will use nslookup command to perform the same.
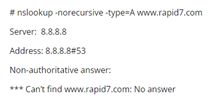
1)
Here, we specified –norecursive to set Recursion Desired bit in query header to 0. Then we used –type to specify A type DNS record and then the domain. As we can see in the result, Google public DNS server (8.8.8.8) doesn’t hold cached record for specified domain.
2) Now, let’s use recursive command to fetch IP address of domain by consulting upper servers in DNS hierarchy.
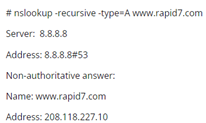
We specified –recursive to set Recursion Desired bit to 1. We see the IP address for requested domain. Now, Google public DNS server might contain cached record as it has fetched resolved IP address from upper servers.
3) Let’s try step 1 again to see whether the record is cached or not.
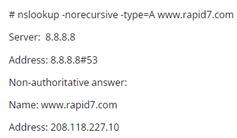
Boom! We see the cached record unlike earlier.
This is how an attacker can check for cached records.
Now one way to avoid cache snooping is to disable non-recursive queries so that always recursive queries are performed and IP address is always generated by DNS hierarchy of servers. This way attacker will always find IP address in the output regardless of its presence in cache or not.
But, here’s a catch! Assume, non-recursive query is disabled. Now consider following cases:
Case 1: Record is present in the cache of DNS Resolver: Here, since resolved IP address is already present in the cache, there is no need to travel to upper servers.
Case 2: Record is not present in cache: No problem, further contacts are made to the upper servers for DNS resolution and IP is returned.
Now notice, that in case 1, there was no need to travel further up, that’s why the response time from DNS resolver will be quite less as compared to the time taken when travelling further up in DNS hierarchy. That’s why attackers can still check for the availability of cache by comparing TTL values of standard DNS to query to DNS resolver and the query which has travelled quite deep in DNS hierarchy.
Since we used nslookup command earlier, let’s use dig command now.
Let’s see the practical implementation using ping and dig command:
1)Let’s ping to public Google DNS server to see the time taken by response from it.
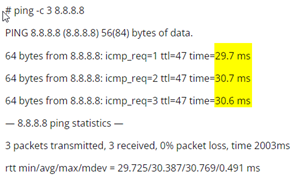
Notice, that it takes average around 30 ms.
2) Let’s check whether DNS server has cached record for google.com.
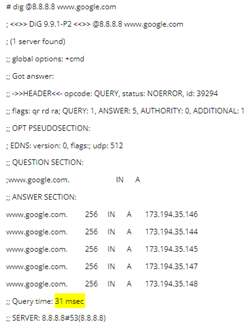
We can clearly see that it takes around 31 ms which is almost equal to our ping results. This means 8.8.8.8 server has cached records for google.com and does not take any additional time to find the resolved IP address.
3) Let’s check for website www.imdb.com.
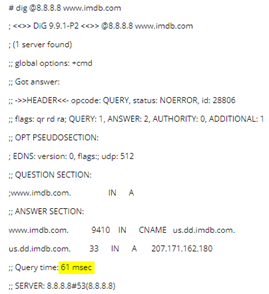
Here we can see that DNS server takes almost double of the time from our ping scan. This means that 8.8.8.8 server is taking additional time to query the other domain servers for DNS resolution.
How DNS cache snooping can be prevented?
Therefore, there is a need for other preventive measures. All the solutions to this vulnerability involve configuration changes. The simplest fix to this vulnerability is to not have the organization’s DNS servers be externally accessible. Typically, most organizations do not have a need for their DNS servers to be externally facing. The main instance is if an organization has publicly accessible IP addresses in their internal network that they want the public to be able to access. For this to work, the organization must have their DNS server externally facing, but it is best practice to put externally facing ports such as this in a DMZ. The second solution is to not allow public access to the DNS servers on the organization’s networks that require recursion to function properly. This solution works well, but requires multiple DNS servers with unique configurations. We can also use DNS rate limiting feature so that the response time is delayed in case of presence of cached version so that time in both the cases is almost equal.
References
https://www.acunetix.com/blog/articles/dns-zone-transfers-axfr/
https://www.cyberciti.biz/faq/linux-unix-dig-command-examples-usage-syntax/
https://digi.ninja/projects/zonetransferme.php
https://www.cloudflare.com/learning/dns/dns-cache-poisoning/
https://www.cloudflare.com/dns/dnssec/dnssec-complexities-and-considerations/
https://subscription.packtpub.com/book/networking-and-servers/9781789952308/1/ch01lvl1sec09/zone-walking-using-dnsrecon
https://resources.infosecinstitute.com/topic/dns-cache-snooping/
https://www.tracesecurity.com/blog/articles/dns-cache-snooping
#WRAP