
🔥 Introduction
Welcome to the captivating world of “Linux for hackers”! In this blog series, we’ll explore the essentials of Linux and how it empowers ethical hackers. Whether you’re a beginner or an experienced hacker, this series will equip you with the knowledge to leverage Linux for hacking adventures. Linux’s flexibility, security, and vast array of tools make it an ideal platform for ethical hacking. In this first blog post, we’ll cover the basics, including command-line skills, file systems, permissions, and the importance of networking and security. Let’s dive into the world of “Linux for hackers” and unlock endless possibilities!
🐧 Intro to Linux
Linux is a free and open-source operating system based on the Unix operating system. It was created by Linus Torvalds in 1991 as a hobby project while he was a student at the University of Helsinki. It is an open-source project which means its source code can be used by anyone.
💡 Linux is a kernel developed by Linus Torvalds.
📌 History
The history of Linux traces back to the early 1990s when Linus Torvalds, a computer science student from Finland, started developing a free and open-source operating system kernel. Torvalds began by creating a kernel for his personal use and later released it to the public. This kernel formed the foundation of what would become the Linux operating system.
Linux quickly gained popularity among developers and enthusiasts due to its open nature, flexibility, and stability. As more developers contributed to its development, Linux evolved into a full-fledged operating system with support for various hardware architectures and a wide range of software applications.
Throughout its history, Linux has seen significant growth and adoption. It has become the backbone of numerous technological advancements, powering everything from smartphones and servers to embedded systems and supercomputers. Today, Linux distributions are widely used across industries, and the collaborative nature of its development continues to drive innovation and propel its success.
📌 Why do the majority of hackers choose Linux?
- Open-source: Everyone can use it
- Stability: Linux is known for its reliability and stability. Linux is less vulnerable to crashing and freezing
- Light-weight: Linux occupies very less space on your hard disk and ram which can help you to free fluently on the old systems as well.
👩🏭 The first ever Linux terminal just occupied only 65KB.
- Performance: Linux is known for its performance, thanks to its efficient use of system resources and its ability to handle multiple tasks simultaneously
- Customizable: You can download any of your tools and remove the old ones.
- Privacy: Linux is less prone to data collection and tracking than Windows, which is a concern for many users.
- Cost: Linux is free to download, which makes it a good alternative to those expensive OSs’ out there.
- Hacking tools: Most of the hacking tools are formed with Linux kept in mind. Most of the hacking tools only run on the Linux operating system.
Famous Linux-based operating system used by hackers
- 1. Kali Linux: Kali Linux is one of the most popular Linux distributions specifically designed for penetration testing, ethical hacking, and digital forensics. It comes preloaded with a vast collection of hacking tools and utilities, making it a favorite among security professionals.
- Parrot Security OS: Parrot Security OS is another Linux distribution focused on security, privacy, and penetration testing. It provides a wide range of tools for network analysis, vulnerability assessment, cryptography, and anonymity, catering to the needs of hackers and cybersecurity experts.
- BackBox: BackBox is a lightweight Linux distribution designed for penetration testing and security assessment. It features a user-friendly interface and a curated selection of tools for web application testing, network analysis, and digital forensics.
- BlackArch Linux: BlackArch Linux is a specialized Linux distribution that provides a large number of security and penetration testing tools. It is known for its extensive repository of over 2,000 tools, making it a comprehensive choice for hackers and cybersecurity professionals.
- ArchStrike: ArchStrike is an Arch Linux-based distribution focused on security and hacking. It aims to provide an optimized environment for penetration testing, offering a broad selection of tools for various hacking tasks.
🐧 Linux file systems
Understanding Linux file systems and permissions is crucial for hackers, as it allows for effective management of files and ensures the security and integrity of data.
We will now go through various topics related to file structure and permissions.
📚 File system hierarchy :
At the very top of the filesystem structure is /, which is often referred to as the root of the filesystem.

- “/home”: User home directories.
- “/var”: Variable data, such as log files and caches.
- “/etc”: System configuration files.
- “/bin” and “/bin”: Essential system binaries and executables.
- “/usr”: User programs and libraries.
- “/tmp”: Temporary files.
- “/boot”: Contains files required to boot the system
🐧 Linux Basic commands with their tutorials?
In the world of hacking and cybersecurity, it becomes vital for hackers to get their hands dirty with CLI (command line interface) as most of the hacking tools out there work on the command line. A command line or shell is a powerful tool that allows the user to execute commands, run scripts and perform various tasks directly from the command line itself!
Firstly, we will learn about some basic commands that are very essential for hackers to know!
pwd : (Print Working Directory): returns your location within the directory structure.
kali >pwd
root@kali:/home/calc1f4r
whoami: command can be used to see which user you’re logged in as.
kali >whoami
root@kali:calc1f4r
cd: change the directory
kali >cd /etc
root@kali:/etc#
To move up one level in the file structure (toward the root of the file structure, or /), we use cd followed by double dots (..), as shown here:
root@kali:/etc# cd.
root@kali:/# pwd
/
cat: use to list the contents of the file
cat file.txt
ls: Listing the Contents of a Directory with ls by default when you type ls, it lists down the files and directories of the current working directory, you can also give it a file directory to list down
kali >ls /home
calc1f4r
You can use various switches with the ls command! You can check the switches with the following command and its
working.
ls --help
Ex: ls -la using switch -a and -l (-a for all things including . and .. -l for the list format)
With ls -la we can also check the owner of the file or what permissions we have over this file
help: Nearly every command, application, or utility has a dedicated help file on Linux that provides guidance for its use and also provides various use
nmap -h
# or
Nmap --help
Man: Most commands and application have a manual page for help, it gives you the whole documentation for the command.
man nmap
Tip: some commands don’t have man pages but they are provided with help commands!
grep: The grep filter searches a file for a particular pattern of characters, and displays all lines that contain that pattern.
grep [options] pattern [files]
Grep goes with piping very well!
Case Insensitive Search
some command |grep -i "Unix"
#or searching inside a file
grep -i "hey" file1.txt
Displaying the count number of matches
grep -c "Unix" fileq.txt
Display the file names that match the pattern
grep -l "Unix" *
# will give the file/files which have the specified pattern in them
touch: creates a file with a name specified to it
Kali> Touch new file
mkdir: The command for creating a directory in Linux is mkdir, a contraction of make directory.
kali >mkdir new directory
cp: To copy files, we use the cp command. This creates a duplicate of the file in the new location and leaves the old one in place.
cp oldfilelocation newfilelocation
mv : used to move a file from one location to another
mv oldfilelocation newfilelocation
We can also use mv to rename a file!
mv oldFileName NewFileName
rmdir: deletes an empty directory
rmdir tmp
rm: deletes the file and can be also used to delete the directories (even filled).
Switches:
-r: recursive
-f: force mode
rm -rf directory
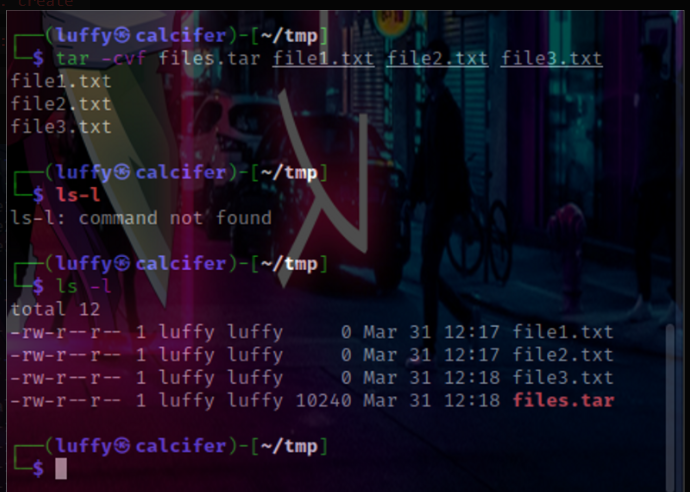
tar: The tar command creates a single file from many files, which is then referred to as an archive, tar file, or tarball.
SYNTAX
tar -switches filetobenamedafterprocess file1 file2 file3
Example :
tar -cvf files.tar file1.txt file2.txt file3.txt
-c: create
-v: verbose
-f: write the following file
To view what files are in there, we can do this!
tar -tvf files.tar

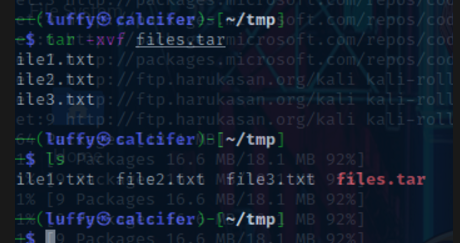
To Extract files we can do this :
tar -xvf files.tar
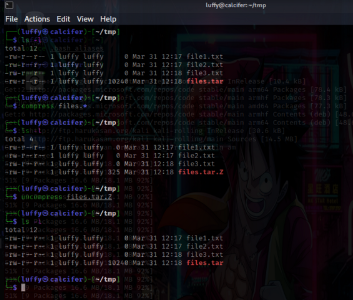
Compressing
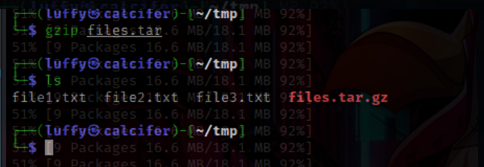
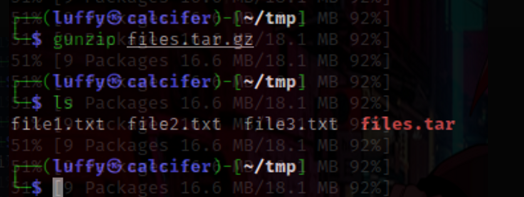
Linux has several commands capable of creating compressed files.
gzip , which uses extension .tar.gz or .tgzbzip2 , which uses extension .tar.bz2compress , which uses the extension .tar.z
gzip & gunzip :
![]()
bzip2 and bunzip2
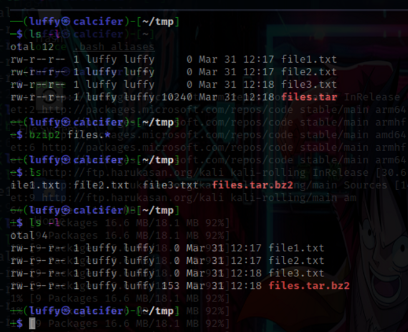
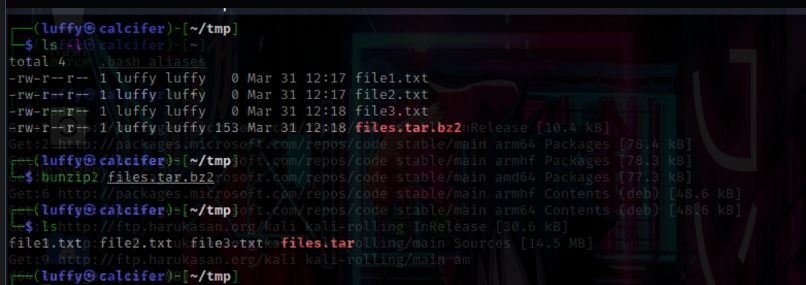
Compress and uncompress
🐾 Conclusion: These are the topmost used tools that should be almost known by every hacker.
🔍 Locating stuff
In ctfs and pen-testing hackers often need to find the locations of flags and fishing files, there are a few commands for that:
i. Locate: locate command can be used very easily, just followed by the file you want to search. It will list all the places in the system where the file is found.
locate flag.txt
Problem with locate
The database is only updated once a day so if you search for a file created a second ago you won’t find it, to solve this you will have to update the database using the following command :
sudo updatedb
ii. Searching for binaries using whereis:
If you’re looking for a binary file, you can use the whereas command to locate it. This command returns not only the location of the binary but also its source and man page if they are available.
kali >whereis aircrack-ng
aircarckng: /usr/bin/aircarckng /usr/share/man/man1/aircarckng.1.gz
Here, it returned the binary of aircracking-ng tool and the location of the man page.
iii. Finding Binaries in the PATH Variable with which
The which command is even more specific: it only returns the location of the binaries in the PATH variable in Linux.
The path is an environment variable that holds the directories in which the operating system looks for the commands you execute at the command line.
kali > which aircrarck-ng
/usr/bin/aircrackng
iv. Using Find Command
– Find command is the most powerful and flexible of the search utilities.
– Find command starts, by default, at the directory, we are currently in.
Syntax:
find directory options expression
Some Important switches for the Find command!
a. -maxdepth: We can change the depth or recursion to which find will look for desired files.

b. -f: file type defining!
find ~/Downloads -type f
# -f for files
# -d for directories

c. -name: searching the file by pattern/name
find ~/location -name "PATTERN"

you can use wildcards with it as well like

Use -i to make the search case insensitive
d. -size: you can filter out results based on the filesize as well:
find directory -size +100k
#-100k means files less than 100kb
#+100k means files greater than 100kb
e. -exec: Using the exec you can execute some command of your choice on the filtered-out results!
find [directory] [swicth] -exec command {} \;

Here, we are copying the filtered files to the documents folder.
📌 Redirection and Piping
when we run any program there are three data streams associated with it.
- STDIN (0) : Standard Input
- STDOUT (1): Standard output (defaults to the terminal)
- STDERR (2): Standard error (default terminal)
We use piping and redirection to connect these streams between programs and files to direct data in interesting and useful ways.
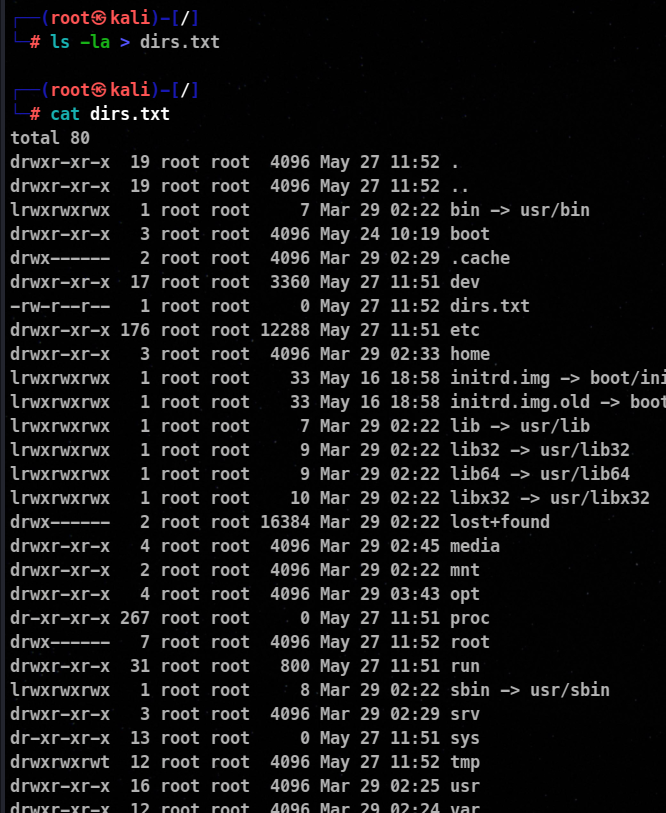
🎯 Redirecting data to a file(no appending)
Normally, we will get output on a screen, which is convenient most of the time, But sometimes we may wish to save it into a file as a record. The greater than operator (>)
indicates the cli that we wish the output to be saved in a file instead of printed on the screen.
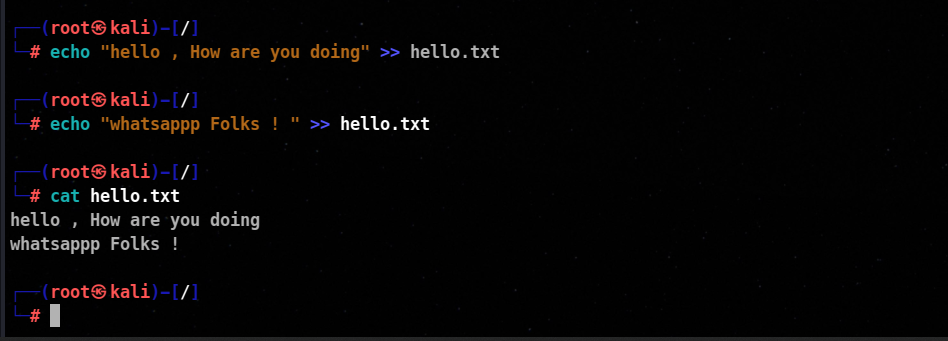
🎯 Redirecting data to an existing file (append data)
By using the (>>) operator we can save data into an existing file.
If the file doesn’t exist, it creates it by itself.
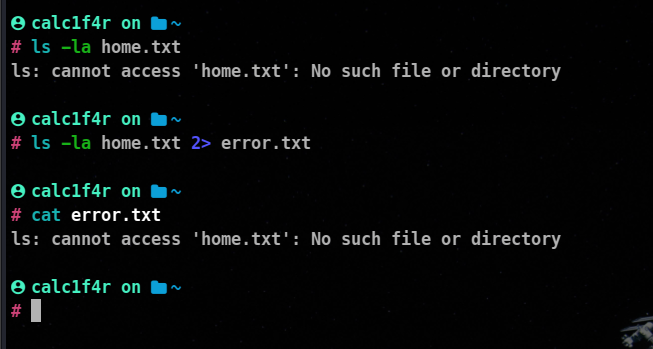
🎯 Redirecting Standard Error
You can also redirect the errors popping to a different location. But standard errors are associated with the number 2. You use > or >> operators in this case as well to redirect the errors.
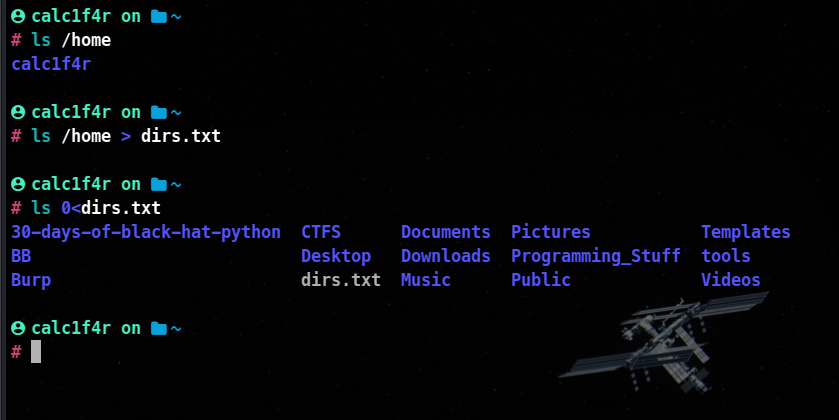
🎯 Redirecting from a File (standard input)
If we use the less than operator ( < ) then we can send data the other way. We will read data from the file and feed it into the program via its STDIN stream.
Many programs allow us to supply a file as a command argument and it will read and process the contents of that file.
📌 Piping
Piping is all about taking the standard output of one command and connecting it to the standard input of another order. We use a pipe | to give the standard input of a command as input for the other command. e.g.

💡 When piping and redirecting, the actual data will always be the same, but the formatting of that data may be slightly different from what is normally printed on the screen.
🐧 File system permissions
Every user of a single operating system should not have the same privileges!
🎯 Types of Users:
- root user: The root user can do anything on the system. Other users on the system have more limited capabilities and permissions and rarely have the access that the root user has.
- normal user: These other users are usually collected into groups that generally share a similar History Topics Tutorials Offers & Deals Highlights Settings Support Sign Out function.
🎯 Granting permissions :
Every file and directory must be allocated a particular level of permission for the different identities using it.
r: Permission to read. This grants permission only to open and view a file.
w: Permission to write. This allows users to view and edit a file
x: Permission to execute. This allows users to execute a file (but not necessarily view or edit it).
🎯 Granting ownership to an individual owner :
To move ownership of a file to a different user so that they can control permissions, we can use the chown (or change owner) command:
kali >chown ➊bob ➋/tmp/bobsfile
Firstly the name of the user followed by the file whose ownership to give!
🎯 Granting ownership to a group from one group :
we use the chgrp command to transfer ownership from one group to another!
kali >chgrp security newIDS
will pass permission for ids which is a service to the security group!
🎯 Granting ownership to an individual owner :
To move ownership of a file to a different user so that they can control permissions, we can use the chown (or change owner) command:
kali >chown ➊bob ➋/tmp/bobsfile
Firstly the name of the user followed by the file whose ownership to give!
🎯 Granting ownership to a group from one group :
we use the chgrp command to transfer ownership from one group to another!
kali >chgrp ➊security ➋newIDS
🎯 Checking permission :
When you want to find out what permissions are granted to what users for a file or directory, use the ls command with the –l (long) switch to display the contents of a directory in long format.
kali >ls –l /usr/share/hashcat
total 348
drwxr-xr-x 6 root root 4096 Mar 29 12:24 charsets
-rw-r--r-- 1 root root 240526 Dec 23 19:23 hashcat.hcstat2
-rw-r--r-- 1 root root 24767 Dec 23 19:23 hashcat.hctune
drwxr-xr-x 2 root root 4096 Mar 29 12:24 layouts
drwxr-xr-x 2 root root 4096 Mar 29 12:24 masks
lrwxrwxrwx 1 root root 25 Dec 23 19:23 modules -> ../../lib/hashcat/modules
drwxr-xr-x 2 root root 69632 Mar 29 12:24 OpenCL
drwxr-xr-x 3 root root 4096 Mar 29 12:24 rules
On each line, we get information about:
The file type :
bash **d**rwxr-xr-x 6 root root 4096 Mar 29 12:24 charsets
The first character tells you the file type, where d stands for a directory and a dash (–) indicates a file. These are the two most common file types.
The permissions on the file for owner, groups, and users respectively
example:
**d**rwxr-xr-x :
owner's permissions: r for read, w for write, x for execute
group's permissions: read and execute
other user's permission: execute
If any r, w, or x is replaced with a dash (-), then the respective permission hasn’t been given.
The number of links (symbolic links )
The owner of the file
The size of the file in bytes
when was the file created or last modified
the name of the file
📌Changing permissions with the decimal notation :
We can use a shortcut to refer to permissions by using a single number to represent one rwx set of permissions.
A binary set like this is then easily represented as one digit by converting it into octal, an eight digit number system that starts with 0 and ends with 7. An octal digit represents a set of three binary digits, meaning we can represent an entire rwx set with one digit while giving permission remember this :
4+2+1 =7, when all the permission switches are on, they are represented by the octal equivalent of 7.
So, if we wanted to represent all permissions for the owner, group, and all users, we could write it as follows:
777
We use the chmod command to change permissions
let’s take an example: we will provide permission to a file named file1.txt
- Providing read and write permission to the owner and the same to other users and group
chmod 666 file1.txt
#r=4 , w=2 4+2=6
- Providing all permissions to the owner, read permission to the group, and no permission to other users.
will pass permission for ids which is a service to the security group !\
🐧User and group management in Linux for hackers
📌 User accounts in Linux
A User is a person or service that has access to system files or resources. A user account is a method of providing or restricting access to system resources. Each user is assigned a unique username and password, which they use to log in and access the system.
🎯 Linux User IDS
Linux implements user IDS ranges to organize users. Depending on the user ID, the individual will have privileges. In contrast to the normal user, there is another type of user called an administrator or root in Linux.
Root user has uid as 0, it has access to all the files on the system.
🎯 User and system accounts
A user account provides non-privileged access to system resources. User account ID ranges are specified by the variables UID_MIN and UID_MAX in the file called /etc/login.defs. The default minimum UID Of a user is 1000, and the default maximum UID is 60000, but it also depends on the CPU model and Linux version.
🎯 Creating a user account
- To create a new user account in Linux, you can use the
useradd command followed by the desired username.
sudo useradd hacker1
After creating the user account, if you want a password for the user, you can set it in the following way :
sudo passwd hacker1
💡 You can use the id command to know your user ID and group ID.
🎯 Switching user
su username: changes the current user’s UID and we change our username through that
su calc1f4r
🎯 Modifying User settings
The usermodcommand is used to modify an existing user account.
Switches :
-G: Removes all of the user’s secondary groups and replaces them with a new secondary group or comma-delimited list of secondary groups.
-aG <group_name> adds a new secondary group
-l: changes the username
-d: change the location of the user’s directory
-m: Moves (renames) the current user’s directory to the new user’s name.
To rename a user to another user we will have to do something like this
usermod -l calc1f4r -d /home/calc1f4r -m hello
🎯 Deleting a user
We use the userdel command to remove a user account.
userdel -r calc1f4r
The -r switch is used to remove the user’s home directory and emails as well.
🎯 Groups in Linux
Groups in Linux allow for the organization of users with similar privileges and access rights. By assigning users to appropriate groups, you can streamline access control and manage permissions effectively.
🎯 Adding a new group/Managing users in the group!
We use the groupadd utility to provide common access to a system resource for multiple users.
groupadd abusers
Switches
-a <username>: adds a new username to the group! -d <username>: Deletes a user from the group -r: Removes the group password
Creating a password for the group:
we use the gpasswd command to manage the group password.
gpasswd dbsusers
🎯 Deleting the group!
We use the groupdel command to delete a group!
groupdel dbusers
🎯 location where all the data gets stored
Linux stores user configuration files on the local system.
/etc/passwd: contains user account information
/etc/shadow: contains user password and password aging info
/etc/group: contains a list of groups and their members
🎯 Structure of /etc/passwd file :
Format:
username
password: x indicated that the encrypted password is in /etc/shadow
userid (uid) [ 0 for root ]
gid [ 0 for root ]
Comment: By default has the user’s full name.
directory: which directory to open when login
Default shell: This field contains the absolute path of the shell to use.
🎯 Structure of /etc/shadow file :

Username of the user
hash itself
- $1$ is MD5
- $2a$ is Blowfish
- $2y$ is Blowfish
- $5$ is SHA-256
- $6$ is SHA-512
last password change/last modified
Minimum days till the password is valid
Maximum days till the password is valid
warn: number of days before warning user
Inactive date
Expire date
🎯 Structure of /etc/group file :
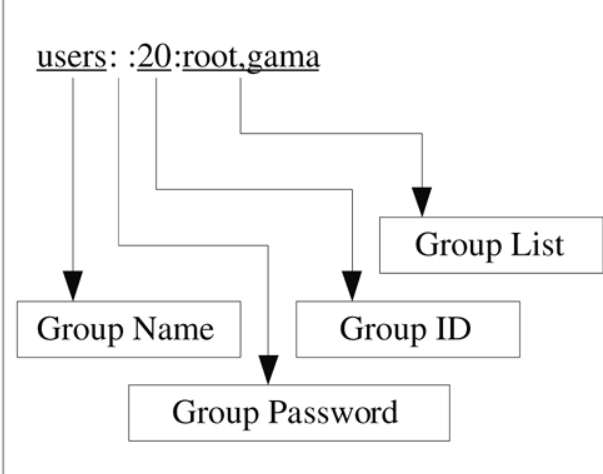
Group: specifies the name of the group
Password: Specifies the group password. The x denotes the group password is stored in /etc/gshadow.
****
****
🐧 Linux package management
Linux package management and software repositories are essential tools for hackers. They allow hackers to easily install and update software, and to manage dependencies between packages. This can be a major advantage, as it can save hackers a lot of time and effort.
🎯 Core concepts of package management
Package: A package is a group of files used by the package manager to install the application.
Package Group: A package group is a group of individual packages that have a similar purpose.
Release Number: A release number identifies a version released to the public.
Source code: text files of code written in programming languages
Repository: A software repository is a location used by a package manager to retrieve stored packages
🎯 Why use a package manager?
While installing software directly, you can get in dependency hell. Let’s understand it with an example for example you want to install software A.PKG for it run you need B.PKG, but to install B.PKG you need C.PKG. To solve this issue, we have package managers. While installing software through the package manager, if your system does have some dependency issues, the package manager will solve them as well!
There are several different package managers available for Linux, each with its strengths and weaknesses.
📌 Some of the common package managers are as follows :
- APT (Advanced Packaging Tool): APT is the default package manager for Debian and Ubuntu distributions. It is a powerful and versatile tool that can be used to install, update, and remove packages.
- RPM (Red Hat Package Manager): RPM is the default package manager for Red Hat and Fedora distributions. It is similar to APT, but it has a different syntax.
- Pacman: Pacman is the default package manager for Arch Linux distributions. It is a fast and efficient package manager that is easy to use.
- YUM: Yum is a package manager used in RPM-based Linux distributions like CentOS and Fedora, providing a command-line interface for managing software installation, updates, and dependencies.
Most beginner hackers pick a Debianbased operating system for start, so I will describe theapt` package manager.
Updating: Displaying updated information about all packages available in your configured package repositories
sudo apt update
Upgrading: upgrading packages to the newest version
sudo apt upgrade
kernel Upgrade: Upgrades all installed packages to the newest version and performs kernel update
sudo apt dist-upgrade
Autoremove: Removes outdated dependencies that are no longer needed
sudo apt autoremove
Installing software
sudo apt install code
Removing software:
apt remove code
As you have seen, each Linux version has its method to install applications. Wouldn’t it be nice to have a package manager that works on all versions of Linux? What comes closest to this are universal packaging systems.
Such package managers are
2. Verifying Package authenticity
sudo apt-key adv --recv-keys --keyserver keyserver.ubuntu.com ABCDEF1234567890
3. Removing Repositories
sudo add-apt-repository --remove ppa: example/repository
Installing Applications from Source Code
Many of the applications and services you will install on a Linux system will be delivered as source code, not as a binary executable. So let’s learn that process as well!
📝Steps
- Firstly download the file, and unzip it using the unarchiving techniques above discussed.
- Run .`/configure script.
The configure file is a script that does two things when it is run. First, it checks your system to make sure all the necessary components required to compile the program are available. It also verifies that your overall system environment is compatible with the program you’re going to install.
Second, the configuration creates a MAKEFILE. The Makefile file contains specific instructions for how the executable should be compiled to run on your platform.
- After executing the script you will end up with MAKEFILE. Now use the
make install command to compile and convert it into an executable and install it.
Conclusion
By mastering Linux, hackers gain access to a vast array of specialized tools, repositories, and customization options that empower them to analyze systems, uncover vulnerabilities, and strengthen security defenses. Linux’s open-source nature, robust security features, and active community support make it an ideal choice for hackers looking to enhance their skills and knowledge.
As we continue this blog series on “Linux for hackers,” we will delve deeper into networking and security, penetration testing, digital forensics, and advanced Linux topics. Stay tuned for the upcoming blog posts, where we will explore more advanced techniques and tools to further your hacking expertise. ♥