Dear Friends:
I’m writing this blog post to help individuals who are having trouble with “Mobile Application Testing” or who are unsure of where to begin while performing mobile app security testing.
Introduction:
Creating a suitable Android development environment is crucial for developers, allowing them to build, test, and debug their applications efficiently. In this blog post, we will guide you through the process of setting up an Android environment using Nox Player, an Android emulator, and explore how to bypass SSL pinging for debugging purposes.
Setting up your Android Device
As most of the following are applicable to both physical and emulated devices, I will present only the aspects used for an emulated device. So, when it comes to emulators, there are plenty of free options when setting up your Android environment. The most common are Android Virtual Device (AVD), Genymotion, and NoxPlayer. Genymotion is rooted by default, NoxPlayer has the option to enable root, and with AVD, root can be obtained easily.
Content Covered:
- What is .APK File ?
- Setting up testing environment.
- capturing http/https traffic.
- Bypass SSL Pinning.
What is .APK File ?
An APK (Android Package Kit) file is the file format used for distributing and installing applications on the Android operating system. It is similar to the .exe file format used in Windows or the .dmg file format used in macOS.
An APK file contains all the necessary components and resources required to run an Android application. This includes the compiled code (in the form of Dalvik bytecode or, more recently, ART bytecode), resources such as images and audio files, and a manifest file that describes the application’s structure, permissions, and other essential details.
When developers finish building an Android application, they generate an APK file that encapsulates the entire application into a single package. This allows users to easily install and run the application on their Android devices. APK files can be distributed through various channels, such as app stores like the Google Play Store or third-party websites.
Setting up a testing environment.
Two of the most popular options for rooted emulators are Genymotion and Nox Player. In my case, I going to chose Nox Player but you can use whatever you want.
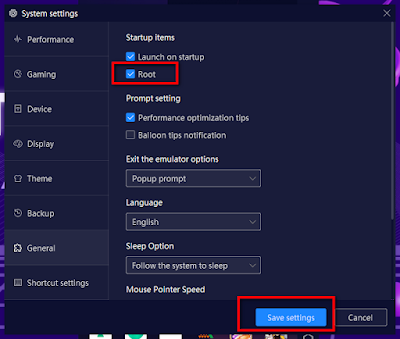
After installing Nox Player, rooting the device is as easiest as choosing the option inside System settings.
Step 1: Select Root and save settings.
Here there are multiple possibilities like Burp Proxy, Zap Proxy, or mitmproxy. But regardless of which proxy we are going to use, we will need to install a custom Certificate Authority (CA).
After already connecting to our root device it is always interesting to involve a proxy to check or modify the traffic. Here there are multiple possibilities like Burp Proxy, Zap Proxy or mitmproxy. But regardless of which proxy we are going to use, we will need to install a custom Certificate Authority (CA).
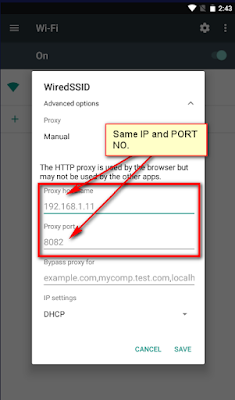
Now In this step, we have to assign our Laptop IP address to the Mobile Device setting as below:
My laptop IP Address is 192.168.1.11
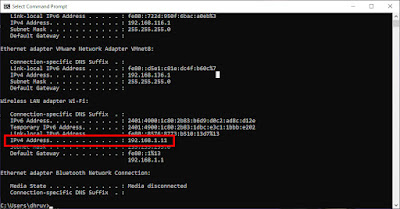
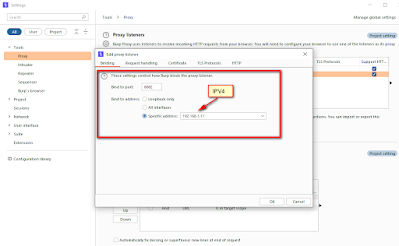
Step 2: Enter your IP address and the port number in the Burp suite proxy settings.
First, we will need to start our proxy in the same network as our emulator. Burp Proxy starts in localhost and our Android would not be able to reach it. One easy solution is to enable our proxy in all interfaces or a specific address reachable by the Android device.
Step 3: Open the Wifi Settings menu in Nox, select Manual Setup, and enter the same IP address and port number.
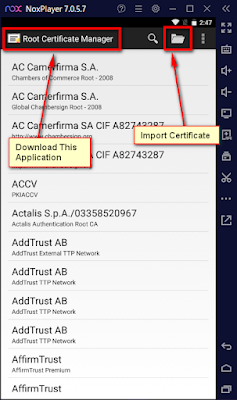
Step 4: Download the CA cert in nox after successfully setting the proxy settings.

Step 5: Get Root Certificate Manager now to import your burp certificates.
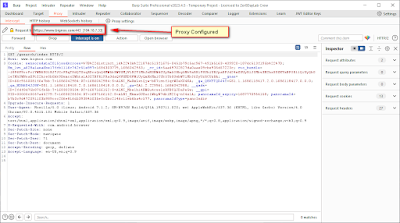
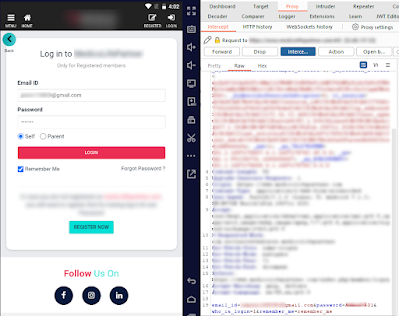
Step 6: Start Burpsuite once all of the processes have been finished, then open your browser to observe the https/http request that has been intercepted.
Step 7: Now let’s see how to bypass SSL pinning.
Certificate pinning and what it is.
Refer to my article on how to get around SSL pinning for additional information regarding certificate pinning.
I’m including a brief description for people who dislike clicking on external links. It adds an additional layer of protection to make applications safer.
1 - You won’t be able to intercept the traffic if certificate pinning is enabled.
2 - Then you must avoid the certificate pinning.
We now understand, thus
How to set up a test environment for Android application testing
What are Certificate Pinning and.apk files?
Let’s proceed now.
Step 8: Download the SSL unpinning application for the Xposed framework.
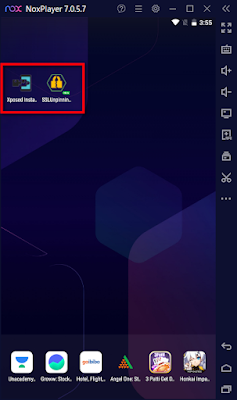
Step 9: let’s download any application and bypass SSL
Step 10: Open the Xposed Framework and select the SSL module under the section for mods. Click the application to reveal that it has been unpinned.

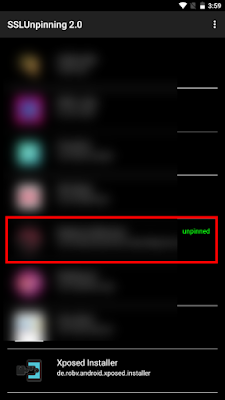
Open the application again, and you can see that the request was successfully captured.
Last but not least, I hope you all gain some new knowledge. Please DM me or let me know if you have any ideas or think I missed anything. I wish I could include them in the post.
We are all, in the end, “learners.”