Hey, every one it’s been a while since I wrote a blog on IoT security, today in this blog post I will cover emulating IoT binaries in your x86 machine. Motivation for the blog, if you wanted to get into IoT security but don’t have a hardware device to get started or you found a vulnerability in the firmware and wanted to create a POC without the device, using emulation we can achieve our goals. There are lots of good tutorials out there on this topic on the internet for example from Azaria Labs. The reason I’m writing this blog post is that document for my own reference in the future.
QEMU Emulation Types
QEMU stands for quick emulator a Swiss army knife for firmware/binary emulation, Usually in IoT devices we often see binaries compiled for ARM/MIPS/powerpc/risc-v/sparc and even x86 in some cases, but ARM and MIPS are found more often in IoT devices. Our personal computers run x86-based processors so running these foreign architecture binaries in a native x86 machine is not possible without emulation and this is where qemu comes in. With qemu we can run almost all known architecture binaries in our x86 machine.
QEMU supports different emulations we only focus on user mode emulation and full system emulation. In this part 1 blog post, I’ll cover user-mode emulation and in part-2 I’ll cover full system emulation and exploitation due to the length of the blog post. Install the required tools using the below command.
sudo apt install qemu qemu-system qemu-user qemu-user-static
Now download our target firmware file to emulate.
wget https://down.tendacn.com/uploadfile/AC6/US_AC6V1.0BR_V15.03.05.16_multi_TD01.rar
User-Mode emulation
The downloaded firmware is a rar archive, to extract the firmware we’ll be using unblob.
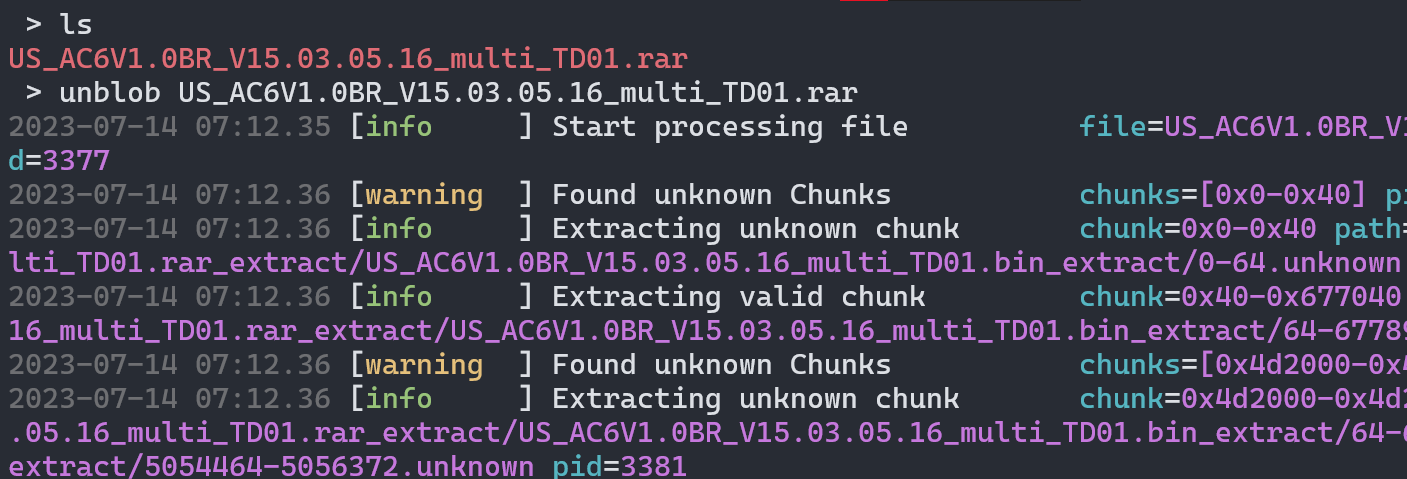
The extracted file system is inside the directory, Alternatively, you can use find to find the file system.

First and foremost we will emulate the binary busybox. Busybox is a utility in IoT devices which mainly used to provide basic program functionalities like ls, cd, mount, id, whoami, cat, etc. The reason is that IoT devices don’t have that much space to include all basic binaries so busybox is used. Target architecture is arm so use qemu-arm to emulate. qemu-arm ./bin/busybox
qemu-arm ./bin/busybox
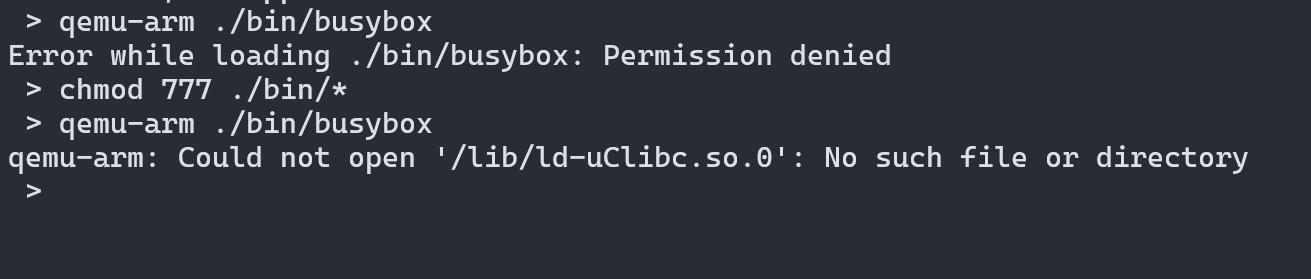
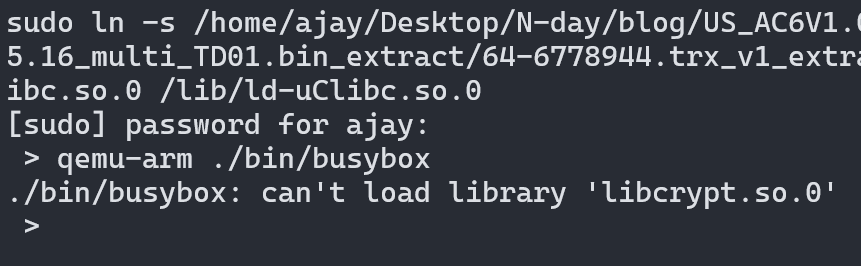
The reason for this error is busybox requires ld-uClibc.so library, which is present in the extracted file system at the lib directory but qemu looked for the library in our Linux distribution /lib directory which doesn’t have the library file it looking for so it fails. To fix this we can create a symlink to /lib.
ln -s lib/ld-uClibc.so /lib/ld-uClibc.so
We fixed the LIBC issue for now but there is another issue it can’t find libcrypto.so library not only this, it will throw errors like this until we create a symlink to all libraries manually, which consumes a lot of time. To fix this QEMU supports loading library files from a directory using the -L parameter we can use this feature to reduce our manual work.
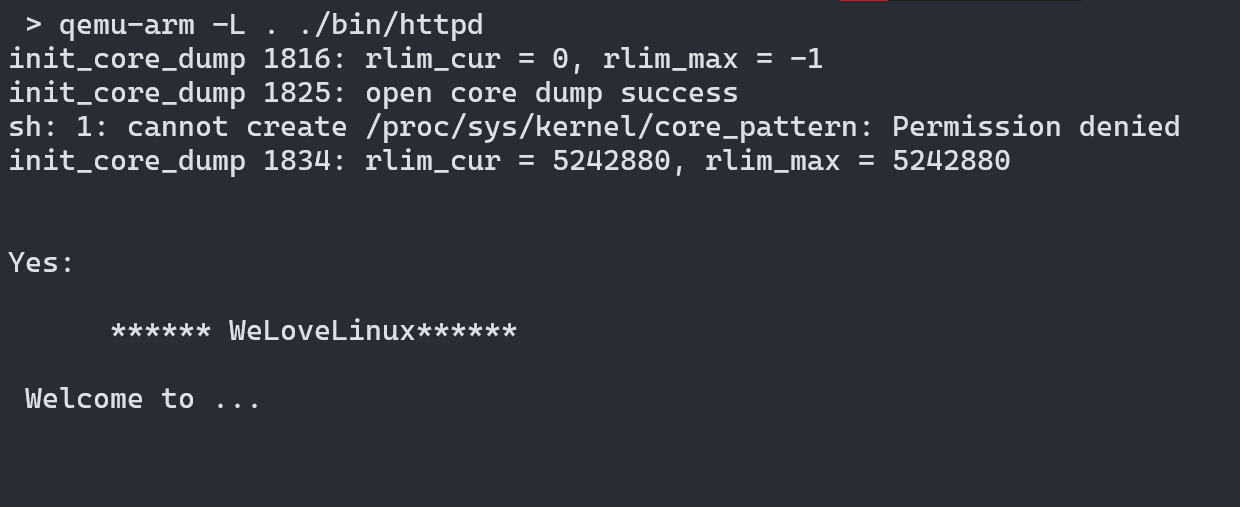
Now we successfully emulated an ARM binary in an x86 machine but emulating busybox is unnecessary for us we are interested in the remotely exploitable bugs, for this, we will emulate the HTTP web server of the target device.

Emulating Webserver
The httpd binary is the webserver running on the router so we emulate it. The binary is running but it didn’t create any network interface or open port 80/443, it hang after the welcome message.
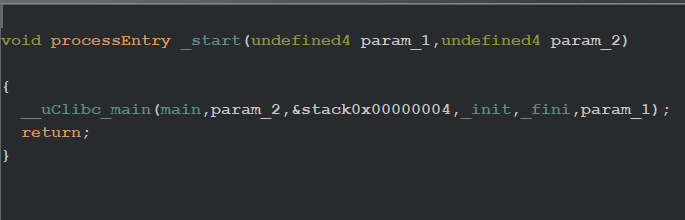
Load the binary in Ghidra/IDA or your favorite disassembler. Found main as an argument for __uClibc_main function this binary is stripped so I renamed the function manually.
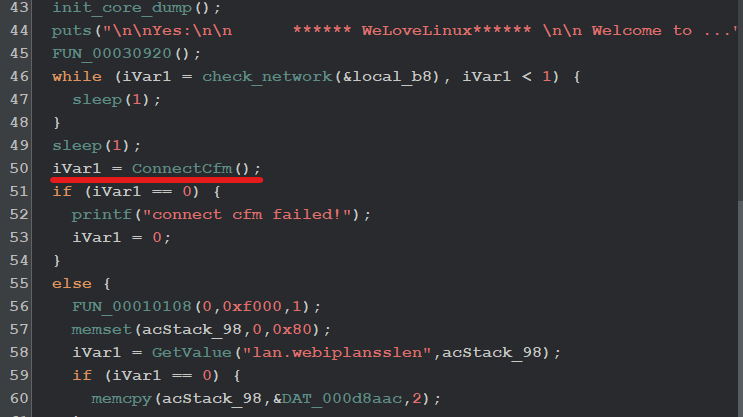
After the Welcome message, it starts a while loop, which executes function check_network, and the return value is stored in the iVar1 variable, and it is checked if the value is greater than 1 next block of code is executed or the sleep function will be invoked and the loop never ends until the value is greater than 1. That’s why this binary stopped after the welcome message.
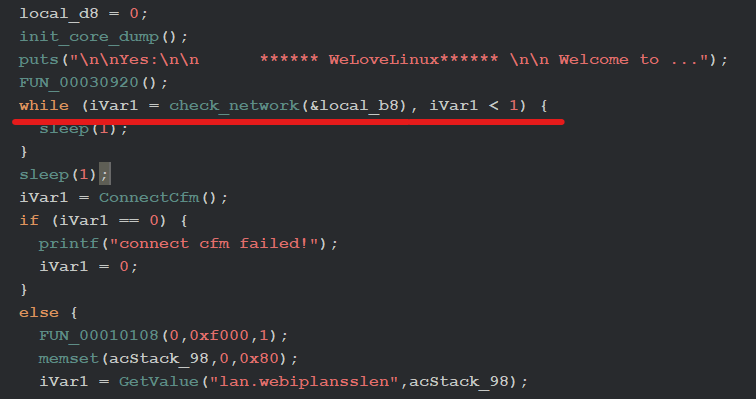
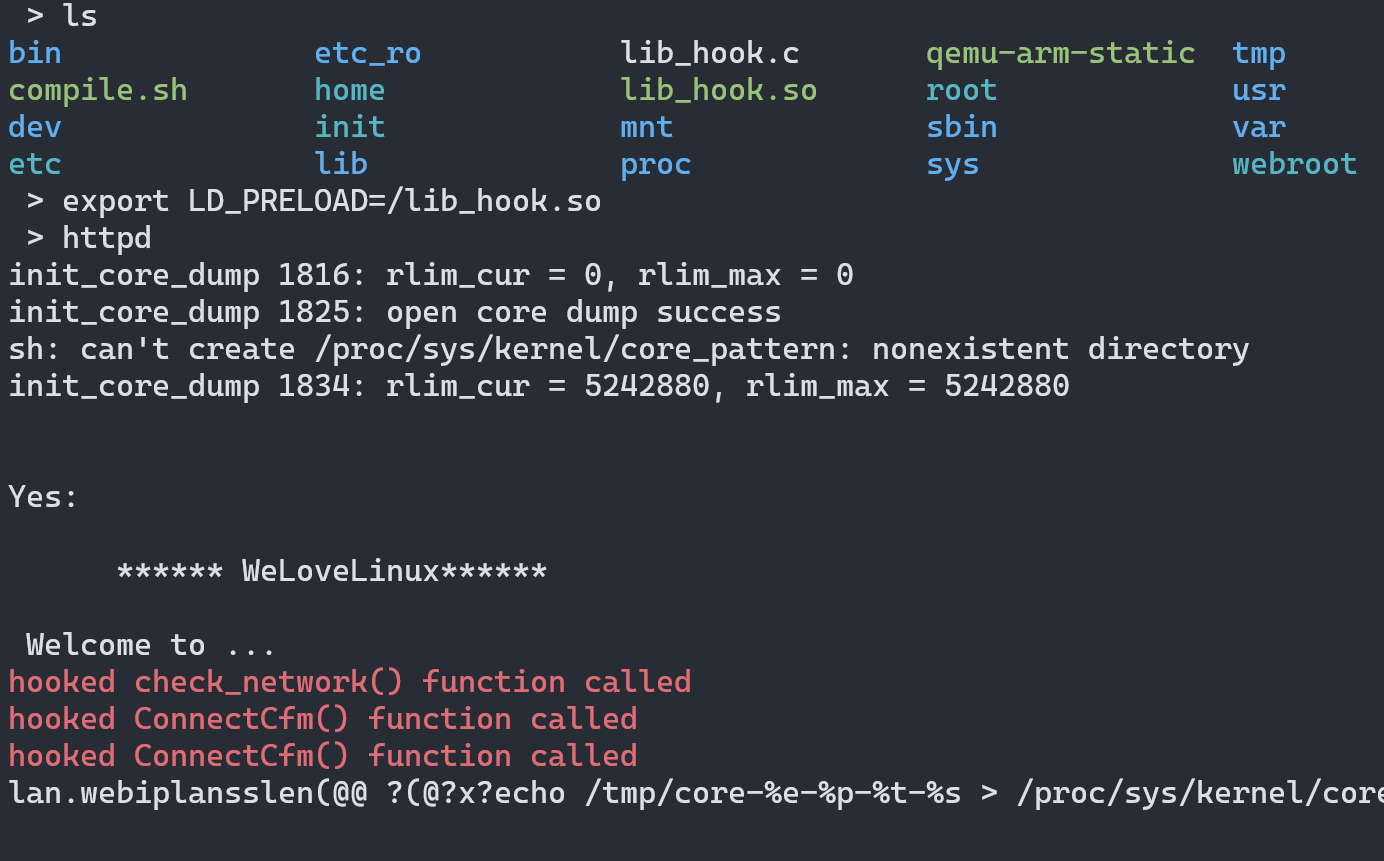
We still don’t know what this check_network function will do or how it calculates the return value it is imported from libcomman.so library. Instead of reverse engineering the library we can simply patch the binary instructions statically to bypass the check, but instead of doing that, I will be hooking the function so that I can control the value I want.
A simple script that hooks the check_network function prints that it has been called and returns value 2 so we can bypass the check. To compile this code I used buildroot toolchain, alternatively, we can use the open-wrt toolchain but I haven’t tried that yet, if any of you used the open-wrt toolchain let me know. Setting up the build root toolchain covered later in this blog post.
#include <stdio.h>
int check_network(int number) {
printf("\x1b[31m%s\x1b[0m\n", "hooked check_network() function called");
return 2;
}
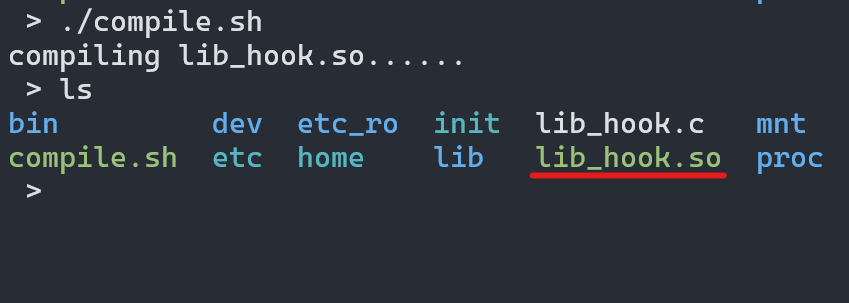
Instead of typing the long commands I created a simple bash script that uses buildroot toolchain to compile the binary as a shared object and compiled the hook program.
> cat compile.sh
#!/bin/bash
# compiles lib_hook.c program
rm lib_hook.so
echo "compiling lib_hook.so...... "
/home/ajay/Desktop/N-day/emulation/buildroot-2023.02.2/output/host/bin/arm-linux-gcc lib_hook.c -o lib_hook.so -fPIC -shared -ldl -D_GNU_SOURCE
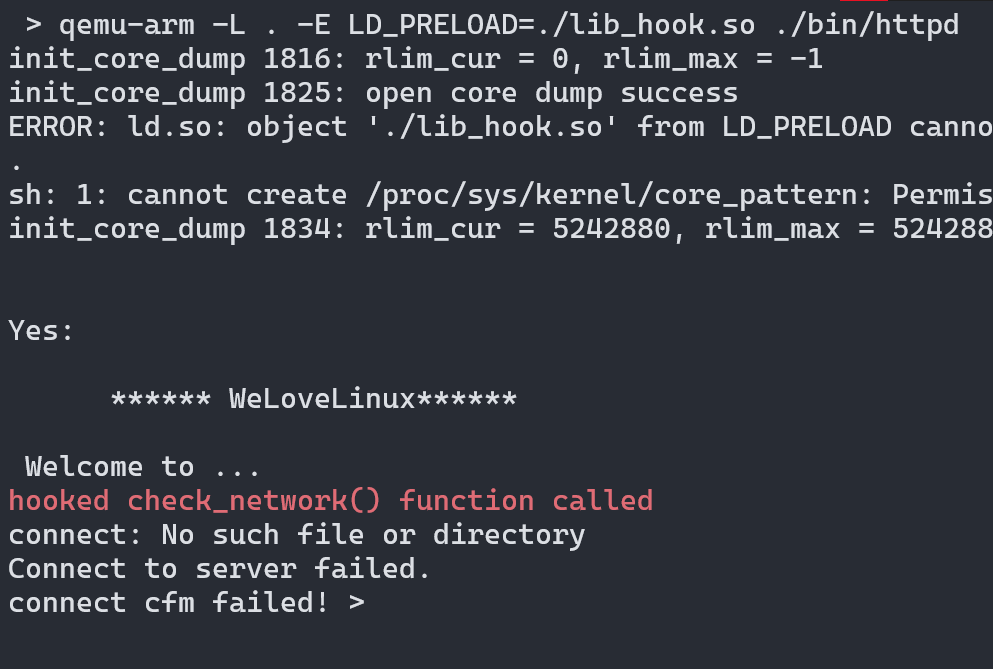
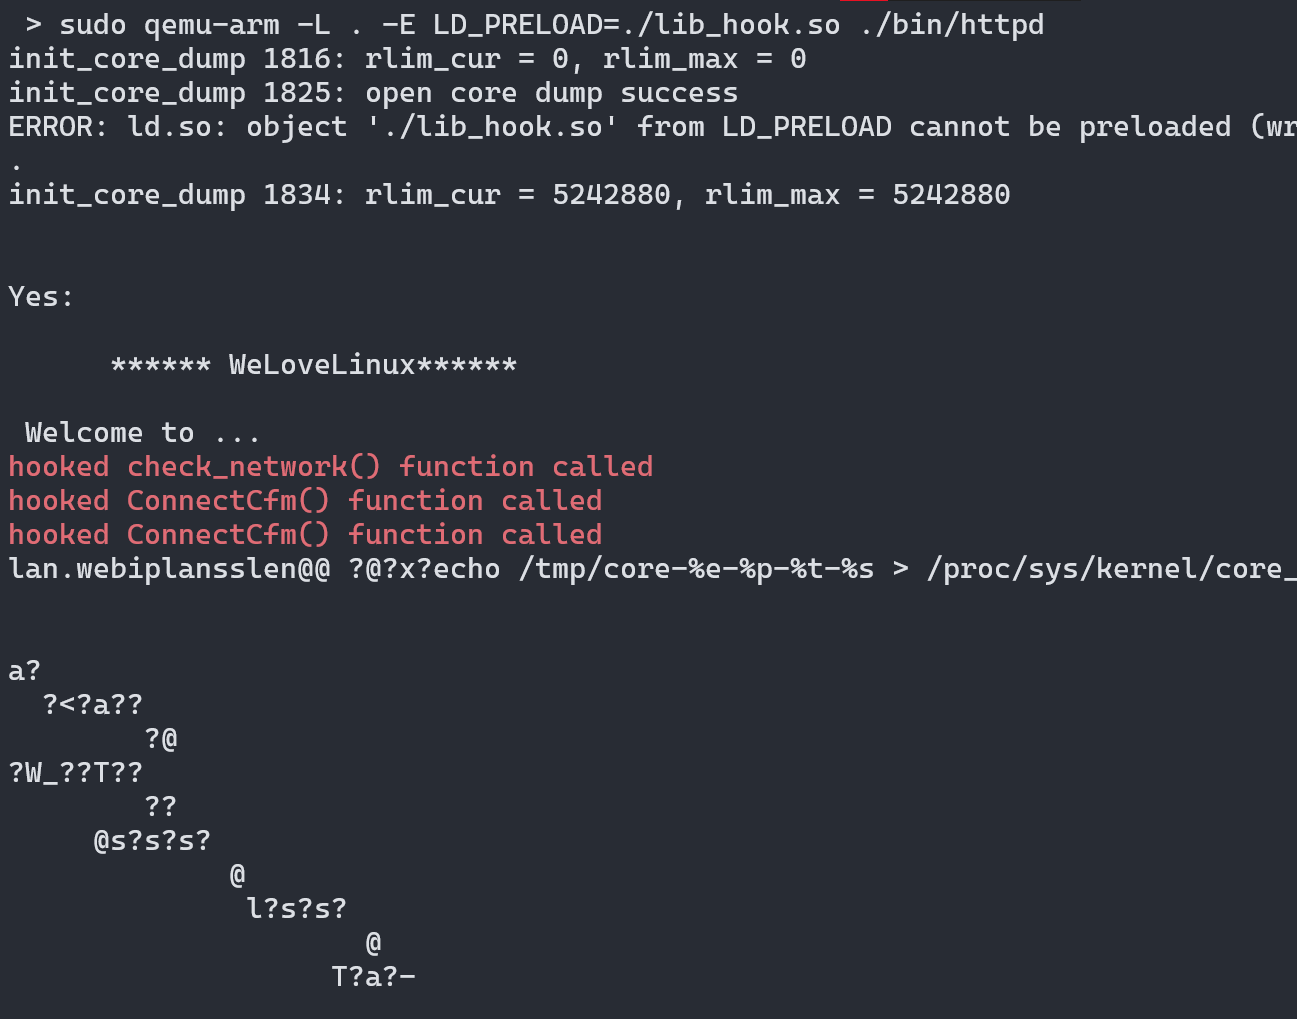
QEMU supports loading environment variables as well using the -E parameter, so we can load the library using the LD_PRELOAD trick. LD_PRELOAD loads the library before any library including the C runtime loader. We can even hook the main function using this technique which is often found in the userland rootkits, or used in fuzzing embedded device binaries. For us, we use this trick to bypass the check.
We bypassed the check but there is another error and the program exits.
Again inspecting the code in Ghidra, we can see there is a call to function ConnectCfm() and the return value is stored in iVar1 then an if comparison is happening if the return value is equal to 0 it prints the message connect cfm failed! to bypass this again we going to hook this function and return a value more than 1.
#include <stdio.h>
// updated lib_hook.c program
int check_network(int number) {
printf("\x1b[31m%s\x1b[0m\n", "hooked check_network() function called");
return 2;
}
int ConnectCfm() {
printf("\x1b[31m%s\x1b[0m\n", "hooked ConnectCfm() function called");
return 1;
}
We successfully emulated the binary but there are lots of unreadable output then pressing enter key a few times on the keyboard we see the below output.
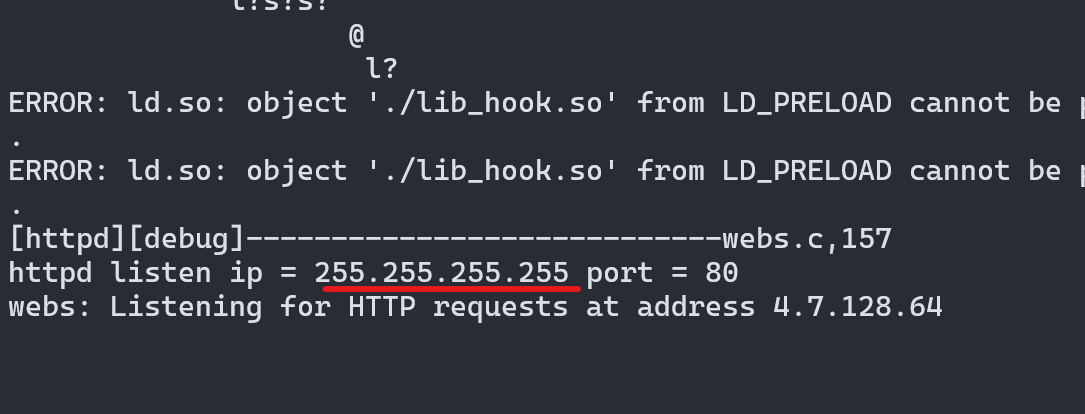
There is another issue it is listening on the 255.255.255.255 IP address which is not accessible from our machine.
If we again inspect this binary in Ghidra at function FUN_0001b584 de-compilation outputs are given below.
int FUN_0001b584(char *param_1,int param_2,undefined4 param_3,uint param_4)
iStack_2c.s_addr = inet_addr(param_1);
-----------------------------stripped---------------------
pcVar2 = inet_ntoa(iStack_2c);
uVar1 = ntohs(addr.s_addr._2_2_);
printf("httpd listen ip = %s port = %d\n",pcVar2,(uint)uVar1);
I stripped some of the code, inet_addr function is used to convert the decimal notation into network byte order and stored in structure iStack_2c in_addr_t type. Which was later used by the inet_ntoa function to convert the network byte order data into a human-readable IP address and prints using printf function. If we look at the man page for the inet_addr function, for error it returns -1 but -1 is the valid address as 255.255.255.255. This is why we see the output shows listening on 255.255.255.255 but the call fails.

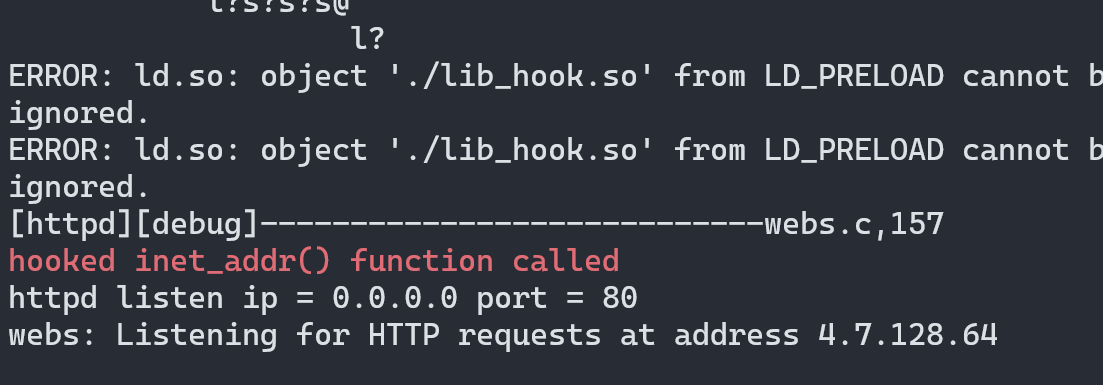
To fix this issue I’m once again gonna hook a function inet_addr function call. The updated hook program code is given below. It returns value 0 which is 0.0.0.0 in network byte order so it listens on all interfaces.
#include <stdio.h>
int check_network(int number) {
printf("\x1b[31m%s\x1b[0m\n", "hooked check_network() function called");
return 2;
}
int ConnectCfm() {
printf("\x1b[31m%s\x1b[0m\n", "hooked ConnectCfm() function called");
return 1;
}
unsigned int inet_addr(const char *ipaddr) {
printf("\x1b[31m%s\x1b[0m\n", "hooked inet_addr() function called");
return 0;
//return -1;
}
Now the HTTP server is running and starts an HTTP server in port 80, we can browse the webpage as well.
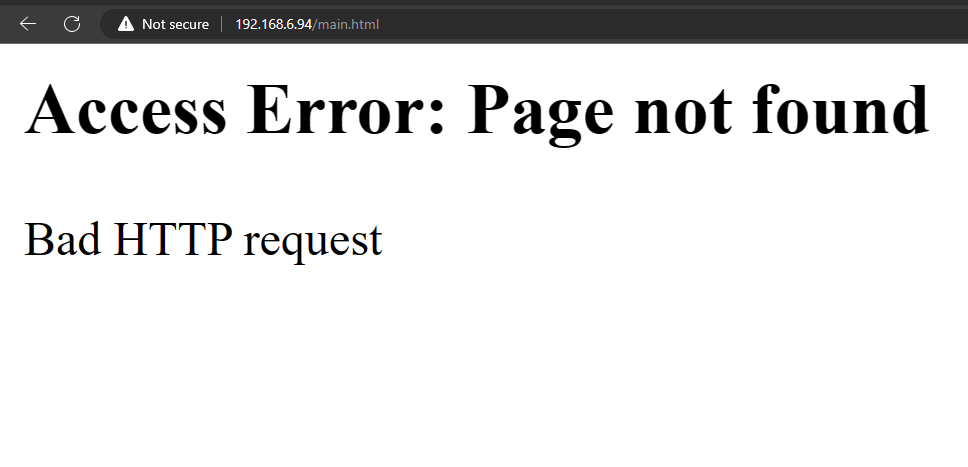
The webpages are not present in the /webroot directory so couldn’t see the web interface.
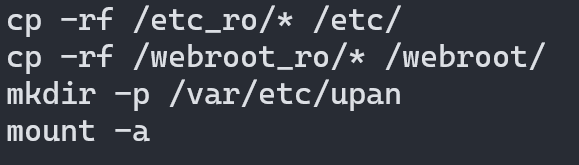
If we take a look at the startup script located at /etc_ro/inet.d/rcS, it’s copying the files in /webroot_ro to /webroot so we will do the same and restart the webserver and wait for 2 mins.
After restarting the webserver we can navigate to a webpage
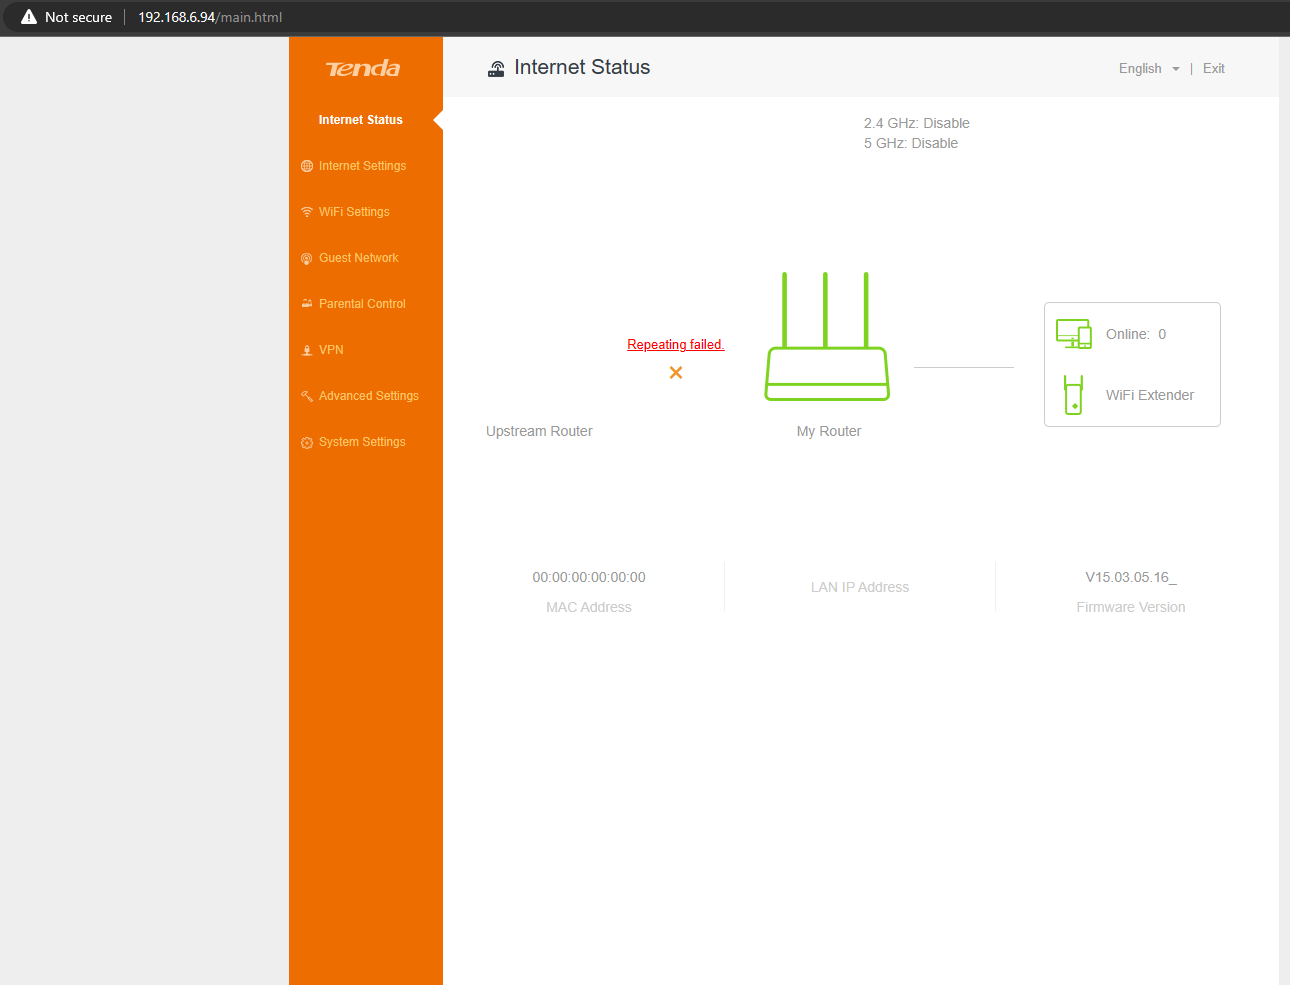
We successfully emulated an HTTP web server, using this method we can emulate most of the binaries used in IoT devices but alternatively, we can use full system emulation which emulates this functionality when starting the firmware which will be covered in the next part. Note if the vulnerability we are trying to exploit is present inside any of the hooked functions then we have to take a different approach to emulate it.
Buildroot toolchain for cross compilation
Download build root Buildroot - Making Embedded Linux Easy and extract the archive.
make menuconfig
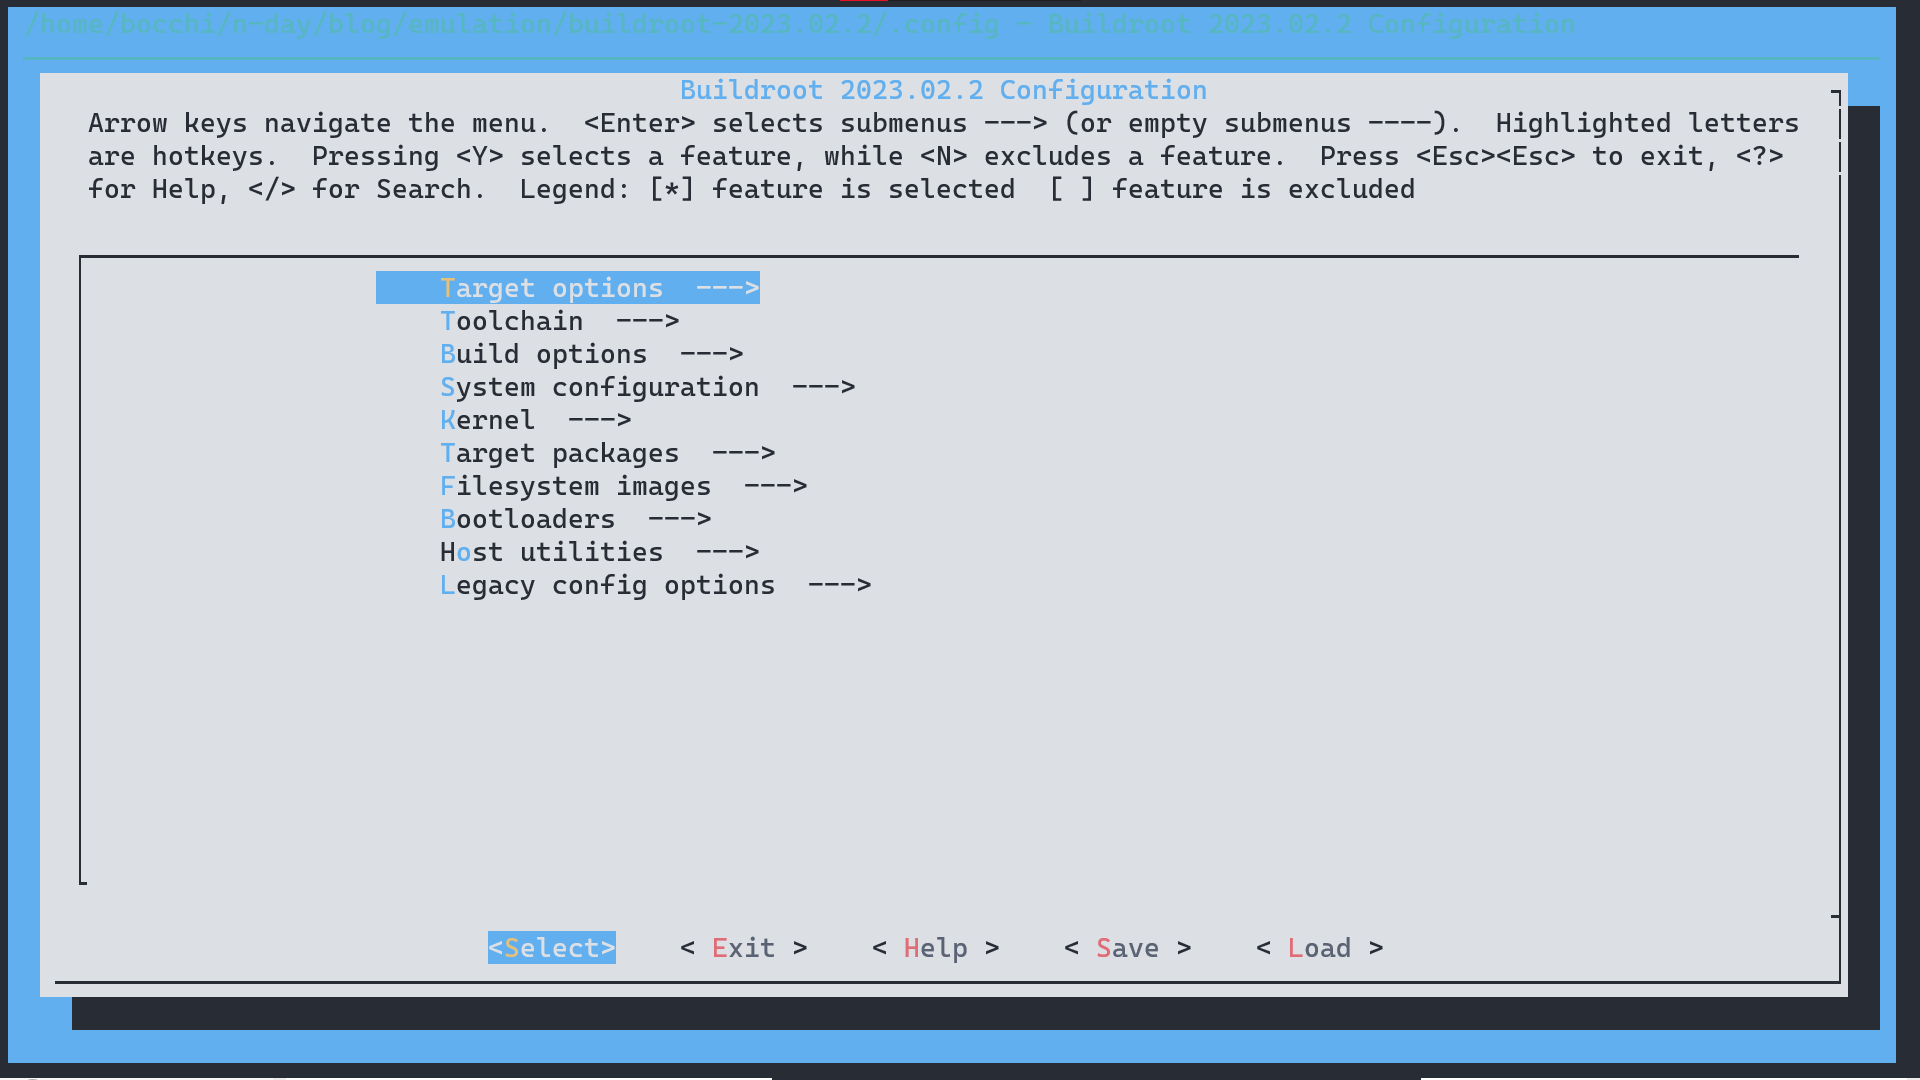
Select Target options → Target Architecture → ARM (Little endian) and come back to the main menu.
Select Toolchain in the C library and select uClibc-ng, because the target device has libraries for uClibc instead of glibc. Then save the changes and exit.
make # it starts building the embedded Linux
We don’t have to wait until it finishes building the firmware, we can stop it once it creates the toolchain. The resulting toolchains are present inside the /output/host/bin/ directory. Use this toolchain to cross-compile binary for the target device.
End note
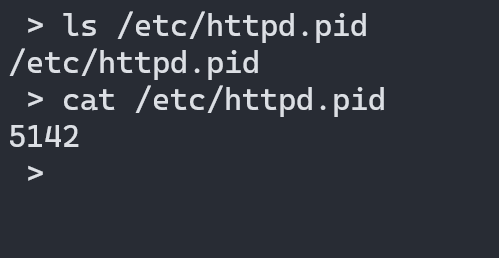
In the main function, there is a call to doSystemCmd() which basically executes system commands. It stores the PID of the program in /etc/httpd.pid file if I look inside my Linux /etc directory the file is present. It created a file in my Linux host machine instead of the file system etc directory. So think before executing any unknown binary, especially malware, and backdoors.

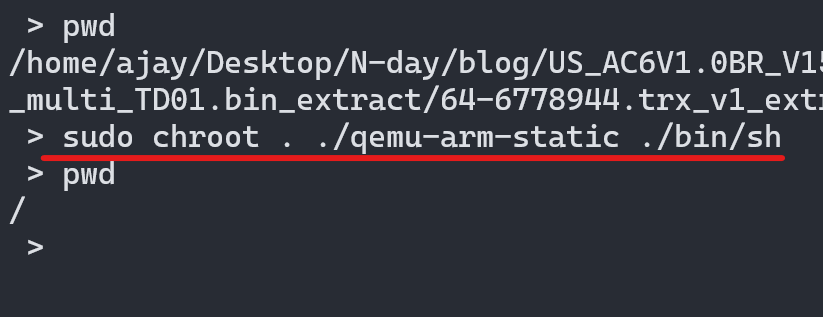
To mitigate this we can use chroot by creating a file system as a temporary root. For that, we use qemu-static binaries, because it is compiled statically so they can run without any libraries. Copy qemu-arm-static binary to the root file system.
cp /usr/bin/qemu-arm-static .
using chroot we can create current as a temporary root since so -L is not needed to libraries, since file system lib/ directory acts as /lib directory. From now on whatever command we execute is run from the file system not from our Linux host machine. Which I will try to explain better in the next part.
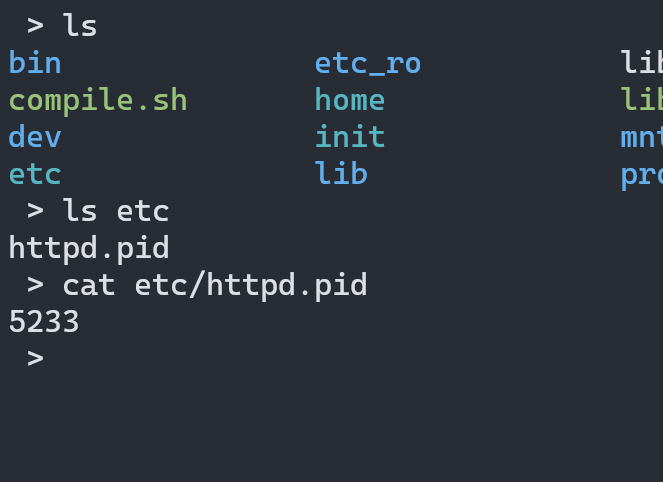
Now start the emulated binary inside this jailed environment, and kill it.
It created the file in the file system instead of my Linux host.
I hope you guys liked this long write-up, Feel free to contact me if you have any queries.
References
https://www.zerodayinitiative.com/blog/2020/5/27/mindshare-how-to-just-emulate-it-with-qemu
https://azeria-labs.com/arm-on-x86-qemu-user/
https://azeria-labs.com/emulating-arm-firmware/