
Hello there, readers. Welcome back to the third chapter of the blog series “Burpsuite 101,” “Exploring burp proxy and target scoping.” This blog dives further into the capabilities of Burp Suite, concentrating on the core components of Burp Proxy and the art of accurate target scoping. Prepare to discover critical ideas that can help you improve your web application security testing game. Let’s get started! 🕵️♂️💻🌐
🐞 Burp Proxy
Burp Proxy is a web proxy server that sits between your browser and the target web application. It allows you to intercept, inspect, and modify HTTP requests and responses.
Features of Burp proxy :
- Intercepting and inspecting HTTP requests and responses: Burp Proxy can intercept and inspect all HTTP requests and responses sent between your browser and the target web application. This can be used to debug online applications, test web apps for security flaws, and monitor web application performance.
- Modifying HTTP requests and responses: Burp Proxy allows you to modify HTTP requests and responses before they are transmitted to the target web application. This can be used to simulate several forms of attacks, such as cross-site scripting and SQL injection.
- Saving and loading HTTP requests and responses: You can save and load HTTP requests and responses using Burp Proxy. This might be useful for troubleshooting online applications or checking for security vulnerabilities in web apps.
- Exporting HTTP requests and responses: You can export HTTP requests and responses to a variety of formats, including XML, JSON, and CSV, using Burp Proxy. This can be handy for reporting on your testing results or sharing them with others.
Intercept
Burp Intercept is a feature of Burp Suite under the proxy tab that allows you to intercept, inspect, and modify HTTP requests and responses. After configuring your external browser with burp as shown in the first blog, you can use this.
To intercept a request or response, simply click on the Intercept tab in Burp Suite and then do something to invoke a request and then open the burp intercept, there you will your request.
Example : Searched for google and there you can see the whole request to get the webpage
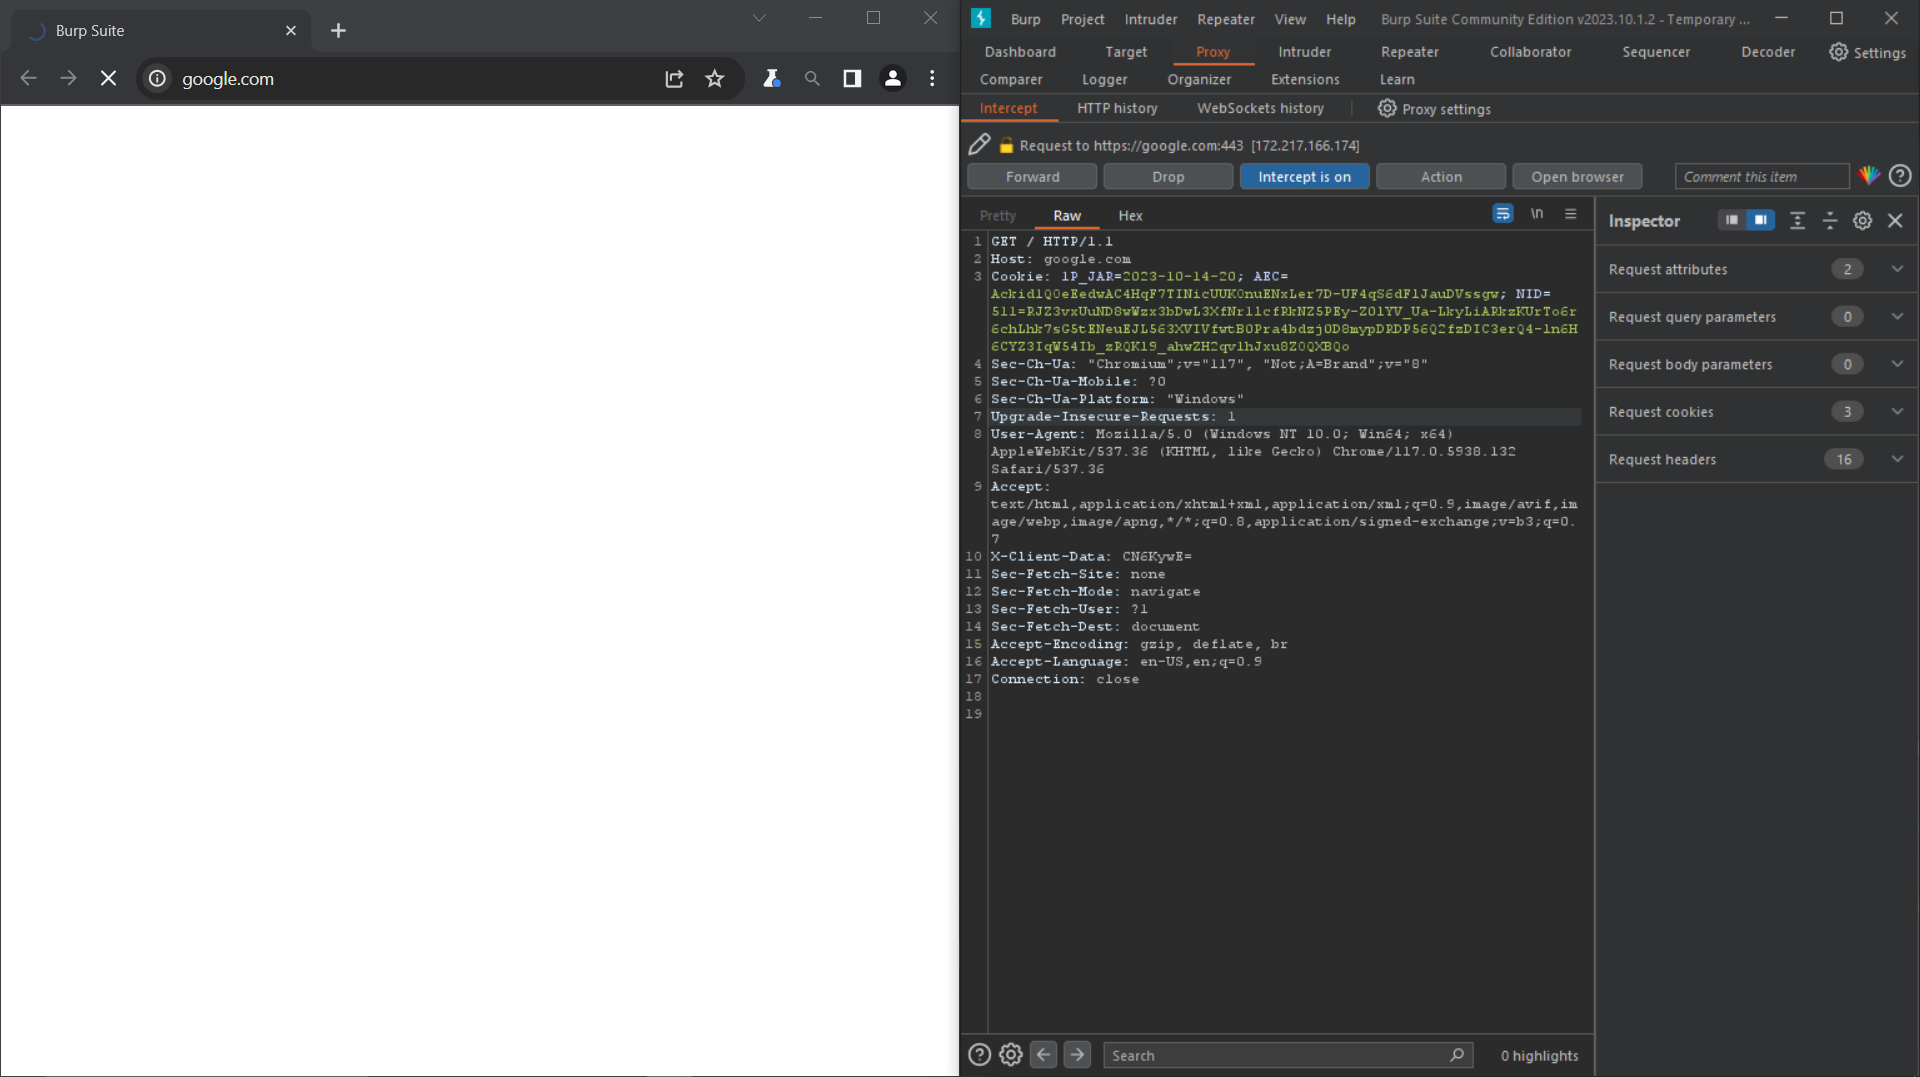
After capturing the request you can perform various operations on the intercepted requests , some of the examples are :
- View the request/response payload in raw format, including request headers and body.
- Modify the request method, such as changing GET to POST or vice versa.
- Add or remove request headers, such as the Cookie header or the Referrer header.
- Change the request body, such as adding a malicious parameter or changing the value of a parameter.
- Redirect the request to a different server, such as a malicious server or a honeypot server.
- Block the request from being sent to the target web application.
- Save the request or response to a file for later review or sharing.
- Replay the intercepted request multiple times, with or without modifications.
- Export the intercepted request to a different tool for further analysis.
- Use the request to create a new test case in Burp Suite’s Scanner tool.
- Use the request to create a new attack sequence in Burp Suite’s Intruder tool.
- Use the request to test for specific security vulnerabilities, such as cross-site scripting, SQL injection, and XML injection.
- Use the request to test the performance of the target web application.
- Use the request to debug the target web application.
- Use the request to learn more about how the target web application works.
- Transfering the intercepted request to the various other modules such as comparer and repeater
And many more……
Some of these functionalities you can access by just right-clicking on the intercepted request
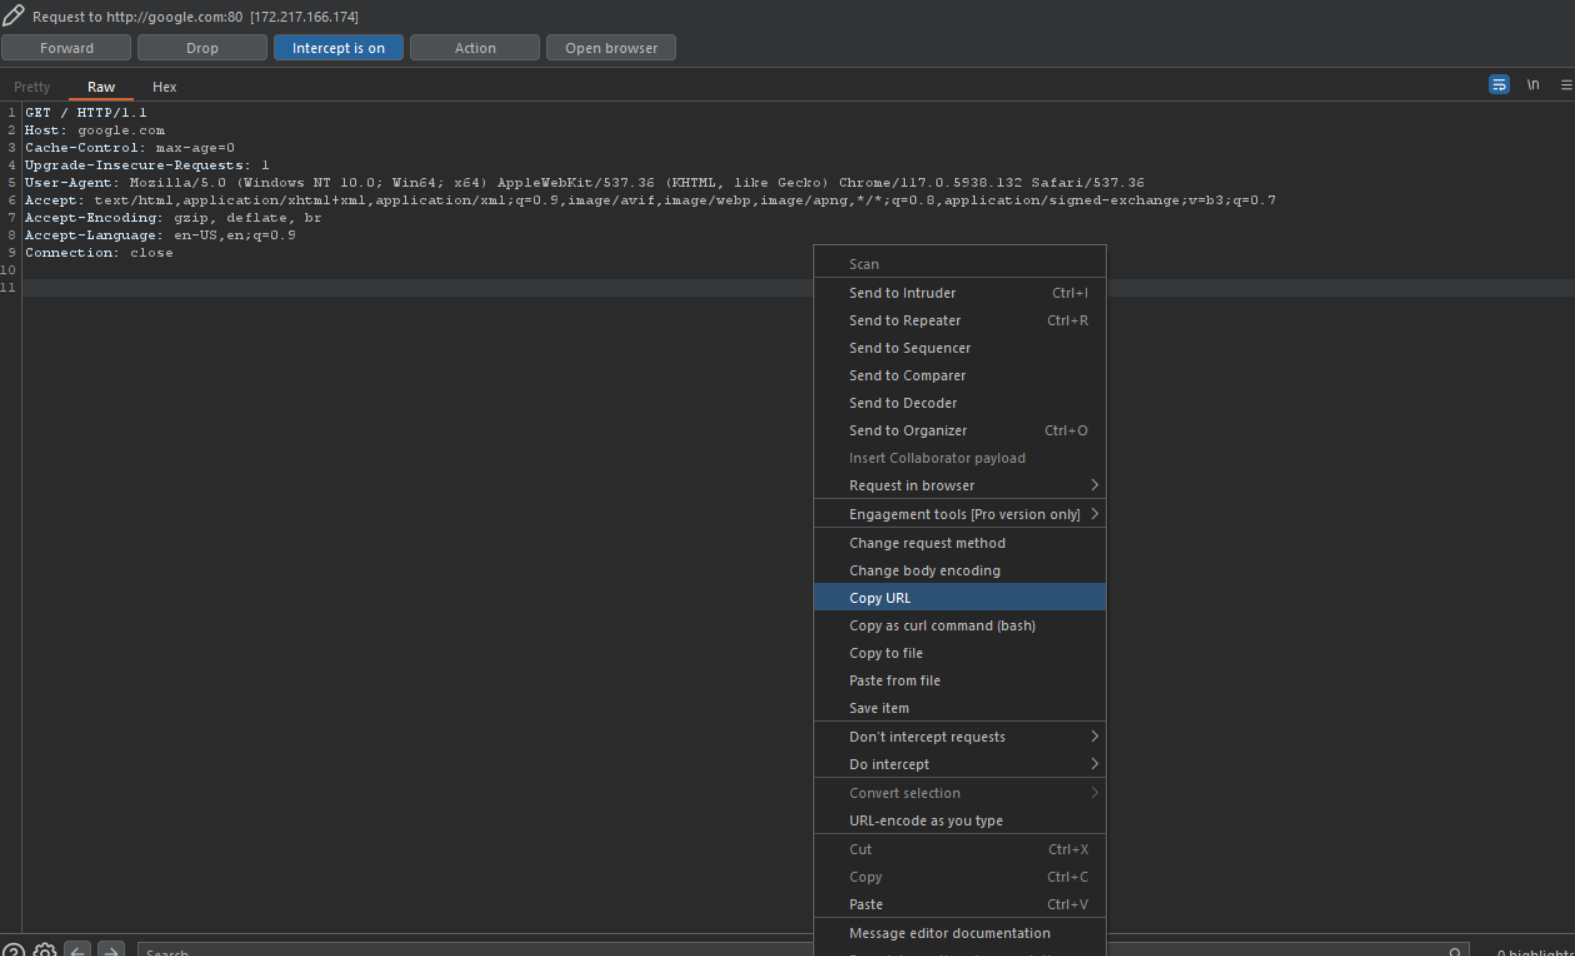
💜Experiment with all of the features and learn the art of intercepting🤘.
Http History
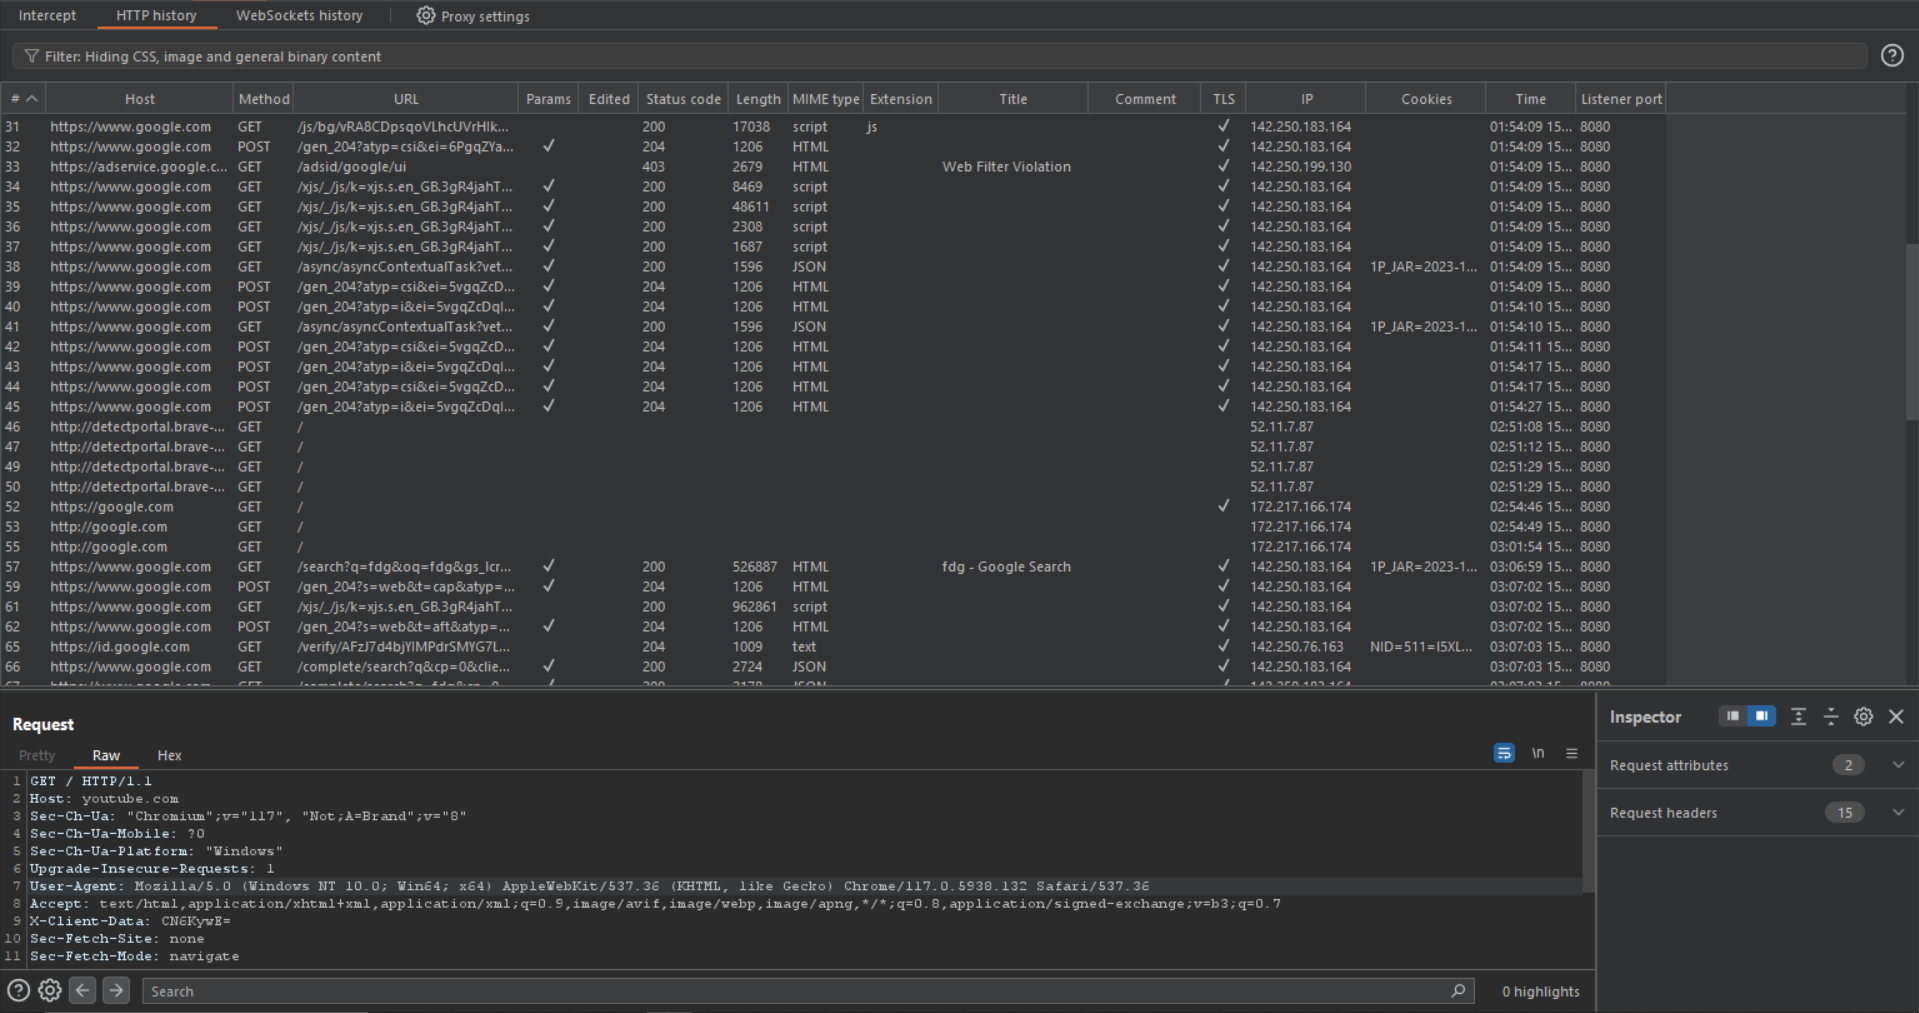
HTTP history is a feature in Burp Suite Community that allows you to view and manage a chronological list of all HTTP requests and responses performed by Burp Proxy. The default value for Burp Suite Community HTTP history is to store the last 1000 requests and responses.
The information it contains are as follows :
- #: The request or response number.
- Host: The host server name.
- Method: The HTTP method used for the request.
- URL: The full URL of the resource that was requested.
- Params: A flag indicating whether the request contains any parameters.
- Edited: A flag indicating whether the request or response was modified by the user.
- Status code: The HTTP status code of the response.
- Length: The length of the response in bytes.
- MIME type: The MIME type of the response.
The Interface :
Some of the useful features of the burp are as follows :
- Import and export: You may export and import requests and responses from Burp history. This makes it simple to share information with others or save information for later review.
- Filter and research: Burp history lets you filter and search for requests and responses. This makes it simple to find the information you require, even when dealing with vast amounts of data. ( I have explained the process in more detail in below to do this)
- Annotations:Annotations can be added to requests and responses in Burp history. This can be beneficial for documenting discoveries, troubleshooting issues, and teamwork.
For annotations, you can add comments and also highlight the request with color to discriminate against others.
Adding comment:

Highlighting with color:

Websockets History
What is websocket?
WebSockets are a communication technology that allows for full-duplex communication channels to be established through a single TCP connection. This implies that both the client and the server can send and receive messages simultaneously, without waiting for the other side to complete. These are utilized in real-time applications like chat apps, streaming apps, and multiplayer games.
Just like http history , WebSocket history in Burp is a feature that allows you to view and manage a chronological list of all WebSocket messages that have been processed by Burp Proxy.
The information which it contains are :
- #: The WebSocket message number.
- Direction: The direction of the message (incoming versus outgoing).
- Edited: A flag indicating whether the message was modified by the user.
- Length: The length of the message in bytes.
- Comment: Any user-applied comment.
- TLS: A flag indicating whether TLS is used.
- Time: The time the message was received.
- Listener port: The listener port on which the message was received.
- WebSocket ID: Burp’s internal ID for the WebSocket that was used for the message.
🔥 Similar to http history, you may also conduct annonation and filtering.
The interface:

Proxy Settings
The proxy settings in the Burp Proxy tab allow you to configure how Burp Proxy intercepts and proxies HTTP traffic. These settings include:
- Intercept: This setting controls whether Burp Proxy intercepts all HTTP traffic. You can choose to intercept all traffic, intercept only selected traffic, or disable interception altogether.
- Bind to port: This setting specifies the port that Burp Proxy listens on for incoming connections.
- Bind to address: This setting specifies the IP address that Burp Proxy binds to. You can choose to bind to all interfaces, a specific interface, or the loopback interface only.
- Proxy: This setting specifies the proxy server that Burp Proxy uses to forward traffic to the target destination. You can specify a proxy server by its hostname or IP address and port.
- Transparent: This setting controls whether Burp Proxy operates in transparent mode. In transparent mode, Burp Proxy intercepts and proxies traffic without the user’s knowledge.
You can choose these settings in here, while including the proxy setting in here :
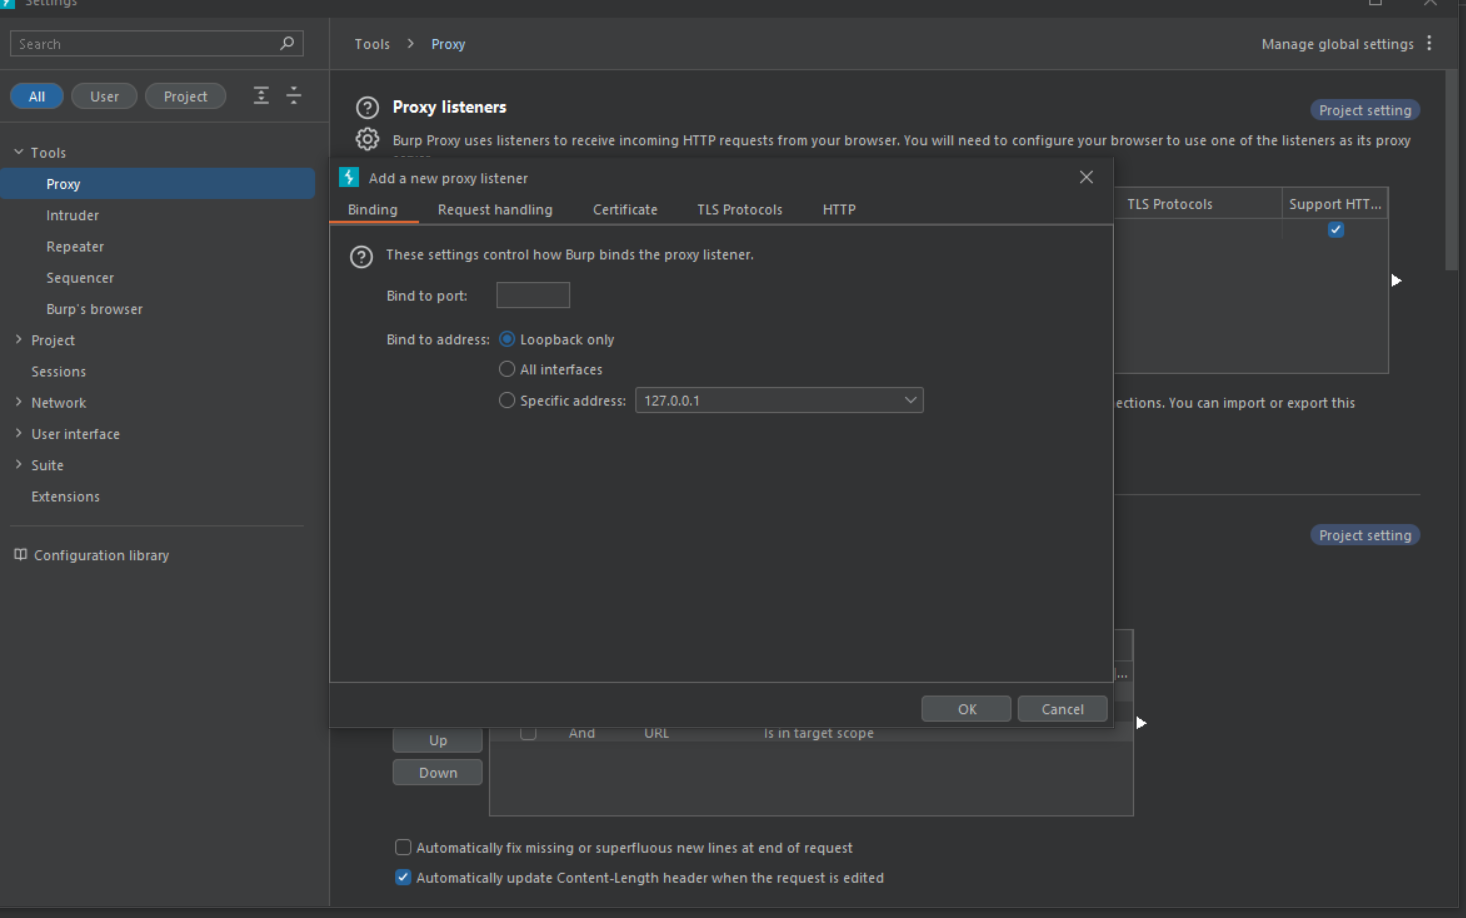
There are various complex settings which can be used to define the most approrpriate interception .
Below interception settings, there are also settings for the rules of interception of request response and websockets.
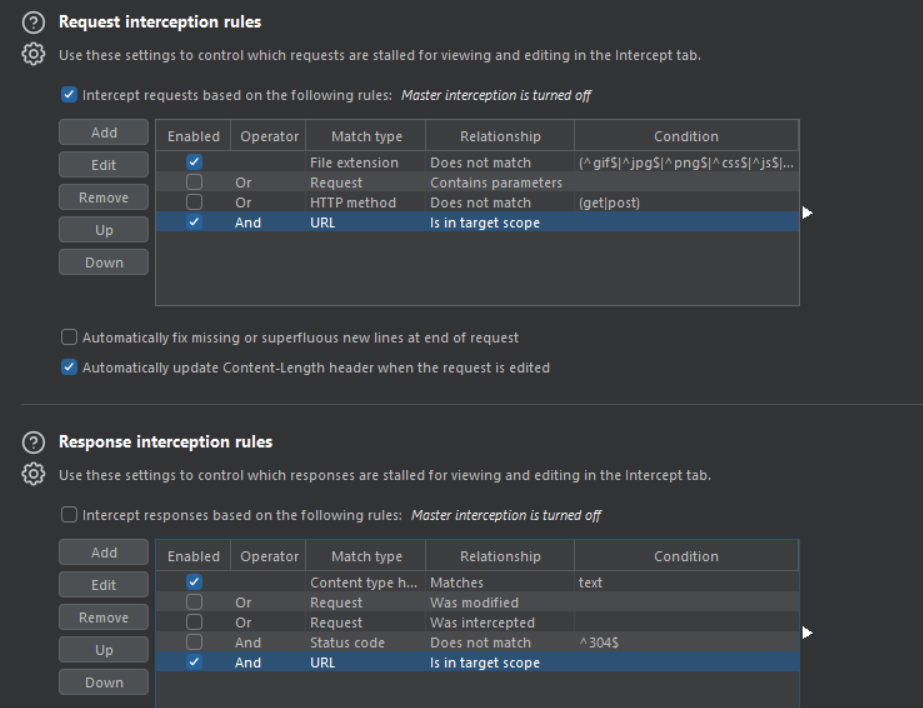
Request/Response interception rules in Burp Proxy allow you to specify which HTTP requests should be intercepted by Burp.
{Trick} By default, Burp intercepts all requests, whether they are in scope or not (more on scope later). If you don’t want to do this, or if you just want to intercept requests and responses that are in the target, you may do this
Simply check the box next to the setting indicated in the picture.
🐞Burp Target
You can specify the parameters of your penetration test using the Burp Target module. You can select which hosts and URLs are included and which ones are omitted from the scope.
To define the scope of your penetration test in the Target module, you can add individual hosts and URLs to the scope, or you can import a list of hosts and URLs from a file. You can also use wildcards to match multiple hosts and URLs.
Benefits of using Burp target module:
- You are able to concentrate your testing efforts on the precise goals that interest you.
- It aids in preventing you from unintentionally testing targets on which you do not have authorization.
- Sharing the scope of your penetration test with other team members is made simpler.
- You can store and reload the scope of your penetration test for use at a later time.
Setting a target scope
- Go to the target.

- Go to Scope settings , a new pop up window will appear
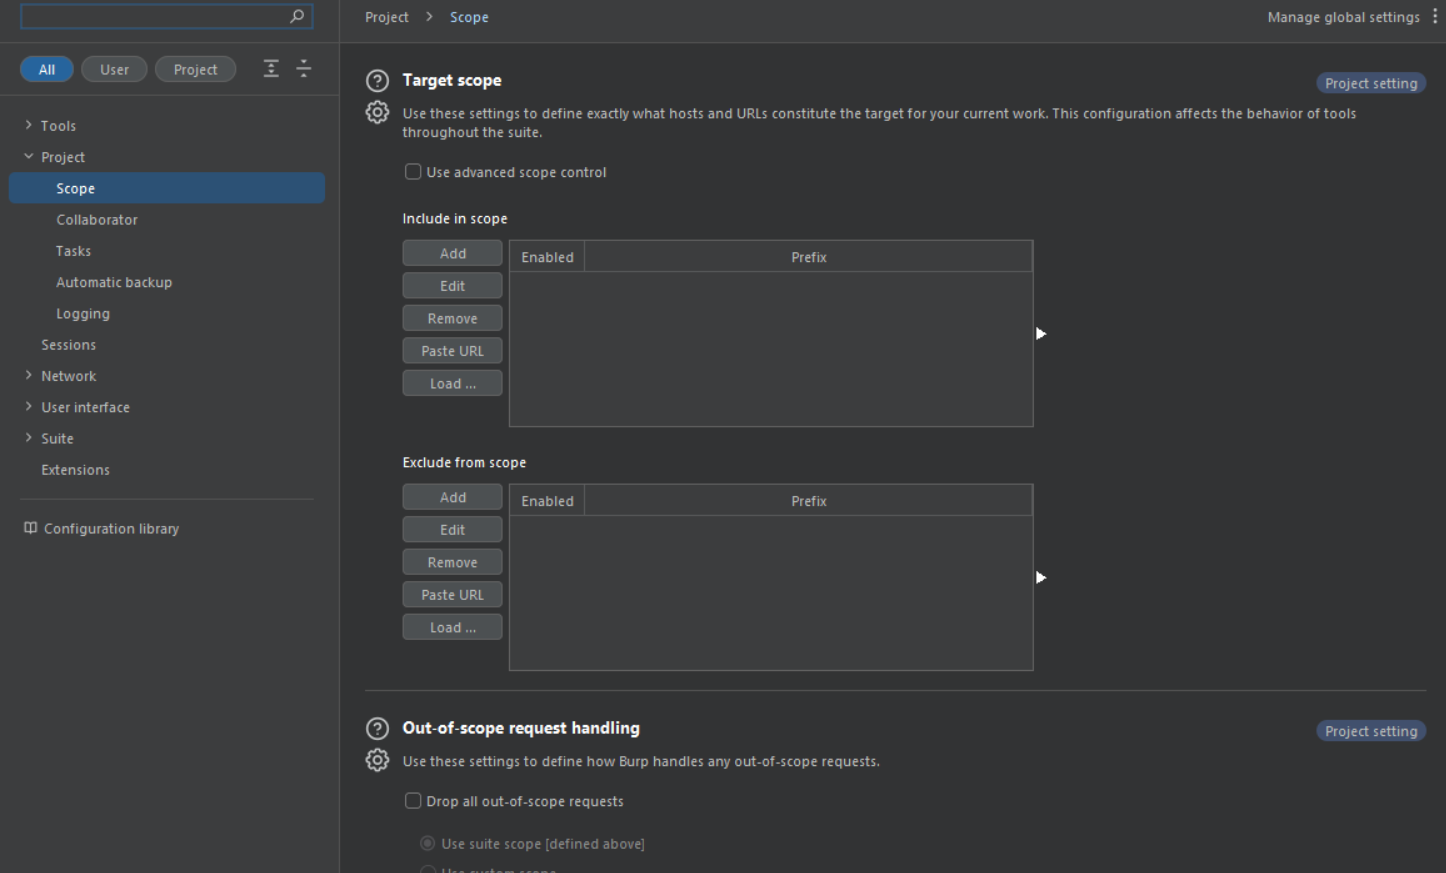
- Now here you have two options , either setting up include or exclude, in both the options you can set IP address ,hostnames or domain names of the host that are included in the scope of your penetration test.
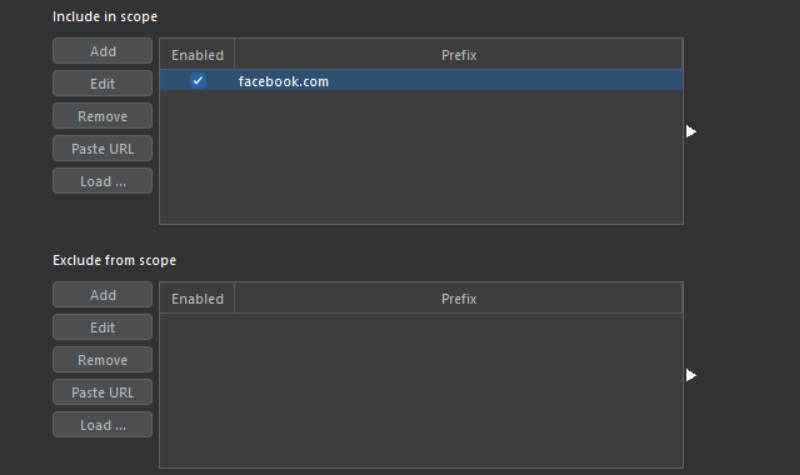
Just click on add and enter the url name up there.
Example : if you want to conduct a test for facebook.com, you would do something like this:
Additional : Dropping out all the out of scope requests
You can choose to drop all requests that are outside the parameters of your objective by selecting that option in the pop-up window at the bottom.

Setting advanced scope
To match multiple characters or strings in the Target module, use the * wildcard character
when setting wildcards in Burp. This can help you narrow the scope of your penetration test and prevent you from mistakenly ignoring targets that you actually want to test.
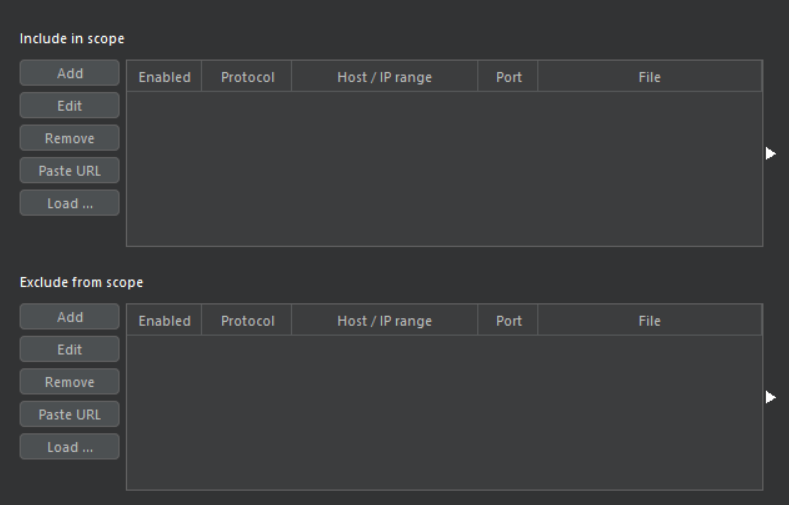
To use wildcards , you will have to turn on use advanced scope control in the section.

As you will tick the mark, the interface for including or excluding will change.
Benefits of advanced scope control
- Nested rules: URL matching rules can be nested to create more complex and specific scopes. For example, you could create a nested rule to match all URLs that start with the
/admin path and that contain the string /login.
- URL matching rules: URL matching rules are regular expressions that are used to match URLs to the scope of your test. This gives you more flexibility and power to control the scope of your penetration test.
- - Negation: URL matching rules can be negated to exclude URLs that match the pattern. For example, you could create a rule to exclude all URLs that contain the string
/api.
Examples how can you use advanced scope control to define some complex scopes
🔥 This is my personally favourite way to declare a scope for pentest.
-> Using advanced scope control is as simple as clicking add and entering information in the popup
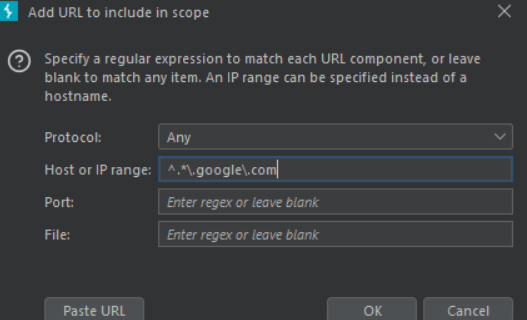
🎇This regex will take every subdomain of google in its subdomain.
Sitemap
Sitemap is one of the most important elements of the target module. The sitemap in the Burp Suite Target tab is a tree-like representation of all URLs discovered by Burp over the course of your penetration test. It includes URLs that Burp has queried as well as URLs discovered in responses from the target application.

In the illustrated example, because I have included Google in the scope, I can see the entire sitemap of Google, as well as all of its subdomains, and by clicking on a specific subdomain, we can quickly locate the requests linked with it.
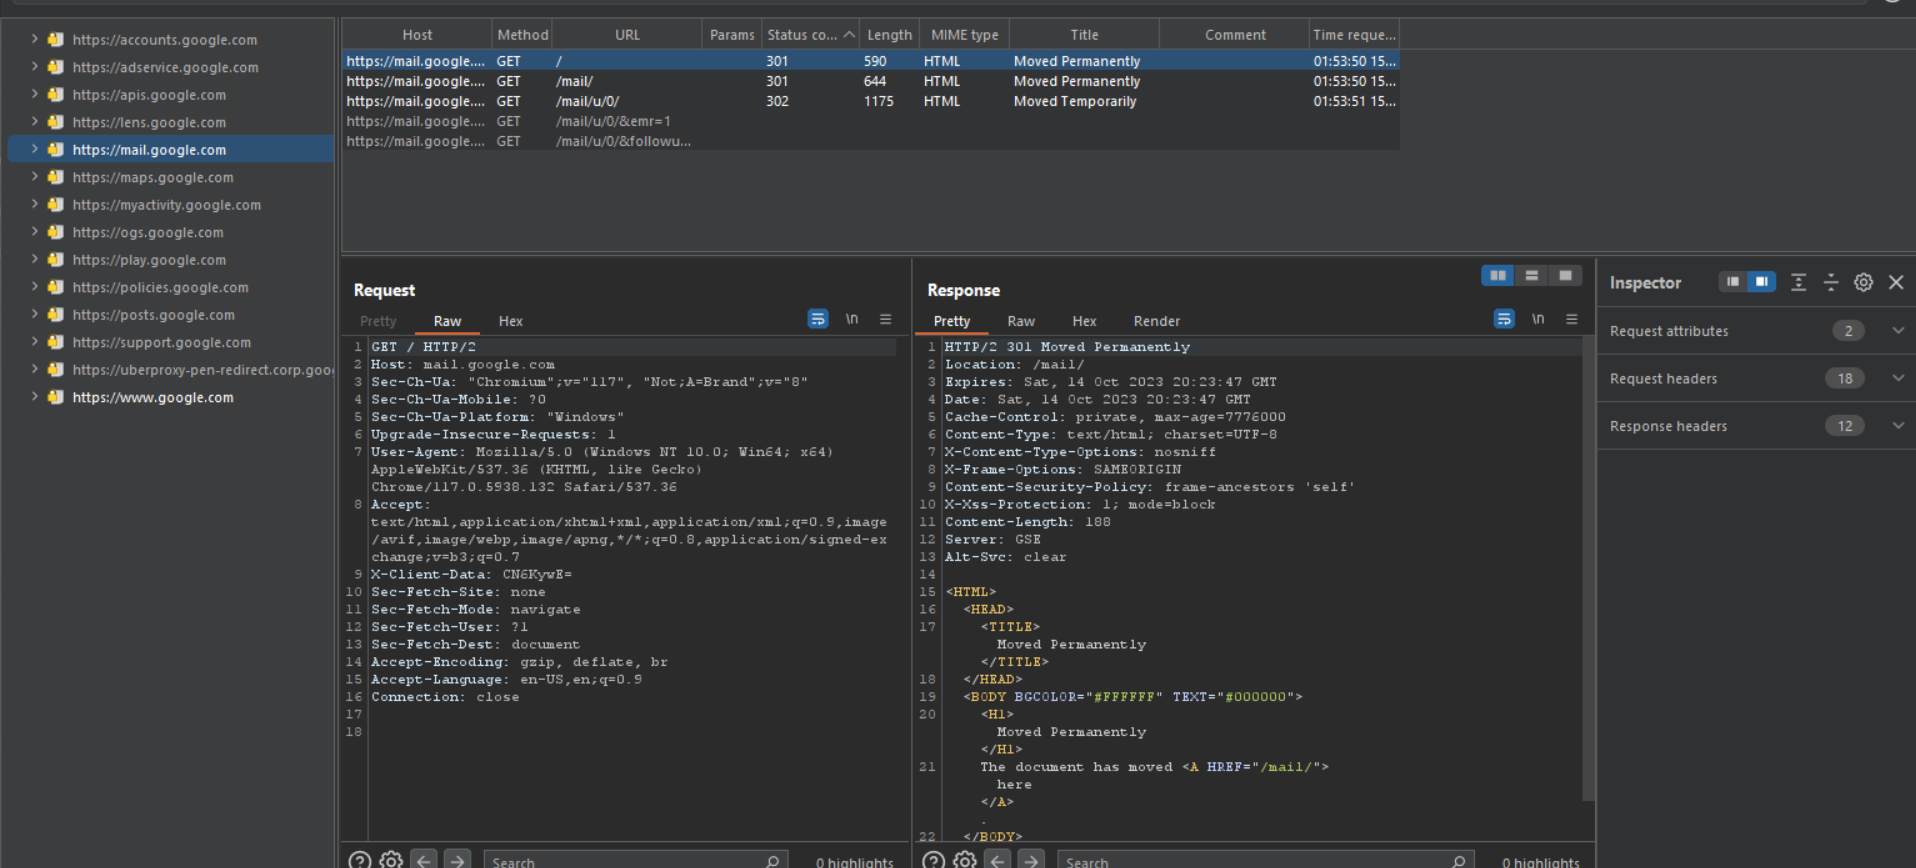
Take a look at its depth.
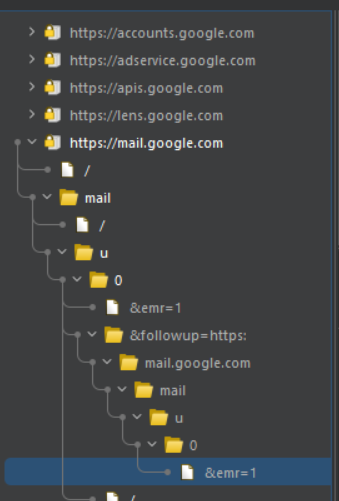
How sitemap helps in finding bugs
Comprehensive URL listing: The sitemap lists all of the URLs discovered by Burp during the scope of your penetration test, including URLs requested by Burp and URLs discovered in answers from the target application. This can assist you in identifying all prospective testing targets, even URLs that may be hidden or difficult to uncover.
The URLs are displayed in a hierarchical tree structure by the sitemap, with the root node being the target domain. This can assist you in comprehending the structure of the target application and identifying potential testing targets, such as login pages, admin pages, and other essential pages.
Contextual information: The sitemap offers contextual information about each URL, such as the status code, the latest changed date, and the size of the response. This information can assist you in identifying potential vulnerabilities, such as URLs that return a 404 status code or URLs that include significant volumes of data.
One of the most important features of Burpsuite sitemap is filtering
In the submenu under the scope settings you can see an filter tab, where there is a lot of options to filter the information.

Filtering options are as follows :
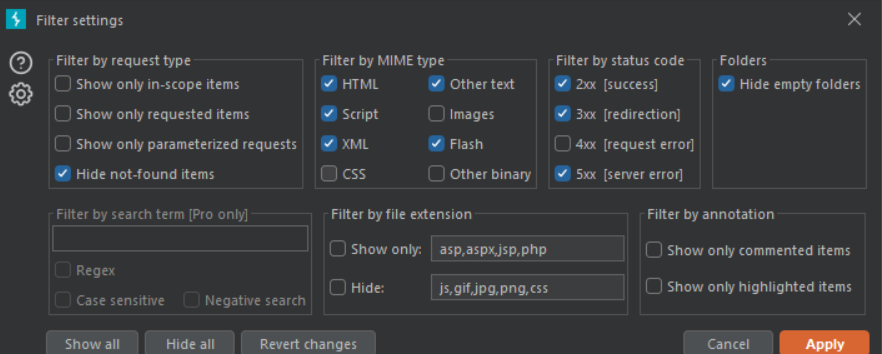
Using this filter popup menu, you can select and filter queries across the whole sitemap based on your requirements.
🟠 As Burp Pro finds faults and vulnerabilities on his own, those discovered vulnerabilities are displayed in the sitemap.
Issue definitions
In the Target tab of the Burp Suite Community edition, issue definitions are a list of all the vulnerabilities that Burp Scanner can discover. They provide information about each vulnerability, including a description, remediation steps, and references to relevant documentation.
Here is a small selection of the vulnerabilities it can discover; you can read more about them in the tab itself.

🐋Conclusion
Our investigation of the basic components of the Burp Suite, Burp Proxy and Target Scoping, has provided you with necessary abilities for web application security testing. We investigated Burp Proxy and its submodules, including Intercept, Proxy Setting, HTTP History, and WebSocket History, which allow you to manage data flow between your browser and the target application.
We also went over the Burp Target module, covering sub-tabs like Target, Site Map, and Issue Definition, allowing for more exact testing emphasis.
Stay tuned for our upcoming blog, where we’ll go through Burp Intruder and Burp Repeater in depth, unlocking additional powerful tools to add to your online security testing toolset. On the way ahead, exciting discoveries and continual learning await. 🛡️💻🌐📚