
♥ Introduction
Welcome back to the second installment of our blog series, “Linux for Hackers.”
And thanks to all for the immersive support on the previous one! In our previous blog post, we dived into the fascinating world of Linux and explored various concepts like the basic Linux directory Structure, File ownership, user accounts, and many more interesting concepts. Just like the other blog In this blog, we will go dive into topics like Linux processes and its management and In this blog we will also learn the storage/ partition management in Linux.
🐧Linux Processes
A process is a program that has been loaded from a storage device into system RAM and is currently being processed by the CPU on the motherboard.
⚡ Type of Linux Programs
Many different types of programs can be executed to execute a process.
- Binary Executables: Compiled programs that were originally written in c, c++, or Java.
- Internal Shell commands: Commands that are rolled into a shell program itself, like the Bash Shell. ex
ls, cp.
- Shell scripts: Described below
📌 User process and System processes
⚡ User processes
The processes created or run by the end user like running a command on the shell or running some application through a Graphical user interface are called user processes.
Viewing Processes
We use the ps command to view the processes running on the system!
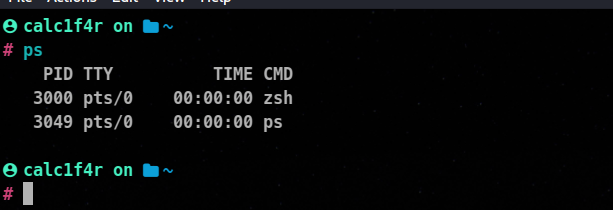
The ps command gave us PID (process ids), the terminal they are running within, the duration of that command, and the command itself.
🦀💡 User processes are called from within a shell and are associated with that shell session.
⚡ System process
Not all the processes running on the system are run by the user or are user processes most processes executing on a given Linux system are of different types and are known as system process or daemons.
System processes are necessary for an os to perform necessary tasks like running a web server, a Samba server, or an FTP server. These processes just run in the background and mostly don’t provide any user interface. When you boot your os, several system services start running automatically and are necessary for a system to boot.
📌 How Linux processes are loaded?
All Linux processes are started by one process called - either the legacy SysVinit or the newer systemd depending on your machine. This single process starts on the boot time itself.
In Linux, any process can launch additional processes. The process that started the new process is called the parent process. The new process is itself called the child process.
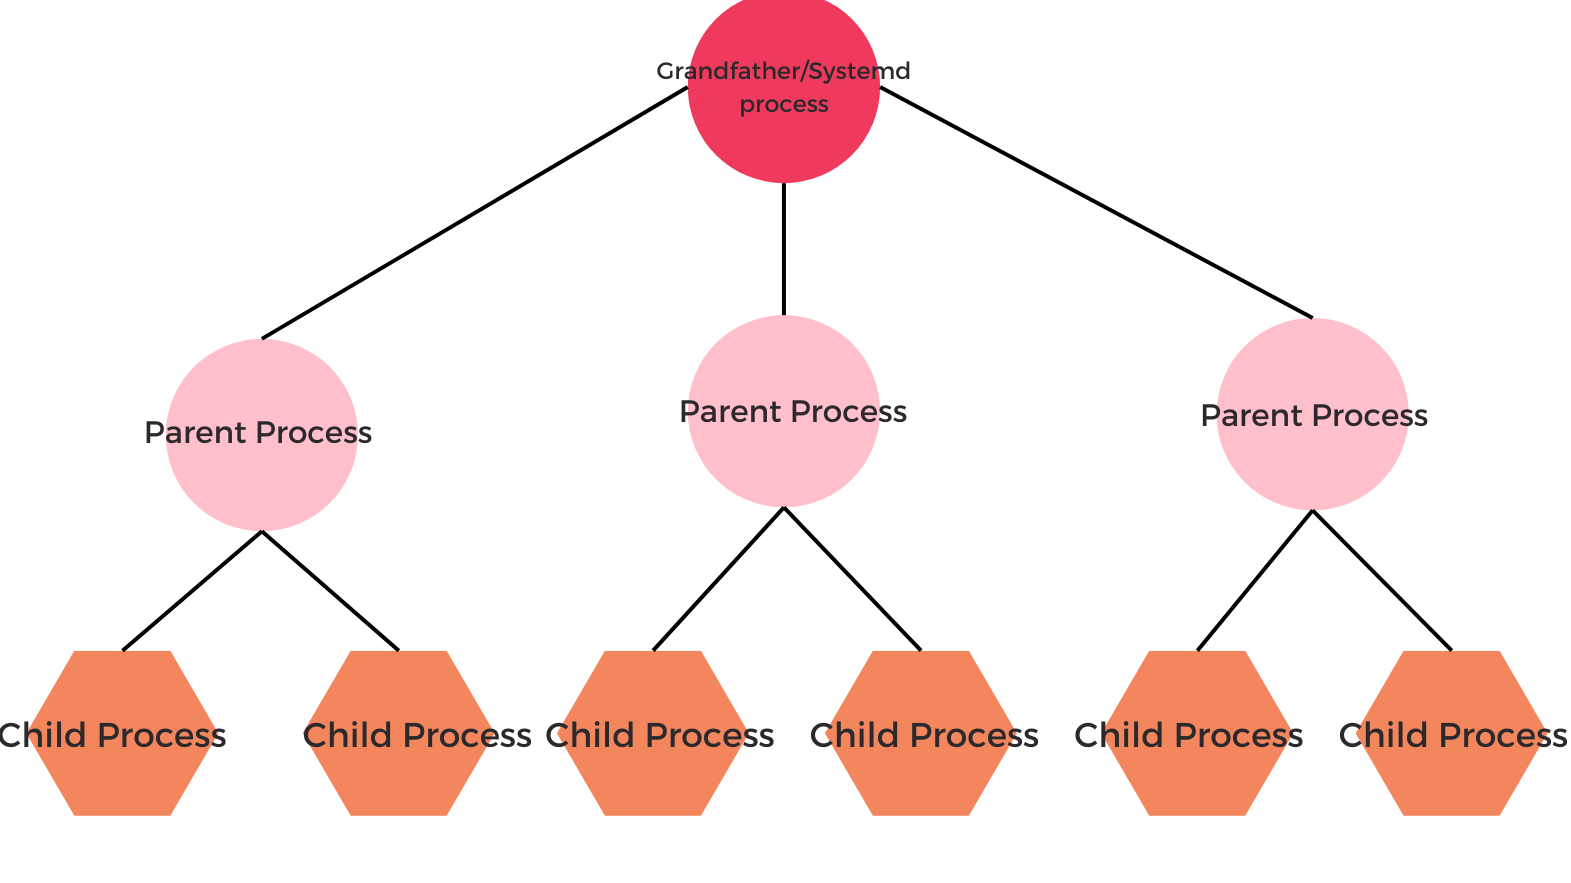
The kernel loads the systemd process automatically during bootup. The systemd process then launches child processes, such as the login shell and the other process.
The PID number assigned to the systemd process is 1. The new process is permanently assigned the next highest PID number.
In short the systemd is responsible for launching all system processes that are configured to automatically start on bootup. And all of this works like a tree family.
📌Managing process
⚡ Starting process
There are two basic ways to start a process on a Linux system.
For a user process, simply enter the command or script name at the shell prompt.
ex :
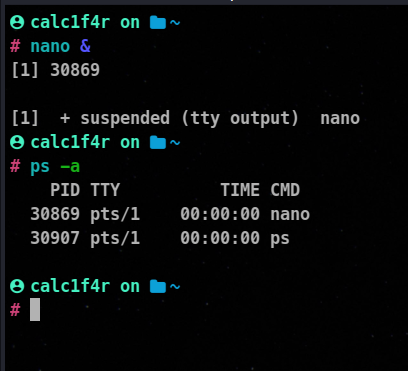
🦀& at the end of nano asks the cli to run the program in the background, you can foreground it using fg command.
For starting a daemon service, we use either init script or service file depending on our OS. These scripts are stored in mostly distributions on /etc/init.d location.
Using init
Whenever a service is installed on a system, a corresponding init script is automatically installed into the directory. The admin can start the service using the syntax
/etc/init.d/<script_name> start
Example

Using systemd
If your operating system uses systemd , then the system services are managed using service files, which have a .service extension. Therefore We can use systemctl command at the cli to start the service.
⚡ Stopping a service
Init.d
/etc/init.d/<script> stop
Using systemd
systemctl stop service_name
⚡ Restarting the service
init.d
/etc/init.d/<script> restart
Using systemd
systemctl restart service_name
⚡ Viewing the running process
Linux provides us with various ways to view the running processes.
Using Top and Htop
Top and htop are my favorite tools as they update the process status every three seconds and rank the process by CPU utilization.
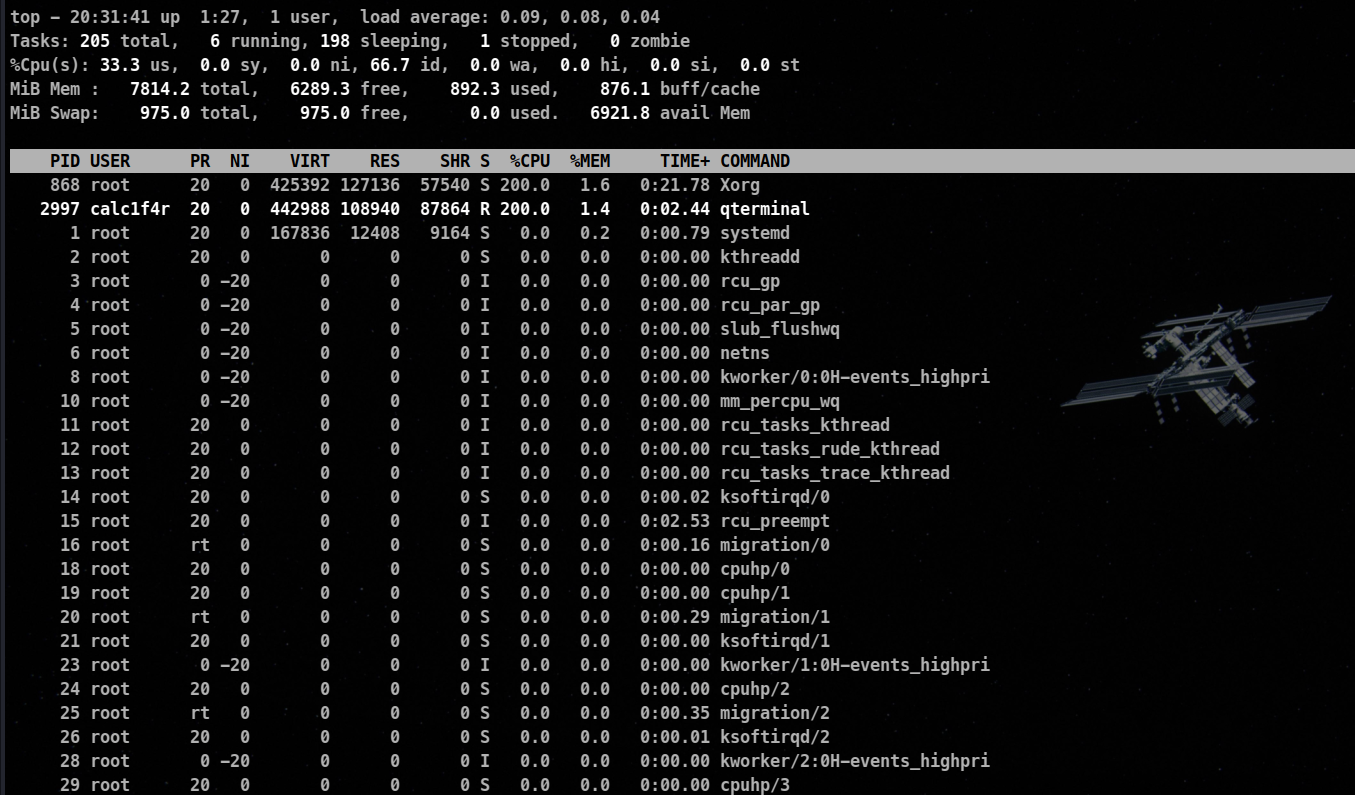
Fields are given by top command.
- PID : The process id of the process
- USER : The name of the user who owns the process
- PR : The priority assigned to the user
- NI : The
nice value of the process
- VIRT : The amount of virtual memory used by the process
- RES : The amount of physical Ram, the process is using ( in KB)
- SHR : The amount of shared memory
- S : Status (Values 👇 )
- D : Uninterruptible sleep
- R : Running
- S : Sleeping
- T : Stopped
- Z : Zombie
🦀Zombie : A process that has been completed but its parents have died thus it being unable to exit. The zombie process eventually clears up as the system becomes its parent process and shuts it down but sometimes it stays there and is killed on the next boot.
- %CPU : The percentage of CPU used by the process
- %MEM : The percentage of available memory (Ram)
- TIME+ : The total amount of CPU time, the process has consumed
- COMMAND : The name of the command that was entered to start the process
Sorting top or htop Results
By pressing these keys you can sort the data according to these parameters.
M: Memory Utilization - N: By PID
- P: BY CPU Utilization
⚡ Using ps to extract more data
Running ps command with aux switches gives far more output about the process.
ps aux
🦀a : all with tty, including other users
🦀u : user-oriented format
🦀x : extra full
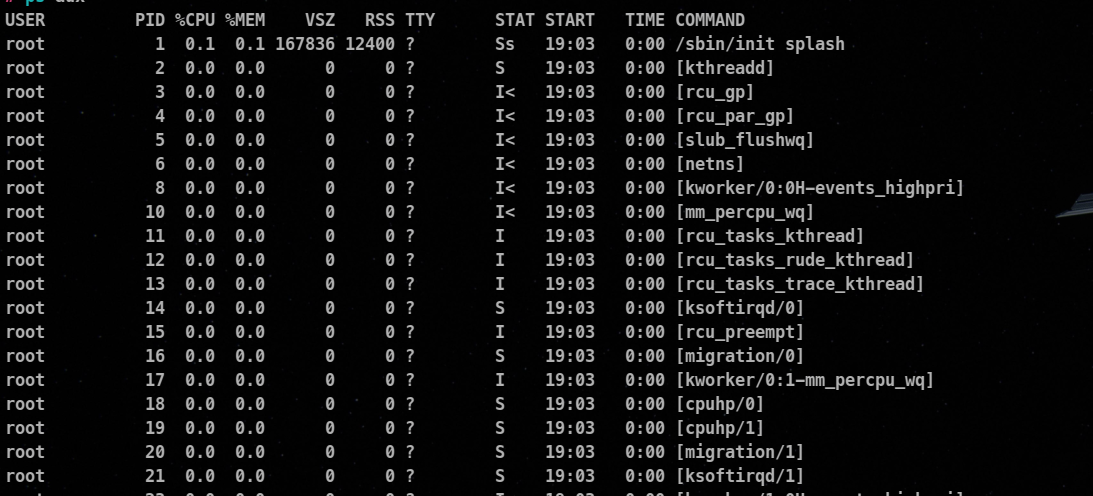
This gives us more data about
USER: The one who started the process
PID : The process id
%CPU: The percent of CPU this process is using
%MEM: The percent of memory this process is using
Command: The name of the command that started the process
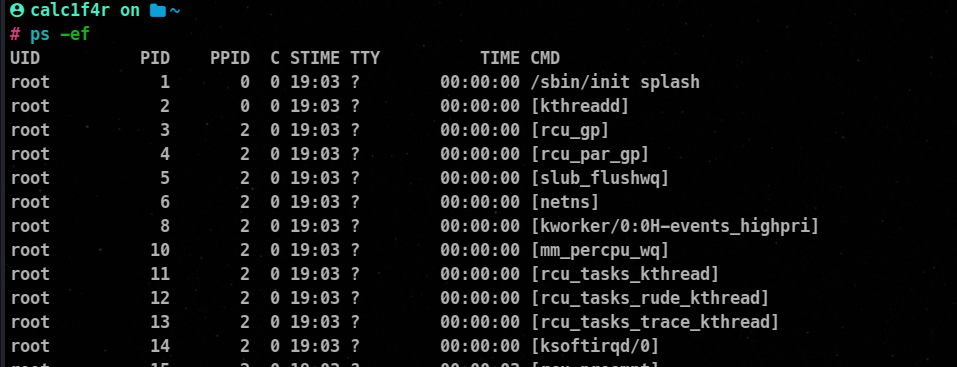
To see all the processes we use the -e switch and to get full detail we can add the -f switch as well.
⚡ Using pgrep and pidof
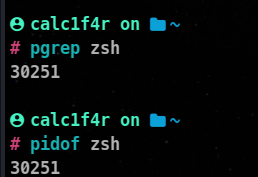
While using ps or top. the data they throw in is very horrifying. To find some service it can be a problem. pgrep and pidof solves that problem.
From running a set of processes, these tools get up the PIDS of the specified service.
Additional Switches
-l: Lists the process name and process ID-u <user_name>: Matches on the specified process owner
📌 Prioritizing Processes
By default, Linux tried to give an equal amount of time to all the processes on the system, however, sometimes you may want to prioritize a process.
⚡ Setting prioritize withnice
The nice utility can be used to launch a process with a set priority level.
From the previous discussion, we know of two parameters PR and NI. PR value is the process’s kernel priority. The lower the number, the higher the priority of the process. The NI value is the value of the process. Same here the lower the number, the higher the priority.
🦀The nice value of a process ranges from -19 to 20.
nice -n <nice_level> <command>
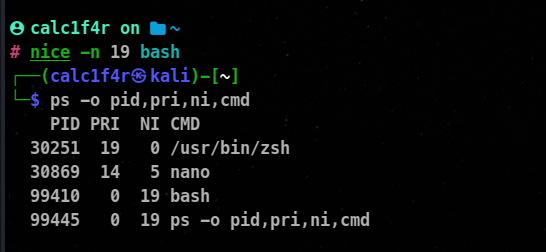
🦀ps -o allows us to list specific columns.
⚡ Rechanging Priorities with renice
To change the priority of the already running process, we can use renice utility.
Syntax :
renice <priority_level> pid_number

🦀⭕ You need root privileges to reassign a nice value.
📌 Managing Foreground and Background Processes
⚡ Running process in the background
To run a program in the background of the shell, simply append an ampersand(&) at the end of the command in the shell.
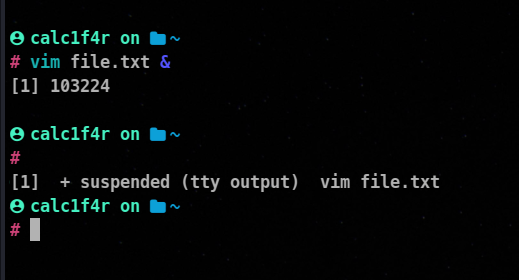
We are returned with two things one is [number] which is jobs id denotes the number of jobs running. The other thing we are returned is the PID number.
🦀You can use jobs command to see the background processes.
🦀
⚡ Switching Processes Between Background and Foreground
fg: This command is used to foreground a process that was running in the background
fg PID
bg: This command is used to background a process that was running in the foreground.
bg PID
📌 Killing a process
Actually, we can just kill a process just by hitting ctrl + c in the shell, but if the process is in the background or the command was not running through the shell. Then killing a process becomes harassing.
⚡ Using kill command
The kill command is used to terminate a process using the process ID or job ID. The syntax
kill -kill-signal PID
There are 64 kill signals an end user can send to process. Some of the famous ones are on the table.
| Signal name | Number | Description |
|---|
| SIGHUP | 1 | This is known as the Hang-up (HUP) signal, It stops the process and restarts it with the same PID. |
| SIGINT | 2 | This is the Interrupt (INT) signal. It is a weak kill signal that isn’t guaranteed to work |
| SIGQUIT | 3 | Known as the core dump. It terminates the process and saves the process info in memory and then it saves this info in the current working directory to a file named core. |
| SIGTERM | 15 | This is the termination (TERM) signal, It is the kill command’s default kill signal. |
| SIGKILL | 9 | Absolute kill signal, It forces the process to stop by sending the process’s resources to a special device, /dev/null. |
If you don’t know a process’s PID, you can use the killall command to kill the process This command takes the name of the process, instead of the PID, as an argument. For example, you could terminate a hypothetical zombie process like this:
kali > killall -9 zombieprocess
📌 Scheduling Processes
There are many occasions when a process needs to run automatically without your intervention. Backups are a good example. One key problem with backups is that people forget to do them! One of the worst things you can do in the backup is to rely on yourself to remember to run them.
You can configure Linux systems to run programs automatically. We will go through two ways to do this.
⚡ 1. Using at daemon
at utility provides a great way to schedule the process. The at service uses the atd system daemon, which runs in the background and monitors the time and when to run at jobs.
Installing
sudo apt install at
Enabling at service
systemctl enable atd.service
💡 Enable: With using enable you to specify the kernel to start this service on every boot.
The at daemon is very flexible as to how to specify the time value for the command.
Reference table to specify a time to at daemon
| Type of Reference | Synatx | Description |
|---|
| Fixed | HH:MM | Specifying exact hour |
| noon | specifies the command to run at 12:00P.M |
| midnight | specifies the command to run at 12:00 AM |
| teatime | 4:00 P.M |
| MMDDYY or MM/DD/YY or MM.DD.YY | Exact date |
| HH:MM MMDDYY | date with exact time |
| Relative | now | Immediately |
| now + value | Command to run at a certain time in the future |
| today | Specifies the command to run today |
| Tomorrow | Command to tomorrow |
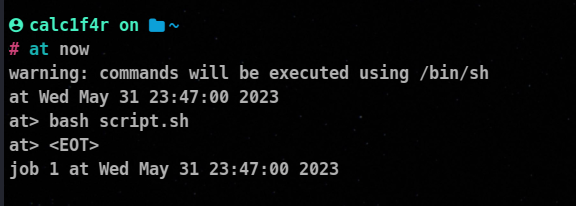
When you have entered your command press Ctrl+D, this will make out of the at> prompt, the job will be scheduled and a job number will be assigned!
You can use atq command to view the pending jobs.
atq
Disadvantage
Using at utility, you can only schedule tasks once!
⚡ 2. Using the crontab
The cron daemon can handle repetitive tasks. This helps you a lot in automation.
How cron works
The crond daemon is a service that runs continuously in the background and checks a special file called crontab once every few minutes, to see if there is a scheduled job it should run.
Enabling Cron
systemctl enable crond.service
Using cron to Manage Scheduled System Jobs
Syntax
* * * * command/script
From the left:
- The first * corresponds to Minutes (0-59)
- The second * corresponds to Hours (0-23)
- The third * corresponds to the Day of the month (1-31)
- The fourth * corresponds to the Month of the year (1-12)
- The fifth * corresponds to the Day of the week (0-6, Sunday to Saturday)
To specify multiple values in a field, use the following operator symbols:
- The asterisk (*) operator specifies all possible values for a field. e.g. every hour or every day.
- The comma (,) operator specifies a list of values, for example: “1,3,4,7,8”.
- The dash (-) operator specifies a range of values, for example: “1-6”, which is equivalent to “1,2,3,4,5,6”.
- The slash (/) operator, can be used to skip a given number of values. For example, “/3” in the hour time field is equivalent to “0,3,6,9,12,15,18,21”; “” specifies ‘every hour’ but the “/3” means that only the first, fourth, seventh…and such values given by “*” are used.
Editing the crontab file:
Crontab is a file that contains the scheduled jobs in a specific syntax. There are two types of crontab files; one for system-specific cron jobs and the other for user-specific cron jobs.
System cron jobs:
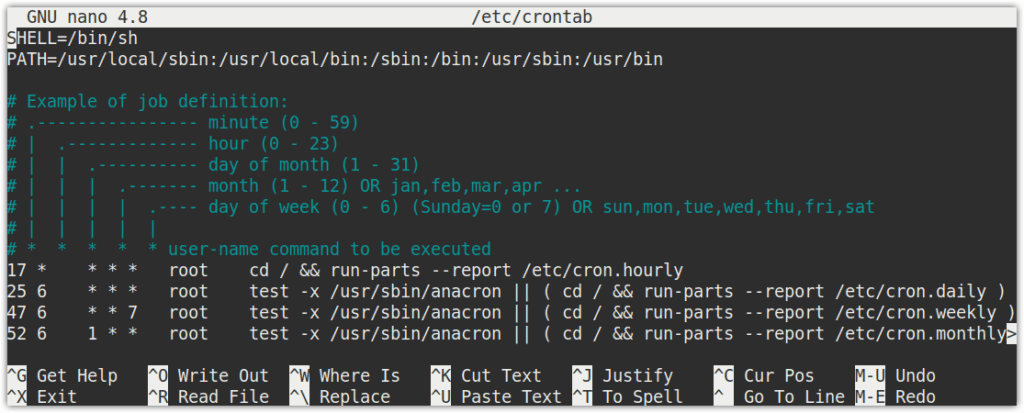
The system-wide cron jobs are located in the /etc/crontab file and /etc/cron.d directory, and they are run through /etc/cron.hourly , /etc/cron.daily , /etc/cron.weekly and /etc/cron.monthly. Only a system administrator can access these files.
A system administrator can define a cron job using the following command:
Here is the syntax of the job in the /etc/crontab file:
🦀🐱 # min hr dayofmonth month dayofweek username command * user1 ifconfig
⚡ User-Specific Cron Jobs :
The user-specific cron jobs are located in the /var/spool/cron/crontabs directory. Although you can edit these jobs manually, it is recommended to edit these jobs using the crontab -e command.
A standard user can define a cron job using the following command :
$ crontab -e
For instance, if you are logged in as a “test” user, running the crontab -e command will edit the crontab file for the “test” user. Similarly, if you are logged in as a root user, the crontab -e command will edit the crontab file for the root user
If you want to edit cron for any other user, you can also specify that
$ sudo crontab -u <username> -e
⚡ Crontab Commands
The crontab command is used to edit, list, and remove the cron jobs:
- crontab -e To edit the current user’s crontab file
- crontab -l To display the contents of the crontab file
- crontab -u [username] To edit any other user’s crontab file
- crontab -r To remove the crontab file of the current user’s
- crontab -i To display a prompt before removing the current user’s crontab file
⚡ Scheduling a Job with cron :
With Cron, you can run a job at a specific time, date, and intervals with a minimum unit in minutes, i.e., you can run a job every minute.
With Cron, you can run a job at a specific time, date, and intervals with a minimum unit in minutes, i.e., you can run a job every minute.
The following line in the crontab file will schedule the cron job to run the command/script at every 30th minutes past 5 hours on every day of the week from Monday through Saturday.
/30 5 * * 1-6 command/script
Minutes
In this field, we specify the minutes when we want the command to be executed. It is specified from 0 to 59. The * in this field means to run the job every minute. In the above crontab line, the */30 tells the cron job to run the specified command/script every 30 minutes.
Hours
In this field, we specify the hours when we want the command to be executed. It is specified from 0 to 23. The * in this field means to run the job every hour. In the above crontab line, the value 5 tells the cron job to run the specified command/script every five hours.
Day of the month
In this field, we specify the particular days or months when we want the command to be executed. It is specified from 1 to 31. The * in this field means every day. In the above crontab line, the * tells the cron job to run the specified command/script every day.
Month of the year
In this field, we specify the particular months when we want the command to be executed. It is specified from 1 to 12. The * in this field means every month. In the above crontab line, the * tells the cron job to run the specified command/script every month.
Day of the week
In this field, we specify the particular days of the week when we want the command to be executed. It is specified from 0 to 6 from Sunday to Saturday (0 for Sunday and 6 for Saturday). The * in this field means every day in a week. In the above crontab line, the * tells the cron job to run the specified command/script every day for a week
⚡ Example of Cron jobs:
Run a cron job every 15 minutes
To schedule a cron job to run every 15 minutes, add the below line in the crontab file:
Run a cron job at 5 am every day
To schedule a cron job to run at 5 am every day, add the below line in the crontab file:
0 5 * command/script
Run a cron job at 5 pm every day
To schedule a cron job to run at 5 pm every day, add the below line in the crontab file:
0 17 * command/script
Run a cron job at 9 am on the first day of every month
To schedule a cron job to run at 9 am on the first day of every month, add the below line in the crontab file:
0 9 1 command/script
Run a cron job every hour on every 15th of March
To schedule a cron job every hour on every 15th of March, add the below line in the crontab file:
0 15 3 command/script
Run a cron job every 5 hours
To schedule a cron job every 5 hours, add the below line in the crontab file:
0 /5 command/script
Run a cron job every 15 minutes
To schedule a cron job to run every 15 minutes, add the below line in the crontab file:
⚡ Using Strings
The following strings can also be used to define a job:
- @hourly: To execute a job once every hour, i.e., “**0 * * * ***“
- @midnight: To execute a job once every day, i.e., “**0 0 * * ***“
- @daily: same as midnight
- @weekly: To execute a job once every week, i.e., “0 0 * * 0“
- @monthly: To execute a job once every month, i.e., “**0 0 1 * ***“
- @annually: To execute a job once every year, i.e., “**0 0 1 1 ***“
- @yearly: same as @annually
- @reboot: To execute a job once at every startup
For instance, to run a script or command every week, the entry in the crontab file would be:
@weekly command/script
🐧 Linux File System :
In the previous blog we had gone through just the overview of the Linux file system. To understand various partitions, disk management, and volume management we will go more in detail in this blog.
A Linux file system refers to the method and structure used by the Linux operating system to organize and store data on storage devices such as hard drives, solid-state drives (SSDs), or network storage. It defines how files, directories, and metadata are stored and accessed.
📌 Types of Linux File system
Linux offers various filesystem supports such as Ext, Ext2, Ext3, Ext4, JFS, ReiserFS, XFS, btrfs, and swap.
⚡ 1. Ext File system
The file system Ext stands for Extended File System. The ext file system is an older version and is no longer used due to some limitations. It was initially developed as the first file system for the Linux kernel by Rémy Card in 1992 and has undergone several revisions since then.
There are several versions of the Ext file system, and each of them has its own features and improvement.
EXT2 ( Second Extended File system): Ext2 was the default file system for many Linux distributions until the introduction of Ext3 and Ext4. It offers robust performance, reliability, and compatibility. However, it lacks some modern features like journaling, which can lead to longer file system checks after unexpected system shutdowns.
Ext3 (Third Extended File System): Ext3 was developed as an extension of Ext2 to provide journaling functionality. Journaling helps in recovering file systems more quickly after crashes or power failures. Ext3 is backward compatible with Ext2, allowing seamless upgrades.
Ext4 (Fourth Extended File System): Ext4 is the latest and most advanced version of the Ext file system family. It improves upon Ext3 with better performance, scalability, and additional features.
⚡ 2. XFS File System
XFS (XFS File System) is a high-performance, scalable file system developed by Silicon Graphics International (SGI) in the mid-1990s. It was designed to address the requirements of enterprise-level systems and is commonly used in Linux and Unix-like operating systems.
Features:
- Scalability and Performance
- Extensive File System Features: XFS offers a wide range of features, including support for extended attributes, access control lists (ACLs), quotas, and snapshots.
- Online Defragmentation: XFS supports online defragmentation, allowing you to optimize file placement on the disk without unmounting the file system.
- Delayed Allocation: XFS utilizes a technique called delayed allocation, which improves write performance by postponing the allocation of disk blocks until data is actually written.
- Online Resize and Management: XFS supports online resizing, allowing file systems to be expanded or shrunk while they are mounted and in use.
- Wide Adoption: XFS has gained popularity and widespread adoption, especially in enterprise environments, due to its scalability, performance, and robustness. It is the default file system for many Linux distributions.
3. Swap File system
A swap file system, also known as a swap space or swap partition, is a dedicated area on a computer’s storage device that acts as virtual memory. It is used to supplement the physical RAM (Random Access Memory) by temporarily storing data that is not actively being used. When the physical RAM becomes full, the operating system can transfer less frequently used data from RAM to the swap space to free up memory for more active processes.
Key Points:
- Memory Extension: The primary purpose of a swap file system is to extend the available memory on a computer. It provides a way to temporarily store data that would otherwise need to reside in RAM, allowing the system to handle larger workloads or run more programs simultaneously.
- Paging: The process of moving data between RAM and the swap space is known as paging. When the operating system needs to allocate memory for a new process or when the physical RAM is nearly full, it may transfer inactive or less frequently accessed data from RAM to the swap space. This frees up memory for more critical processes and helps prevent system slowdowns or crashes due to insufficient memory.
- Swap Space Location: Swap space can be implemented in different ways. It can be created as a dedicated partition on the hard drive or stored within a swap file on an existing file system. The choice between a dedicated partition or a swap file depends on the system’s configuration and requirements. Swap files offer more flexibility and can be resized or added later without repartitioning the disk.
- Hibernate and Resume: Swap space is also used for hibernation or suspend-to-disk functionality. When a computer is put into hibernation, the contents of the RAM are saved to the swap space. The system can then be powered off, and upon resuming, the saved state is restored from the swap space back into RAM.
- Swap Space Size: Determining the appropriate size of the swap space depends on factors such as the system’s RAM size, the workload, and the intended use. In the past, it was often recommended to set the swap space size equal to or larger than the RAM size. However, modern systems with ample RAM may require smaller swap spaces or even no swap space at all.
4. ZFS (Zettabyte File System)
ZFS is an advanced file system developed by Sun Microsystems (now owned by Oracle) and primarily used in Solaris, FreeBSD, and other Unix-like operating systems. Although it is not natively included in the Linux kernel, there are third-party implementations that enable ZFS support on Linux.
Features:
- Data Integrity : ZFS is designed with a strong focus on data integrity and protection against silent data corruption. It achieves this through the use of checksums, which are computed for each block of data and stored along with the data.
- Pool-based Architecture: ZFS uses a pool-based architecture that allows administrators to combine multiple physical storage devices (such as hard drives or SSDs) into a single storage pool.
- Scalability and Performance: ZFS is designed to handle large amounts of data and scale efficiently.
- Self-Healing and Scrubbing: ZFS continuously monitors data integrity and can automatically repair corrupt or damaged data if redundant copies or checksums are available.
🐧Managing Storage
📌 What is Storage?
In Linux, storage refers to the management and utilization of storage devices, such as hard drives, solid-state drives (SSDs), and other storage media. Linux provides a flexible and powerful set of tools and technologies for managing storage and accessing data efficiently.
Storage Consists of various partitions which are partitioned according to different partition schemes.
📌 What is partition?
A partition is a logical division of a physical storage device, such as a hard drive or SSD, into separate sections. Each partition acts as an independent unit with its own file system and directory structure. Partitioning allows for better organization, improved performance, and increased flexibility in managing data on a storage device.
There are different types of partitions commonly used :
System Partition: A system partition, also known as a boot partition, contains the essential files required for the system to boot. It typically includes the bootloader and other system-specific files. In Windows systems, the system partition is often labeled as the “System Reserved” partition. A primary partition is a basic type of partition that can be used to install an operating system and store data. In most partitioning schemes, a disk can have up to four primary partitions. Each primary partition is identified by a unique identifier and can be formatted with a file system such as NTFS, Ext4, or FAT32.
Extended Partition: An extended partition is a special type of partition that can be created when the maximum number of primary partitions has been reached. It acts as a container for logical partitions. The extended partition does not directly hold data but allows for the creation of multiple logical partitions within it.
Logical Partition: Logical partitions reside within an extended partition and are used to store data. They are created when the maximum number of primary partitions is reached, and additional partitions are required. Logical partitions are formatted with file systems and can be assigned drive letters or mount points to access data.
System Partition: A system partition, also known as a boot partition, contains the essential files required for the system to boot. It typically includes the bootloader and other system-specific files. In Windows systems, the system partition is often labeled as the “System Reserved” partition.
⚡ What is a Partition Scheme :
A partition scheme, also known as a partitioning scheme or disk partitioning scheme, refers to the overall layout and organization of partitions on a storage device, such as a hard drive or SSD. It determines how the available storage space is divided and allocated for different purposes, such as installing an operating system, storing user data, or creating separate partitions for specific functions.
The two of Famous Partition schemes are :
⚡ MBR (Master Boot Record)
- MBR is the traditional partitioning scheme widely used in older systems.
- It uses a 512-byte boot sector at the beginning of the disk to store the partition table.
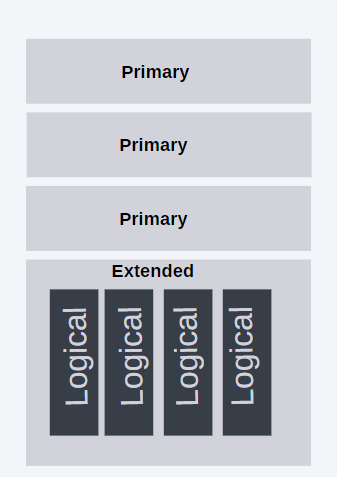
- MBR supports up to four primary partitions, or three primary partitions and one extended partition.
- The extended partition can be further divided into logical partitions.
- MBR has a maximum disk size limitation of 2 terabytes (TB).
- It uses 32-bit disk addresses, limiting the number of partitions that can be created.
- MBR does not support more modern features such as a secure boot or larger disk sizes.
- The MBR’s partition table was designed to contain four 16-bit partition table entries. The four-partition limitation was overcome by using an extended partition.
⚡ GPT (GUID Partition Table)
- GPT is a newer partitioning scheme introduced as part of the UEFI (Unified Extensible Firmware Interface) specification.
- It uses a globally unique identifier (GUID) partition table to store partition information.
- GPT supports a maximum of 128 primary partitions.
- It does not require the concept of extended or logical partitions, simplifying partition management.
- GPT has a much larger disk size limit of 9.4 zettabytes (ZB).
- It uses 64-bit disk addresses, allowing for a virtually unlimited number of partitions.
- GPT supports features such as secure boot, better data integrity, and redundancy through multiple copies of the partition table.
⚡ Name conventions for devices in Linux
Format : aabc
aa : denotes device type. Ex: sd (SCSI/SATA) , hd (IDE hard drives)
b : denotes logical unit number, it is a unique identifier for a device within a group of devices. The first logical unit number is a and then b and it goes on like that.
Example: sda , sdb
c: Denotes the partition number. A device can have some partitions so it denotes the number of partitions.
📌Viewing Disk Partitions
We can use various Linux utils to view the current partitioning of the system.
⚡ Using fdisk
we can use fdisk -l to view the current partitioning of the system.
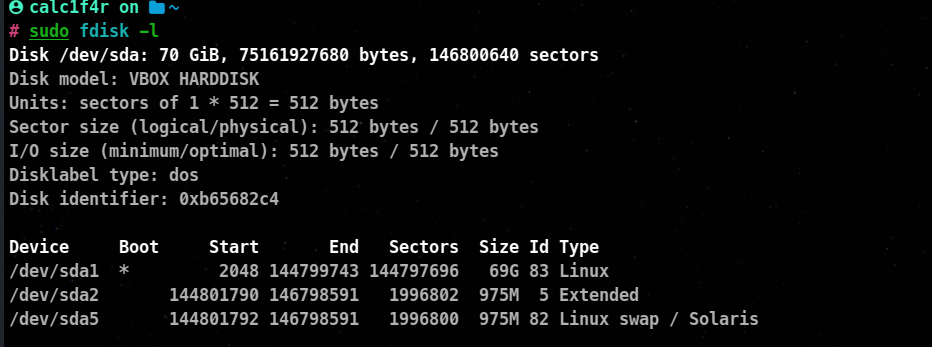
In my device, there is one block device currently if you want to be specific in viewing the partitioning of a block device.
You can use fdisk dev/disk_name.
⚡ Using parted -l
The parted command prints some additional information on logical volume.
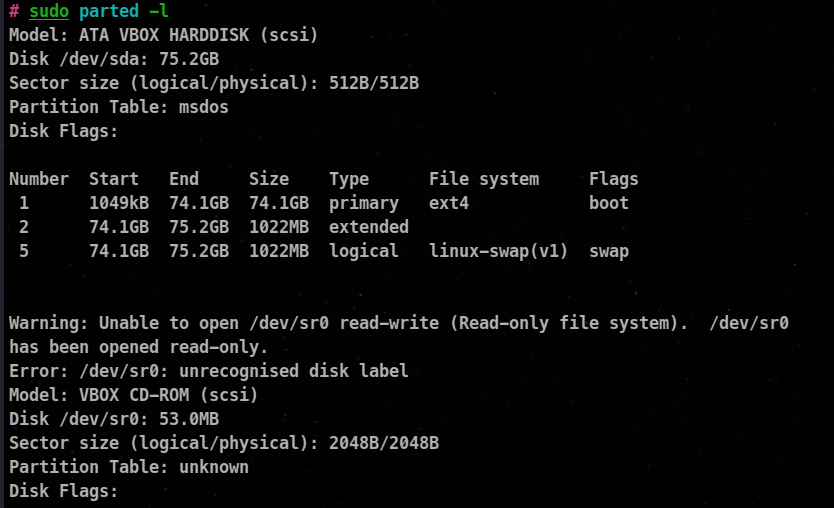
Just like fdisk you can use parted and the name of that block device to get more info about the device.
⚡ Using lsblk
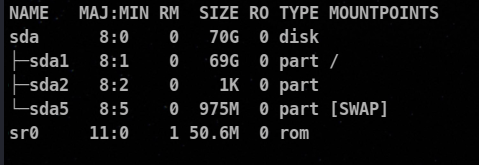
The lsblk is not specifically made for viewing partitions, but it is used to see the block devices on the system, but we can get a rough idea using this.
📌 Managing Partitioning
There are some things you should consider while creating partitions.
Partition Number
- SCSI device can have up to 15 partitions.
- Ide Device can have 63 partitions.
Partition Size
The partition size depends on the type of application running, the number of users assessing it, and the projected amount of data.
Swap Size
Swap space should be larger than the amount of ram installed on the system reason as mentioned above as well is that at the system crash, all the data gets dumped into the swap for later analysis.
⚡ Managing Partition using fdisk
⚡ Creation of Partition

Steps
- Select the block device.
fdisk <device_path>
- Type
n to create a new partition
- Now choose whether you wanted a primary partition or an extended one.
- Select the partition number.
- Then you are asked to end and start the sector. It is set accordingly by default.
🦀The start sector indicates the location where the partition begins, and the end sector indicates the location where the partition ends. The range of sectors between the start and end sectors is allocated exclusively for that partition.
- You can press
p to view the partitions.
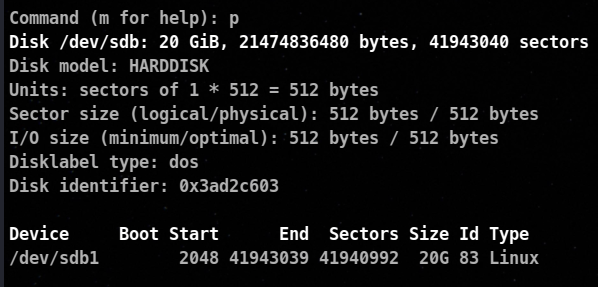
ID denotes the file system code.
⚡ Change of The file system code
If you are creating a partition that will contain a different filesystem type, you must change the file system code. This is done by entering t and then the partition number you want to change.

⚡ Deleting Partition

In my case there was only one partition, you your case you can be asked to specify the partition number to be deleted.
⚡ Writing Partitions to the partition table
You can write all changes to the file by entering w in memory.

⚡ Managing Partition using parted
To use parted utility, enter parted at the shell prompt. By default, it selects /dev/sda to select another device using select command.

⚡ Creating partition
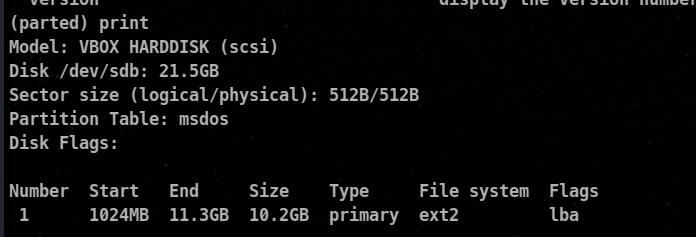
We use mkpart subcommand at the parted prompt to create a partition.
🦀🔺 makpart immediately writes changes.
Syntax :
mkpart type_of_partition starting_point(in MB) ending_point (in MB)

You can use print command to print the partitions.
⚡ Renaming partition
To change the name of the partition
name number <name>
⚡ Moving a partition
To change the location of the partition to a different location,
move <partition> 🦀<start_point> 🦀<end_point>
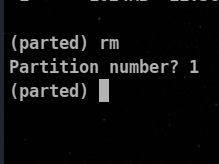
⚡ Deleting a partition
rm <partition>
⚡ Managing Partition using gdisk
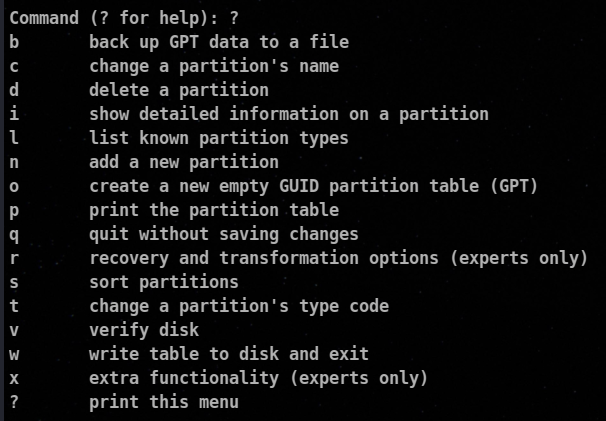
To manage GPT partitions, we use gdisk utility. gdisk can help you in tasks like
- Convert an MBR partition table to a GPT partition table
- Verify a hard disk
- Create and delete GPT partitions
- Display information about partition
- Change the name and type of partition
- Backup and restore a disk’s partition table
Creating partition

All of the other options can be assessed by typing the ? command and the working is the same as the above parted and fdisk commands.
Creating Filesystems
⚡ Getting Information about Available Filesystems for your Linux kernel
To use a specific filesystem type, the kernel module must be available, To view the filesystem modules use the command below :
ls -l /lib/moudles/$(uname -r)/kernal/fs

To Determine Filesystems loaded using:
cat /proc/filesystems
📌 Building Filesystem
Once you create a partition, prepare it for storing data. To use that partition we must create a filesystem on that partition.
As mentioned above there are various Filesystems in Linux we will learn to create them.
⚡ Creating Ext filesystem
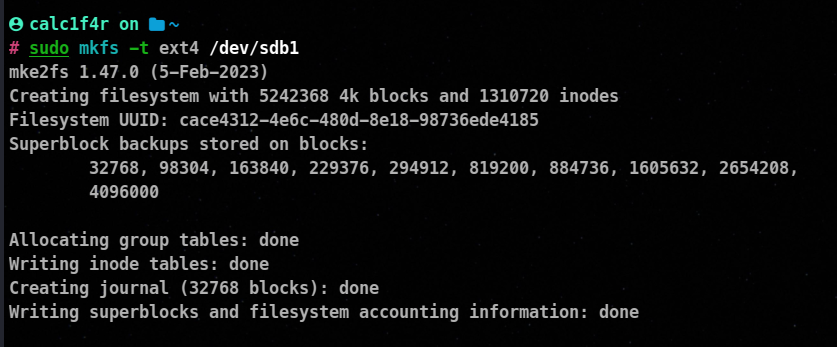
mkfs is primarily used to make an ext2,ext3, or ext4 filesystem on a partition.
Syntax
mkfs -t ext4 /dev/sdb1
-t : It is used to specify the type of filesystem
⚡ Creating a XFS filesystem
mkfs -t xfs /dev/sdb1
⚡ Creating Swap Memory/Partition
To create a partition for a swap memory firstly you need to change the partition type to 19 which is Linux swap.

Then we use mkswap command to create a swap partition.

Then we use swapon command to turn on the newly created swap memory and we free command to view if the swap is working or not!

🦀🔥 Actually there are two ways to create a swap space on the system one is discussed above in which we create a partition but apparently we can also create a swapfile that will do the same work for us
Creating Swap using swapfile
👩🏭 Steps
- We use
dd command to create the swap file by copying input from the file /dev/zero and writing it to another file.
command used :
dd if=/dev/zero of=/root/swapfile bs=1024 count=50000
🦀if : input file
🦀of : output file
🦀bs : block size
🦀count : Number of blocks of block size to copy
- Change the permission of the root file to read and write
chmod 600 /root/swapfile
- now
mkswap command to create a swap
mkswap /root/swapfile
- Turn on the swap
swapon /root/swapfile
⚡ Mounting a filesystem
Mounting is the process of making a file system available for access at a specific location in a directory tree, known as a mount point, within a file system hierarchy. When a file system is mounted, it becomes accessible to the operating system and its users.
mount -t file_system_type <device> <mount_point>
 ]
]
Some important switches for the mount option
-t or --type: Specifies the file system type to be mounted. For example, -t ext4 would mount an ext4 file system. If this option is not provided, mount will attempt to determine the file system type automatically.
-o or --options: Specifies additional mount options for the file system. Multiple options can be comma-separated. Some commonly used options include:
ro: Mounts the file system as read-only.
rw: Mounts the file system as read-write (default).
uid=XXX: Sets the user ID that owns the files on the mounted file system to XXX.
gid=XXX: Sets the group ID that owns the files on the mounted file system to XXX.
noexec: Disables the execution of binaries on the mounted file system.
nosuid: Disables the execution of setuid and setgid bits on the mounted file system.
remount: Remounts a mounted file system with different options, without unmounting it first.
-a or --all: Mounts all file systems listed in /etc/fstab (except those marked with the noauto option).
-r or --read-only: Mounts the file system as read-only.
-w or --read-write: Mounts the file system as read-write (default).
-L or --label: Mounts the file system by specifying the volume label instead of the device path.
⚡ Unmounting a partition with umount
To unmount a partition, simply enter umount followed by the device or the mount directory for that partition.
sudo umount /dev/sbd1
or
sudo umount /public

📌Managing Linux Filesystems
⚡ Using df to Verify Free Disk Space
You must have disk space available to make partitions. we can use the df command to get an idea of the free space available.

If we add -T option, it will display the filesystem type

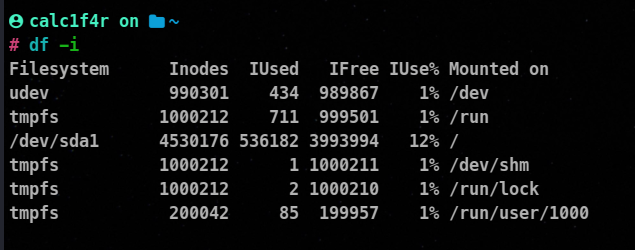
When a file is created, it is assigned an inode number. If a filesystem runs out of inodes, files can no longer be created, even if space exists. The df -i command lists inode usage of mounted filesystems.
⚡Using du to verify Directory Usage
Du (Directory Usage) is to provide you with a summary of disk space usage of each file, recursively for a specified directory.

Syntax:
du /home/calc1f4r/script.sh
Some important Switches include
-c : Used to calculate grand total-s : Used to calculate a summary of each argument-h : Used to display output in human-readable
Trick to know which dirs are using most space
du -sh /home/**

⚡Checking the filesystem Integrity
The filesystem check utility fsck, checks the integrity of a filesystem. Please before using unmount the block device.
Syntax
umount /dev/sdb1

🦀 Conclusion
As we conclude this second blog post in our “Linux for Hackers” series, we hope that you’ve gained valuable insights into the world of Linux storage management and process handling. By mastering the art of creating partitions, managing storage, and understanding the intricacies of process management, you are now equipped with powerful tools to optimize your hacking endeavors.
So, stay tuned for our upcoming blog posts, where we’ll go through volume management and walk you through the Linux boot process. Together we will expand our hacking toolkit and unlock the true power of Linux.