
I recently set up my device to run Windows and Kali Linux seamlessly using WSL2, which has streamlined my workflow. I’ve tried various setups including installing Kali Linux directly on my hardware, using virtual machines through VMware and VirtualBox, and utilizing Windows Hyper-V. From my experience, Kali Linux performs best and is the simplest to set up when installed directly on hardware. However, I often run into issues when I need tools that are only available on Windows. For example, performing PE analysis or analyzing Windows-based malware. Virtualization lacks the integration I desire, and activities like excessive typing or moving files between the host and guest OS (especially without shared folders to maintain better isolation) can be frustrating. I find that WSL2 provides excellent integration, making it feel like I’m using a combined “Winlux” OS (Windows + Linux). Despite following official guidelines for my setup, I encountered numerous problems, which led me to write a blog for the community. I believe that by working together, we can solve problems more efficiently and accelerate our collective growth, rather than struggling individually with the same challenges.
System Configuration used:
The setup was done in a ACER Aspire 7 series Laptop.
- OS - Windows 11 Home
- OS version - 23h2
- OS Built - 22631.3447
- RAM - 8 GB
- Processior - Intel Core i5 10th gen
- Dedicated Graphics card - NVIDIA GeForce GTX 1650 (4 GB).
Third Party Software Needed: VcXsrv
Let’s Do It
- To avoid errors first open “Turn windows feature on or off” and check “Virtual Machine Platform” & “Windows Subsystem for Linux” both are turned off. If not uncheck them and click ok. It will need a restart as windows likes to restart.
( Pro tip - To get back to the blog after your device restart open your browser and press Ctrl+Shift+Tab)
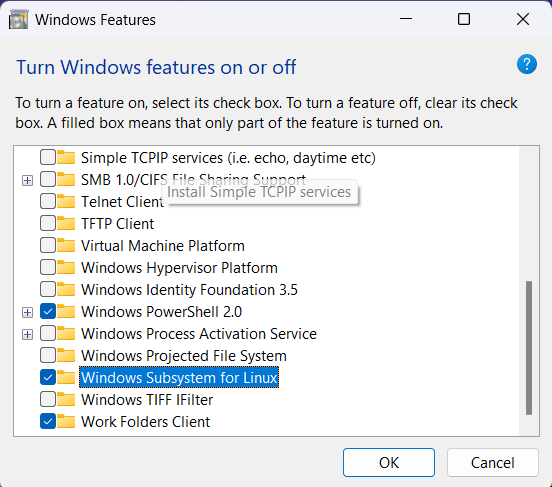
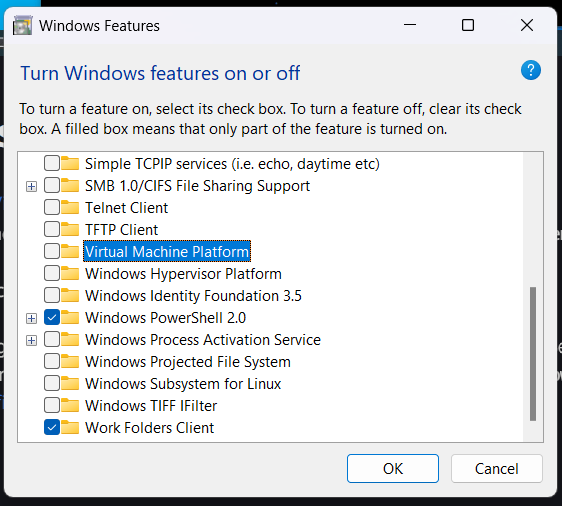
- Open powershell in elevated mode and run
wsl --install --distribution kali-linux --web-download it will initialize WSL, turn on necessary services and install kali-linux. In the installation process you have to setup your username and password for Kali-linux while prompted for. And its time for windows to restart again.
Note - Using the --web-download command line argument allows you to bypass the default behavior of downloading the distribution from the Microsoft Store, instead sourcing it directly from the internet. I’ve encountered problems with the distributions available on the Microsoft Store, particularly with dpkg, which have prevented OS upgrades and showing “frontend-lock” error. Attempts to resolve this issue were unsuccessful, but switching to the--web-download option provided a flawless solution, indicating that the problem lies with the versions distributed through the Microsoft Store.
- Open your elevated powershell and run
kali to access the CLI version installed.
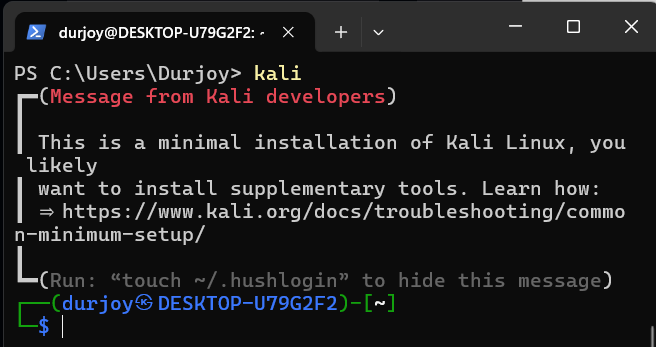
At the point you are ready to operate on CLI with an minimal installation of kali-linux. But we want the GUI. So lets play a bit around -
- The GUI experience is provided by kali via WSL using Win-kex. Run
sudo apt update & sudo apt install -y kali-win-kex to install winkex.
Possible issue - I encountered a problem where the installation of win-kex halted at around 90% for an unknown reason. My hypothesis is that there might be a time limit when executing commands with sudo for security reasons because when I interrupted the process using Ctrl+C and ran the command again, it prompted me for the sudo password once more. This experience led me to believe in the time limitation issue, althoughrunning the command again resolve the installation issue.
Possible Issue - If you have used --web-download while installing you may face an issue related to non-free-firmware. A message may appear in the command line interface indicating that updates are impossible because non-free firmware is missing. Run the following command to confirm the branching problem: cat /etc/apt/sources.list if the output is any different from deb http://http.kali.org/kali kali-rolling main contrib non-free non-free-firmware run sudo sed -i 's/non-free$/non-free non-free-firmware/' /etc/apt/sources.list to resolve the issue. Run sudo apt update to make the change effective over your OS.
Now lets set the server on windows:
The service is provided using VcXsrv which requires Visual C++ Redistributable for Visual Studio 2015. It usually comes with Windows Installations but if you recieve an error complaining its missing just download and install it.
Download VcXsrv on host and install.
VcXsrv will appear as XLaunch in windows. Open it and configure for Multiple Windows, Display number : 0, start no client, Disable access control and add additional parameter -ac. See the screenshots for better understanding.
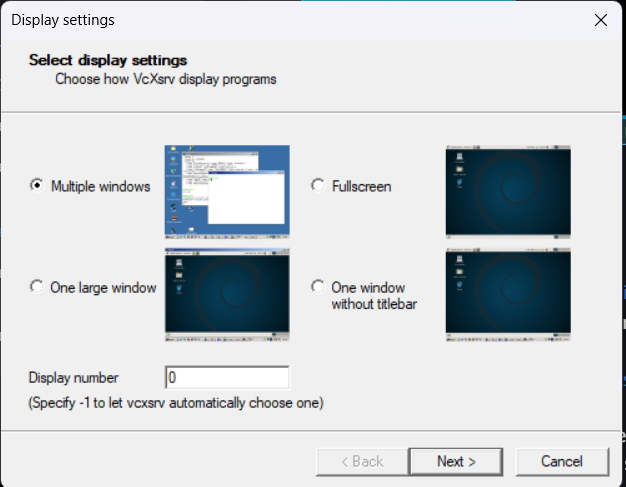
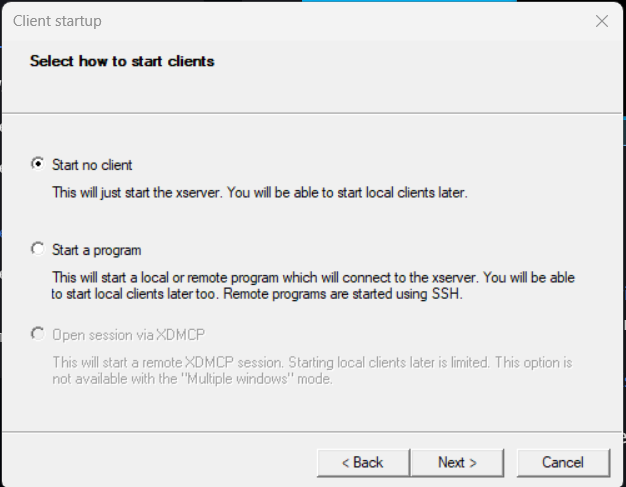
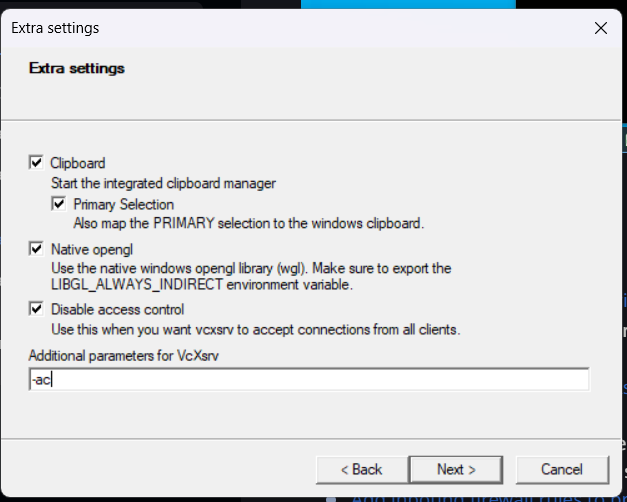
Note - You can save the configuration for future use and the configuration file in XML should look like <?xml version="1.0" encoding="UTF-8"?>
<XLaunch WindowMode="MultiWindow" ClientMode="NoClient" LocalClient="False" Display="0" LocalProgram="xcalc" RemoteProgram="xterm" RemotePassword="" PrivateKey="" RemoteHost="" RemoteUser="" XDMCPHost="" XDMCPBroadcast="False" XDMCPIndirect="False" Clipboard="True" ClipboardPrimary="True" ExtraParams="-ac" Wgl="True" DisableAC="True" XDMCPTerminate="False"/>
- Go to your kali terminal and run
kex --sl -s. It will run kex in seamless mode with sound support.
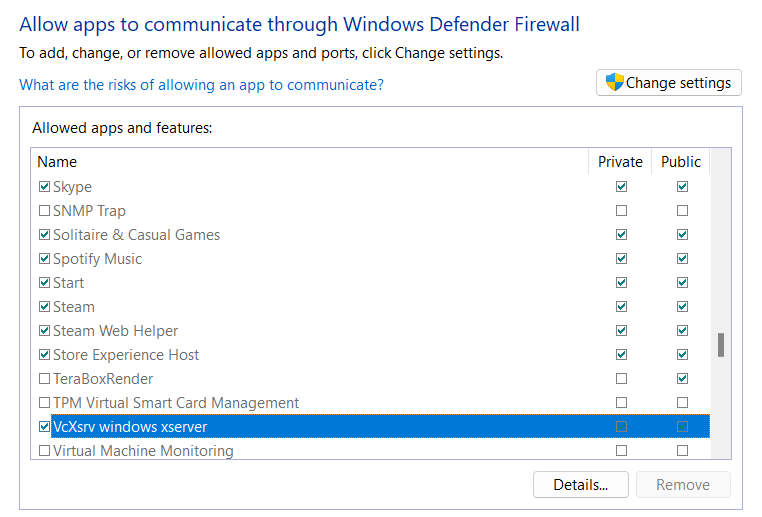
Note - For the first time of running it will request for firewall permision twice. Once for VcXsrv windows Xserver and another time for pulseaudio.exe. I recommend to allow them for both private and public network.
Possible Issue - I haven’t faced it but found in communities that sometime the pop-up will not arrive and your connection may fail. In that case Open windows security firewall and network protection and click on allow app via firewall then find both mentioned above and allow them.
Possible Issue - Though the command kex --sl -s should show only the menubar of Kali-linux to you as per official documentation but it starts Xface and the transperency doesn’t works at all. As a result you will encounter issue where,
- Your device will act as linux only as the appeared linux window will cover your Windows.
- In case you are having extended monitor setup, one monitor will act as Linux and another as Windows. The scaling is also horrible specially for menubar. (I have faced this)
& some other unexpected behaviour you can find online. Whatever alll those situation eliminate the seamless integration.
I have searched a lot to resolve the issue and found one that worked out,
Run the command kex --sl -s & while true; do pkill -9 xfdesktop; done.
I am grateful to the person who came up with such an extraordinary solution. This command kill the xfdesktop process which essencially gives the UI using an While loop. Linux will try for 100 seconds to get xfdesktop and give up. Thus the problem resolves and now we have an setup to run Windows and Kali tools seamlessly.
In case you are still having scaling issue for Kali panel just adjust the pannel preferences.
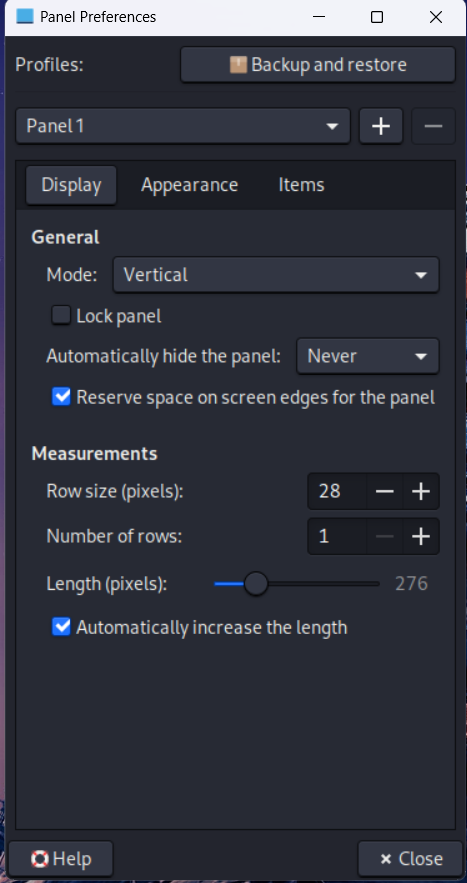
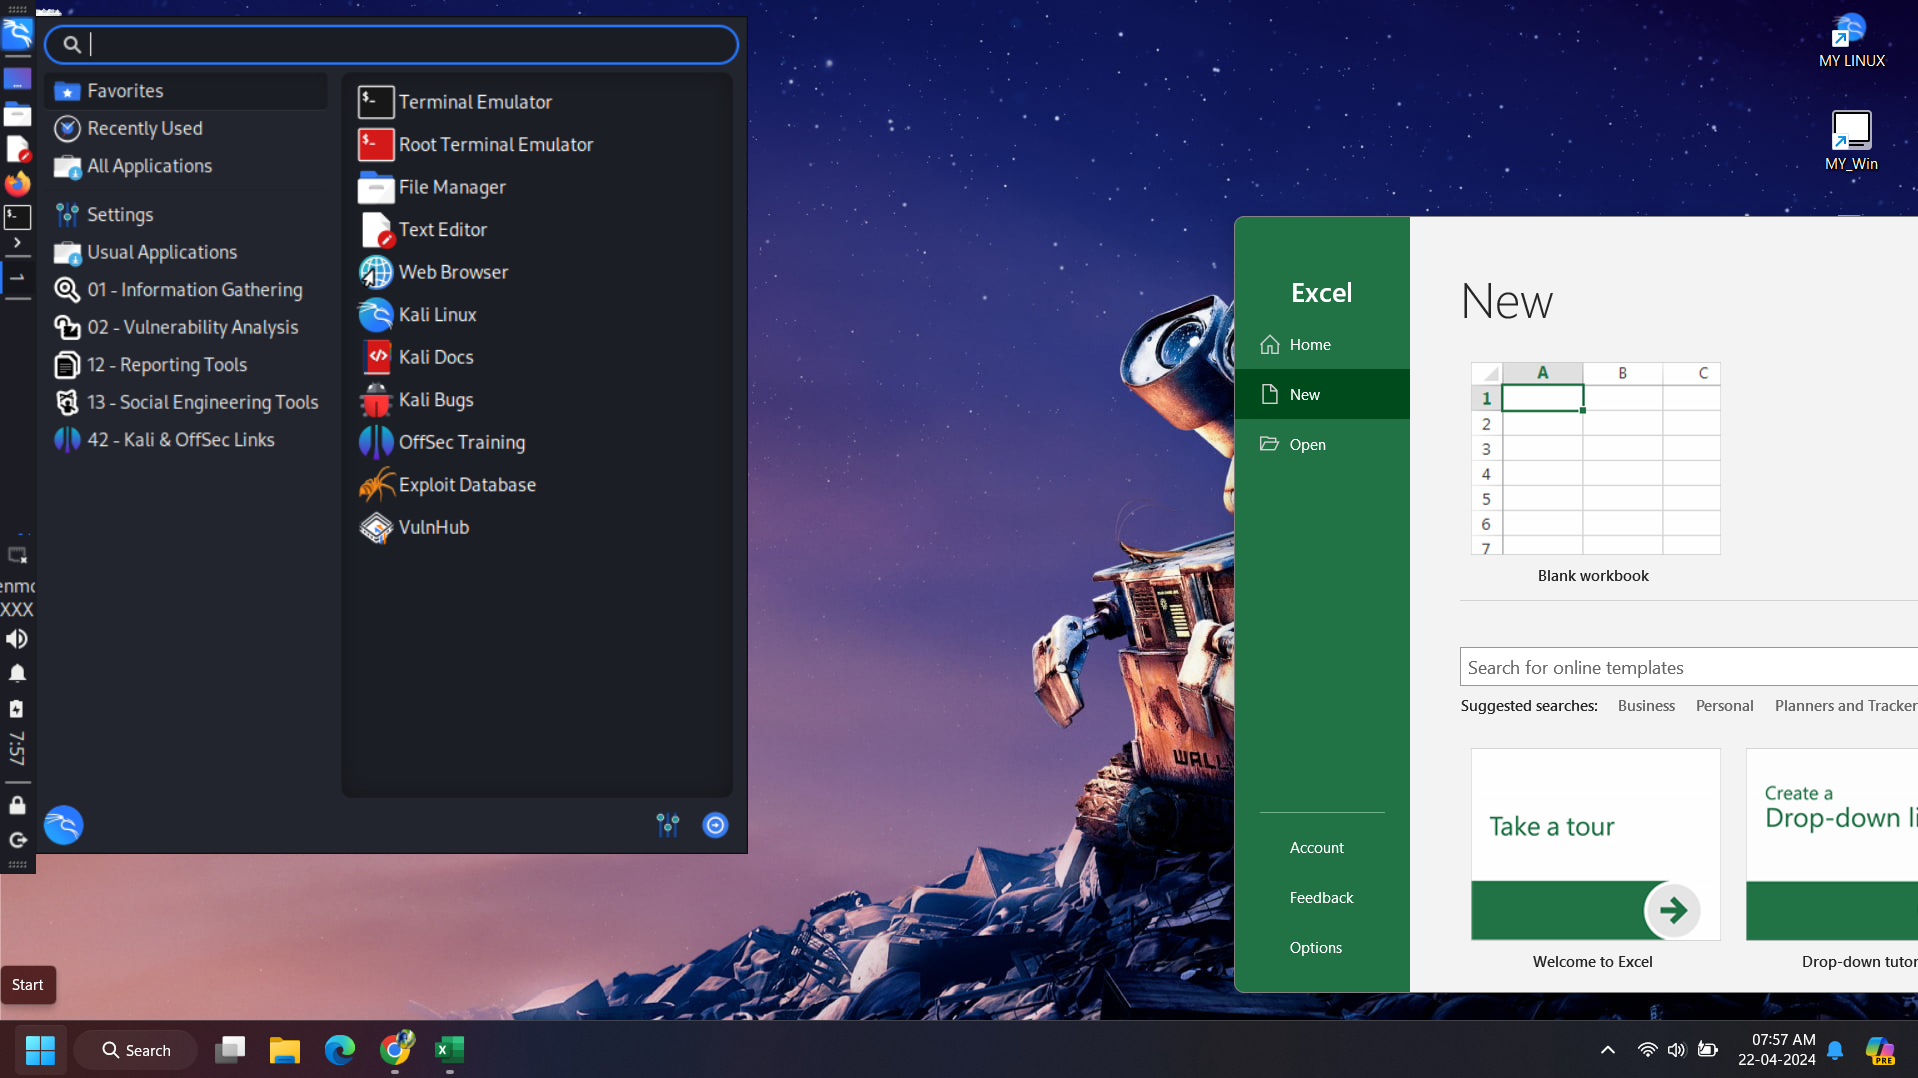
Now you have something like this,
Lets Hack Together For Better World - I am here to know you
Happy Hacking 🙂 !!